Integrate Angular with Spring Boot
In the first section, you learned about Angular and how to use it without having a back end. In this section, I’ll show you how to use it with a Spring Boot back end.
Spring Boot is one of the most popular frameworks for developing Java applications and REST APIs. It also has first-class support for Kotlin!
What is Kotlin? It’s an open source, statically typed, general-purpose programming language with type inference. Kotlin originated at JetBrains, the company behind IntelliJ IDEA, in 2010, and has been open source since 2012. Today, it is widely used to develop Android applications. At first glance, Kotlin looks like a more concise and streamlined version of Java.
When Kotlin was announced as an official Android development language at Google I/O in May 2017, it became the third language fully supported for Android, in addition to Java and C++. As of 2020, Kotlin is still most widely used on Android, with Google estimating that 70% of the top 1000 apps on the Play Store are written in Kotlin.
Spring Boot 1.0 was released on April 1, 2014, and revolutionized the way Java developers write Spring apps. Instead of writing a lot of boilerplate XML or JavaConfig with annotations, Spring Boot introduced the idea of pre-configured starters with smart defaults via auto-configuration.
Long story short, Angular, Kotlin, and Spring Boot are a match made in heaven!

What’s New in Angular?
Angular 15 is the version of Angular used in this book. It adds support for standalone components and optimized images using the ngSrc attribute. You can read more about its new features on the Angular Blog.
|
If you have an existing app, you can update to the latest release of Angular using |
What’s New in Spring Boot?
Spring Boot 3.0 was released in November 2022. It requires Java 17, supports native images by default with GraalVM, improves observability with Micrometer, and adds support for Jakarta EE 10. You can read more about its new features on the Spring Blog.
In this chapter, I’ll show you how to build a note-taking application with Angular 15 and Spring Boot 3. Along the way, I’ll do my best to weave in security tips and advice on how to make your apps more secure.
The Angular and Spring Boot projects release major versions every six months. Since Java does, too, this book might be a release or two behind when you’re reading this. Both projects have great track records for backward compatibility, so there’s a good chance everything will work on newer versions.
Please try newer versions at your own risk and email me if you find issues and/or solutions! I’ve been known to trade t-shirts for contributions. 😉
Prerequisites:
To install Node and Java on a Mac, Linux, or Windows Subsystem for Linux (WSL), you can use Homebrew.
brew install node
brew tap AdoptOpenJDK/openjdk
brew cask install adoptopenjdk17
You can also use SDKMAN! to install Java 17.
sdk install javaIf you like to live on the bleeding edge, the latest version of the JDK should work too.
The previous section was an intro to Angular and showed you how it works without a back end. In this section, you’ll create a new app that’s more of a real-world application.
Create an Angular App
You should have installed the Angular CLI in the previous section. If you did not, do it now.
npm install -g @angular/cli@15Then, create a directory on your hard drive called angular-spring-boot. Open a terminal window and navigate to this directory. Run the ng new command from Angular CLI to create a new Angular application.
ng new notes --routing --style cssIn this command, --routing installs the Angular router, and --style css makes it use CSS (as opposed to Sass and Less) for stylesheets.
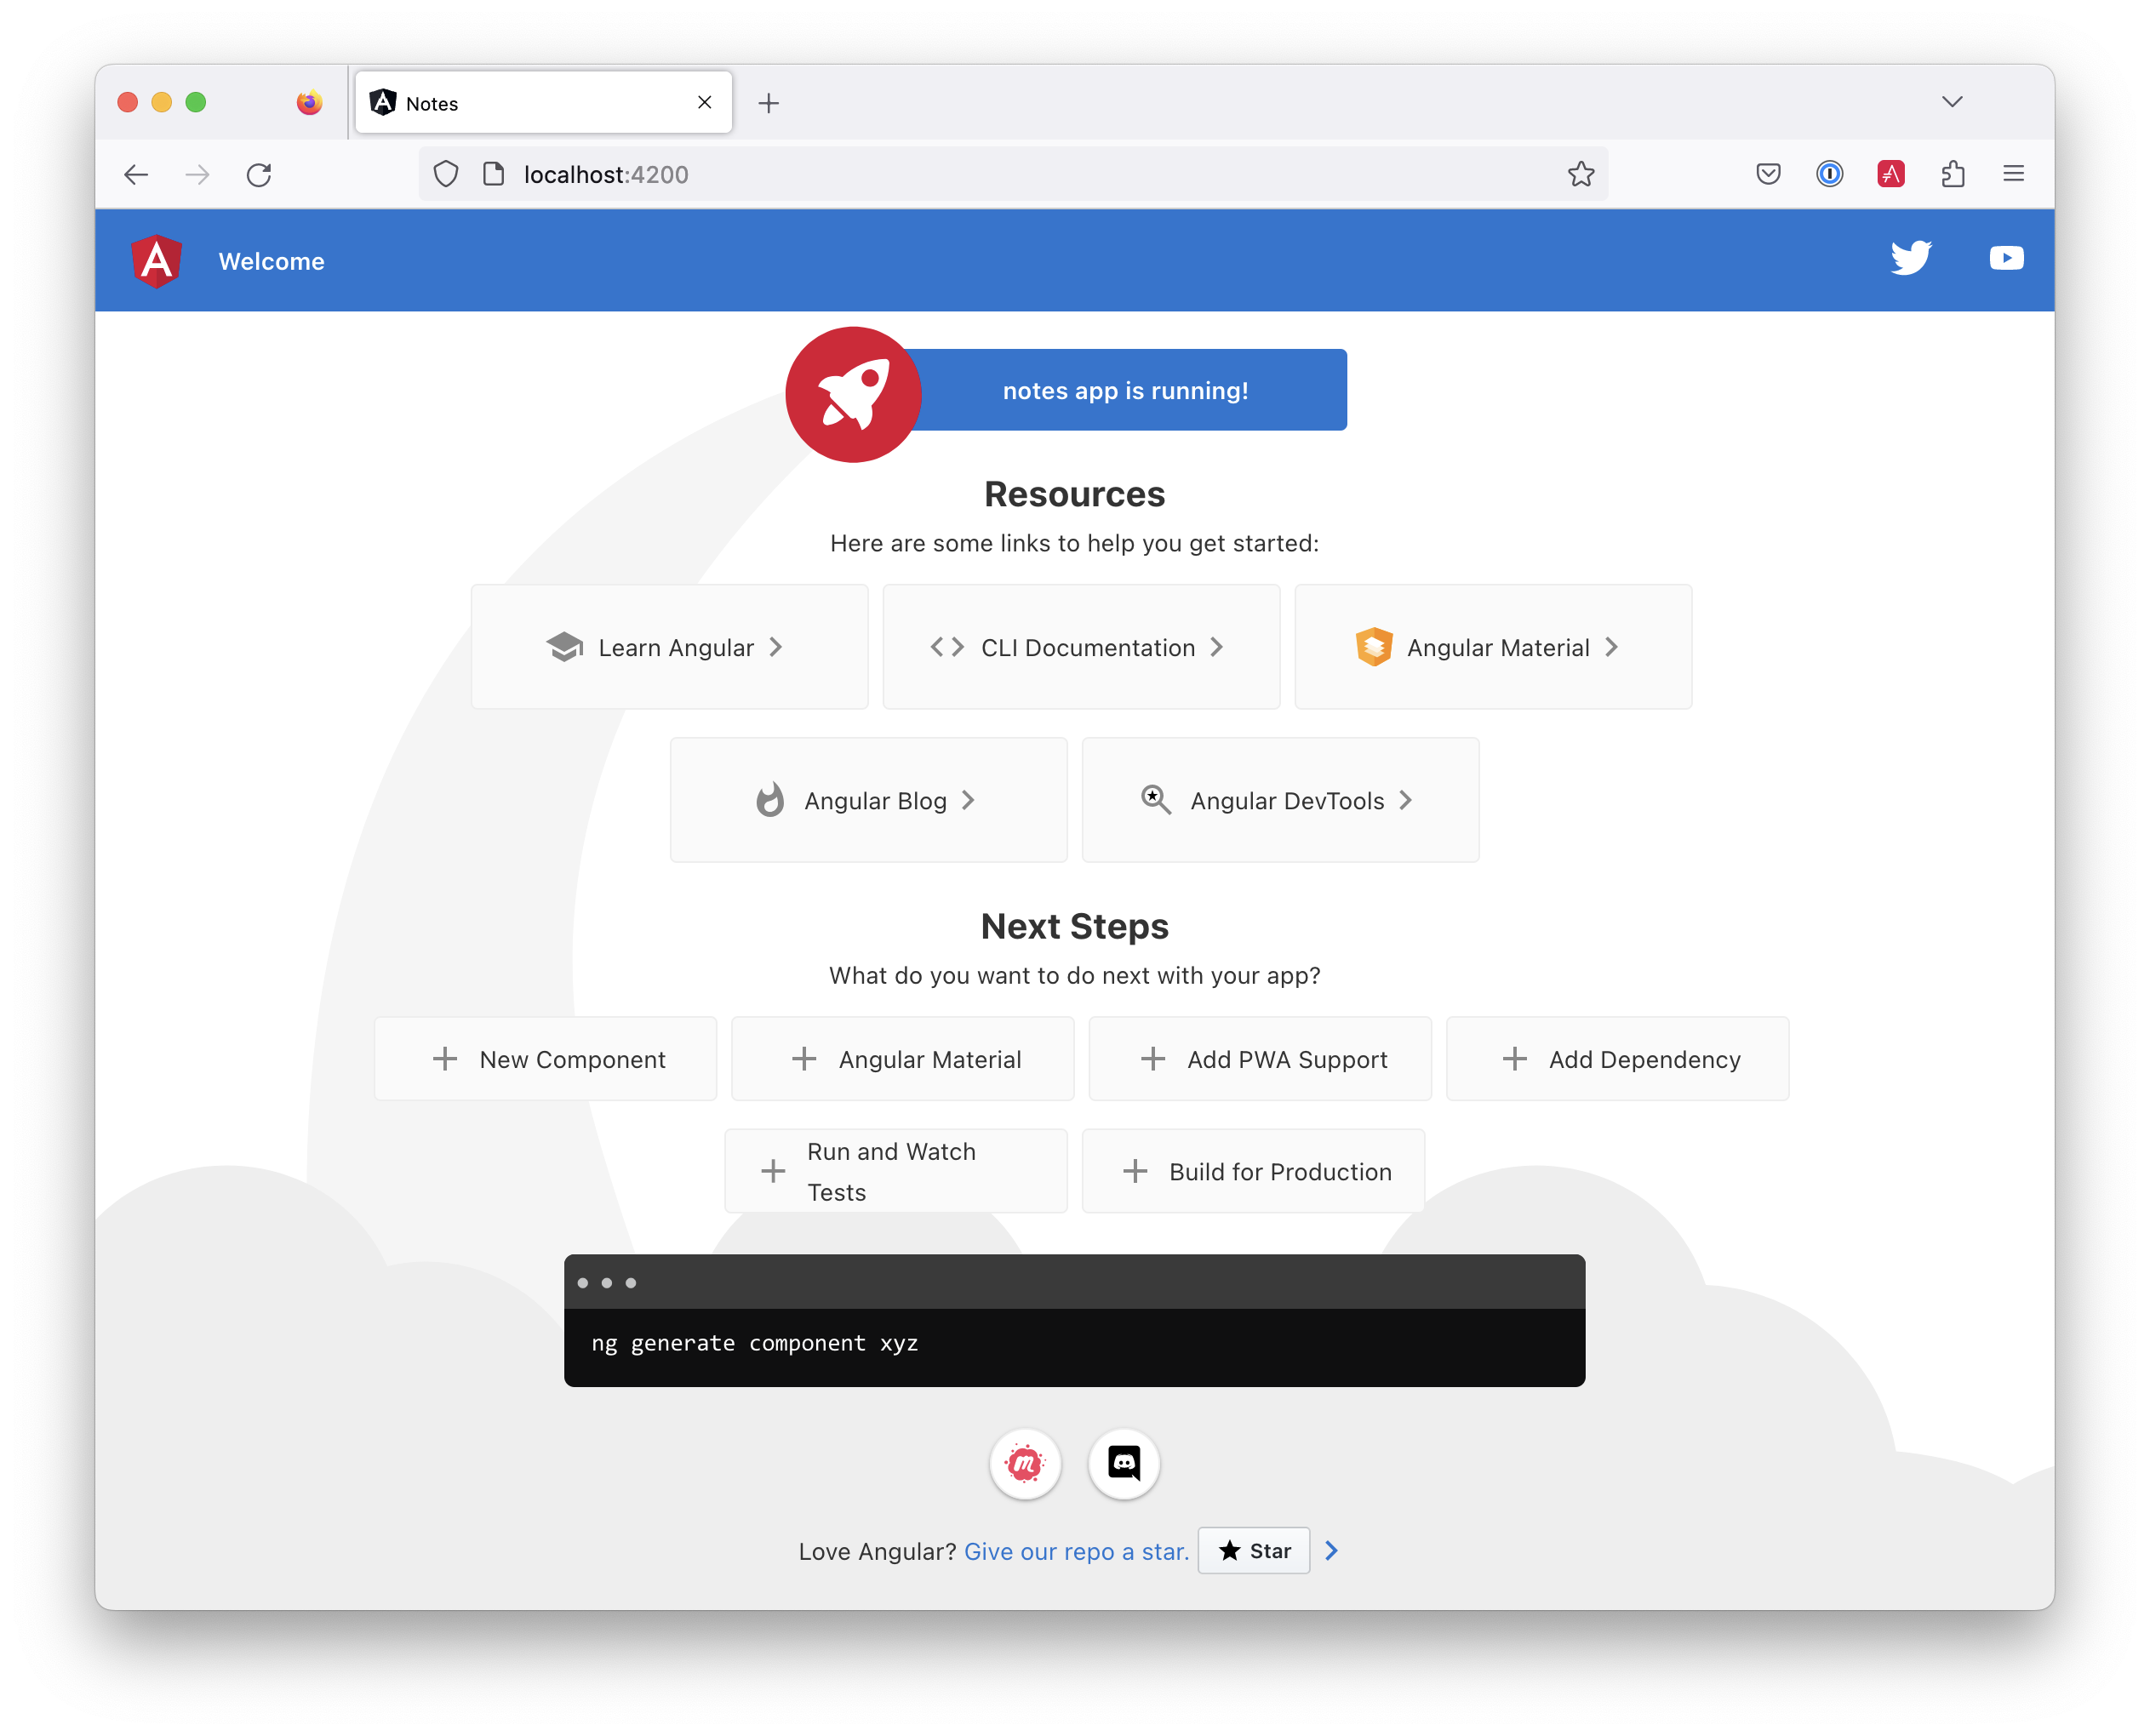
Depending on your internet speed and hardware, this process will take a minute or two. Once it’s finished, navigate into the directory and run ng serve.
cd notes
ng serve
Open your browser to http://localhost:4200, and you’ll see the default homepage.
Stop the ng serve process using Ctrl+C in your terminal.
Add Authentication using OpenID Connect
OpenID Connect (also called OIDC) is an identity layer based on the OAuth 2.0 specification. It leverages JSON Web Tokens (JWT) to provide an ID token and other features like discoverability and a /userinfo endpoint. In the first section, I showed you how to use Auth0 as an identity provider. Let’s continue that path because Auth0 is excellent and one of the easiest identity providers to use.
To add OIDC login support to your Angular app, you’ll need a free Auth0 account. Install the Auth0 CLI and run auth0 login to authorize your device.
Then, create a new OIDC app with auth0 apps create. Specify the name, type, callback URls, and logout redirect URL.
auth0 apps create \
  --name "Angular" \
  --description "Angular OIDC App" \
  --type spa \
  --callbacks http://localhost:4200/home \
  --logout-urls http://localhost:4200 \
  --origins http://localhost:4200 \
  --web-origins http://localhost:4200
When you create Single Page Applications (SPAs) with the Auth0 CLI, authorization code flow with PKCE (Proof Key for Code Exchange) is selected by default. This setting provides the maximum level of security you can currently have for single-page apps when using OIDC for auth.
| To learn more about PKCE (pronounced “pixy”), see Implement the OAuth 2.0 Authorization Code with PKCE Flow. |
Copy your client ID and issuer URI (from the Auth0 CLI’s output) into the following command.
ng add @oktadev/schematics --auth0 --issuer=$issuer --clientId=$clientIdThis command adds Auth0’s Angular SDK and configures OIDC authentication for your app.
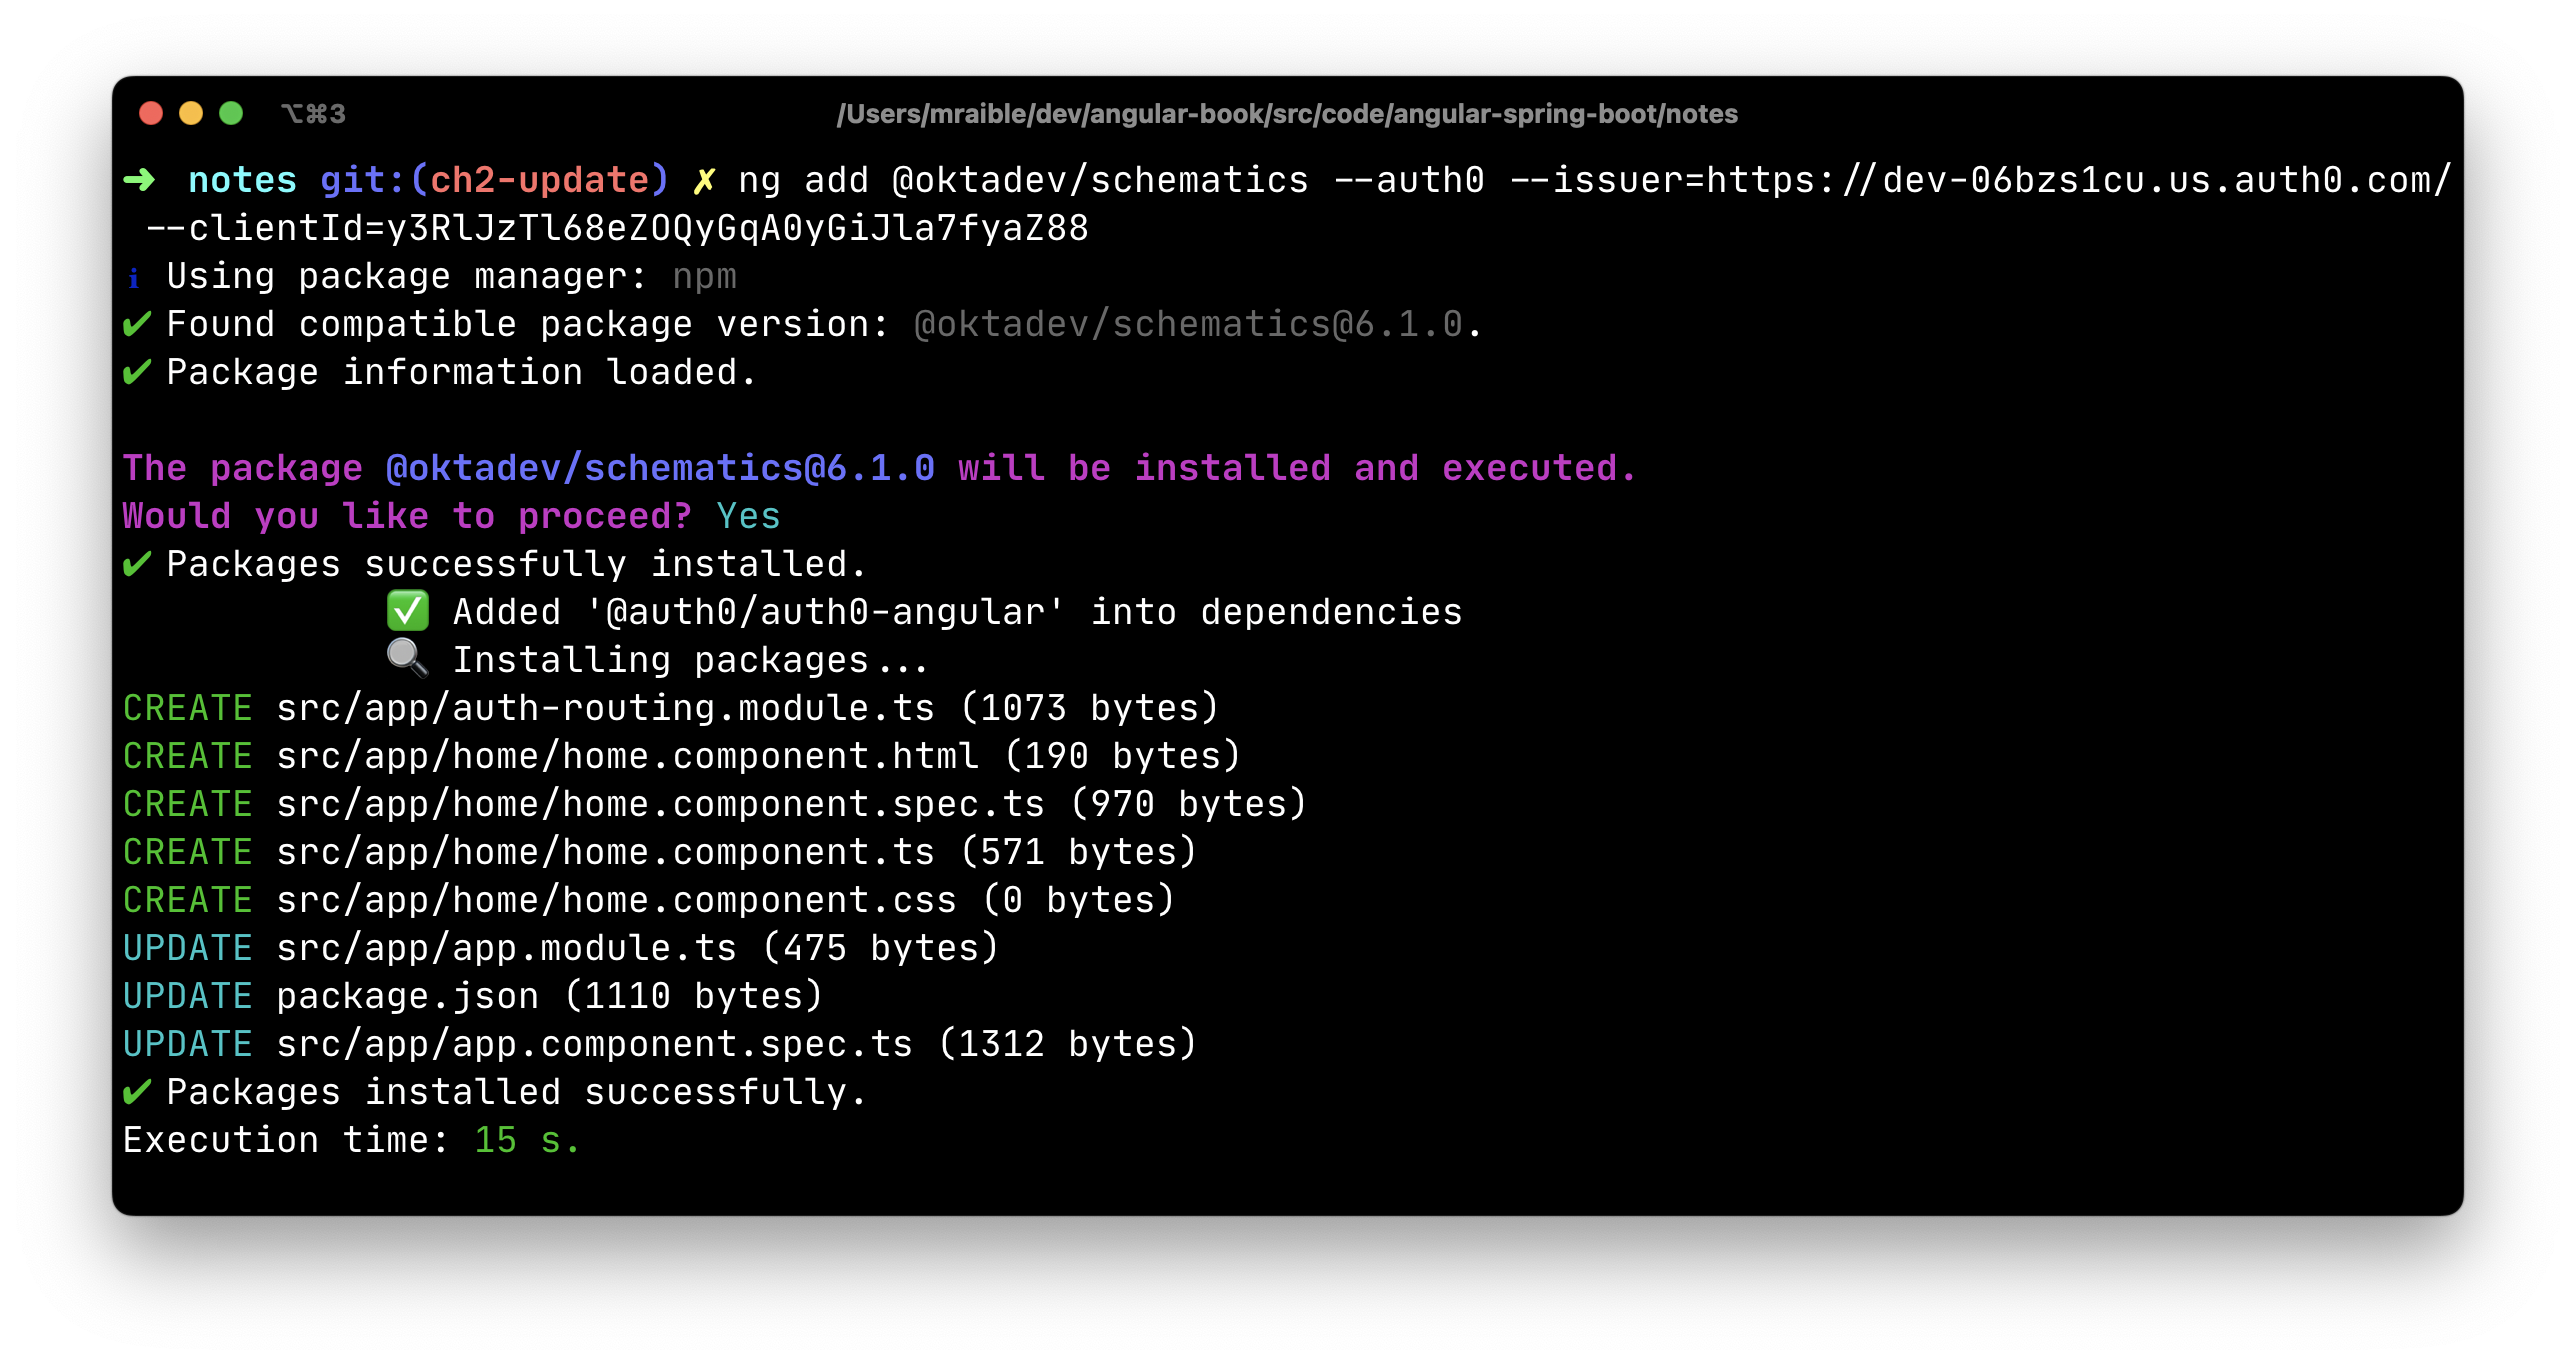
The process creates a home.component.ts that has authentication logic, as well as a template that renders login and logout buttons.
import { Component, Inject } from '@angular/core';
import { AuthService } from '@auth0/auth0-angular';
import { DOCUMENT } from '@angular/common';

@Component({
  selector: 'app-home',
  templateUrl: './home.component.html',
  styleUrls: ['./home.component.css']
})
export class HomeComponent {

  constructor(public auth: AuthService, @Inject(DOCUMENT) private doc: Document) {
  }

  login(): void {
    this.auth.loginWithRedirect();
  }

  logout(): void {
    this.auth.logout({
      logoutParams: {
        returnTo: this.doc.location.origin
      }
    });
  }
}<div>
<button *ngIf="(auth.isAuthenticated$ | async) === false"
(click)="login()">Login</button>
<button *ngIf="auth.isAuthenticated$ | async"
(click)="logout()">Logout</button>
</div>The auth-routing.module.ts configures an HttpInterceptor and its allowedList to add an access token to outgoing HTTP requests.
const config = {
  domain: '...',
  clientId: '...',
  authorizationParams: {
    redirect_uri: window.location.origin + '/home',
  },
  httpInterceptor: {
    allowedList: ['/api/*']
  },
};
You’ll need to update this configuration to add an audience parameter and so it’ll add an access token when sending requests to your Spring Boot API.
const config = {
authorizationParams: {
audience: 'https://<your-auth0-domain>/api/v2/',
},
httpInterceptor: {
allowedList: ['http://localhost:8080/*']
},
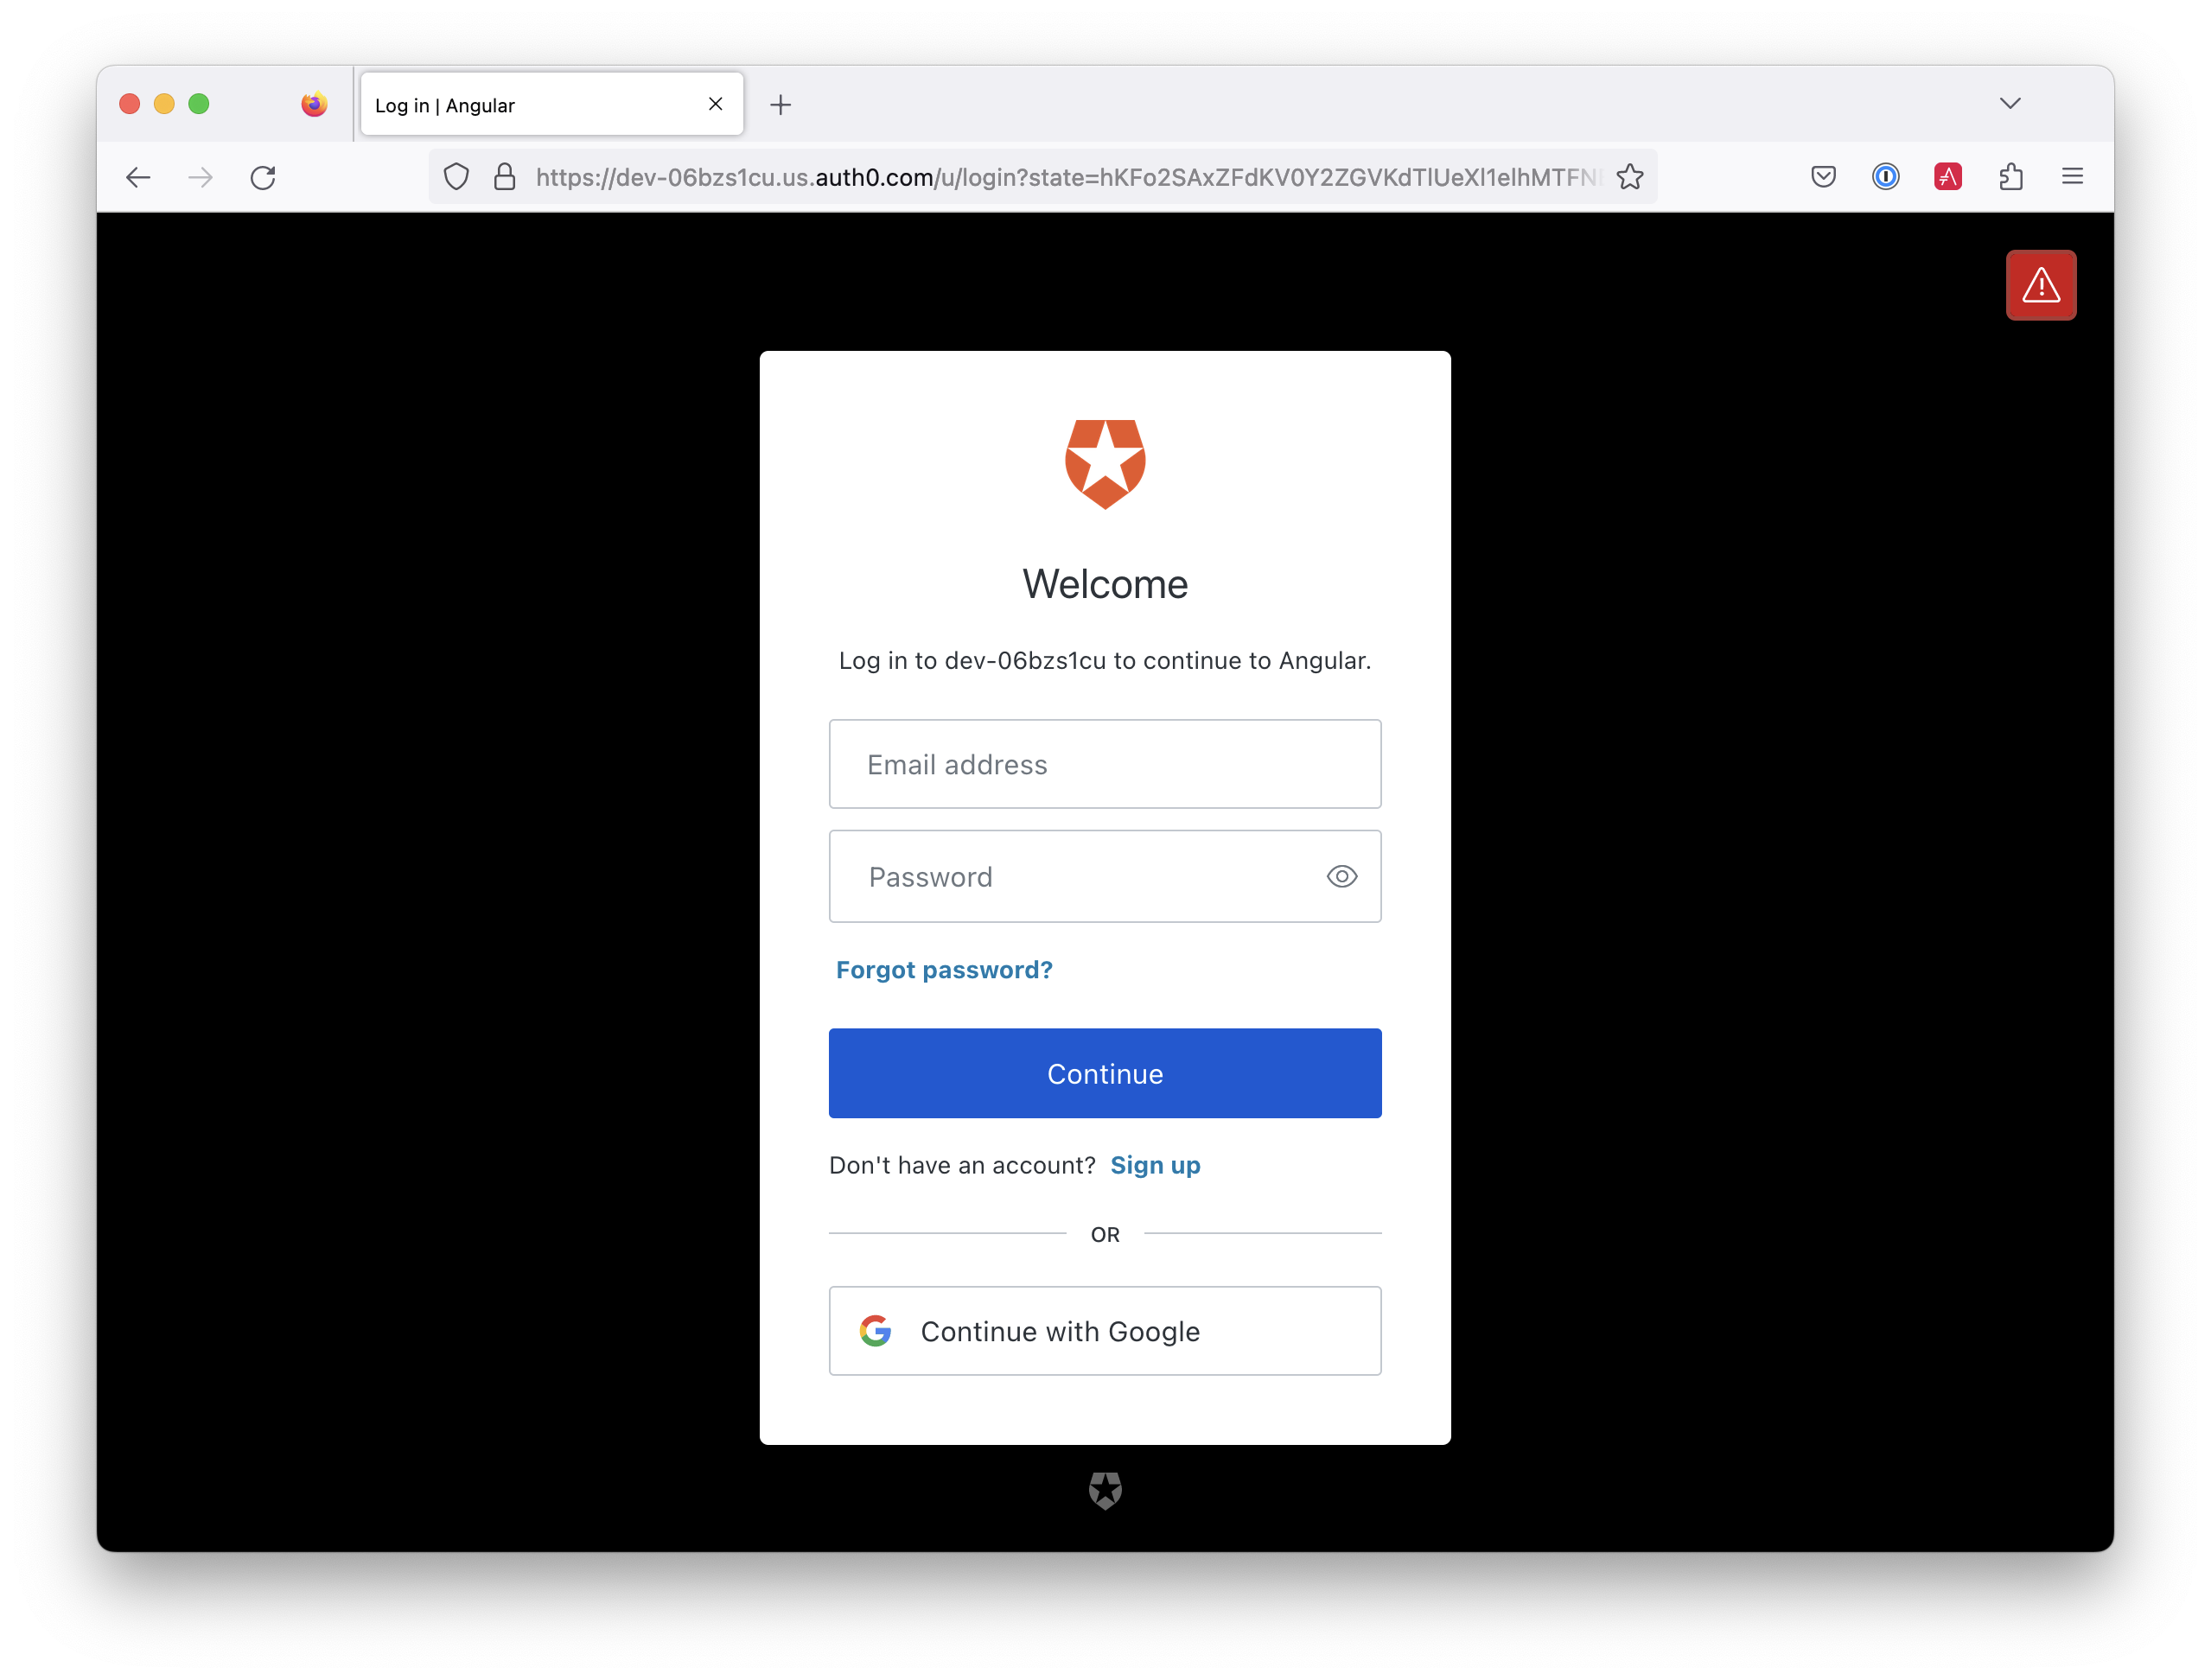
};Start your app again using the ng serve command, open a private/incognito window to http://localhost:4200, and you’ll see a Login button in the bottom left.

Click on it, and you’ll be redirected to Auth0 to log in.
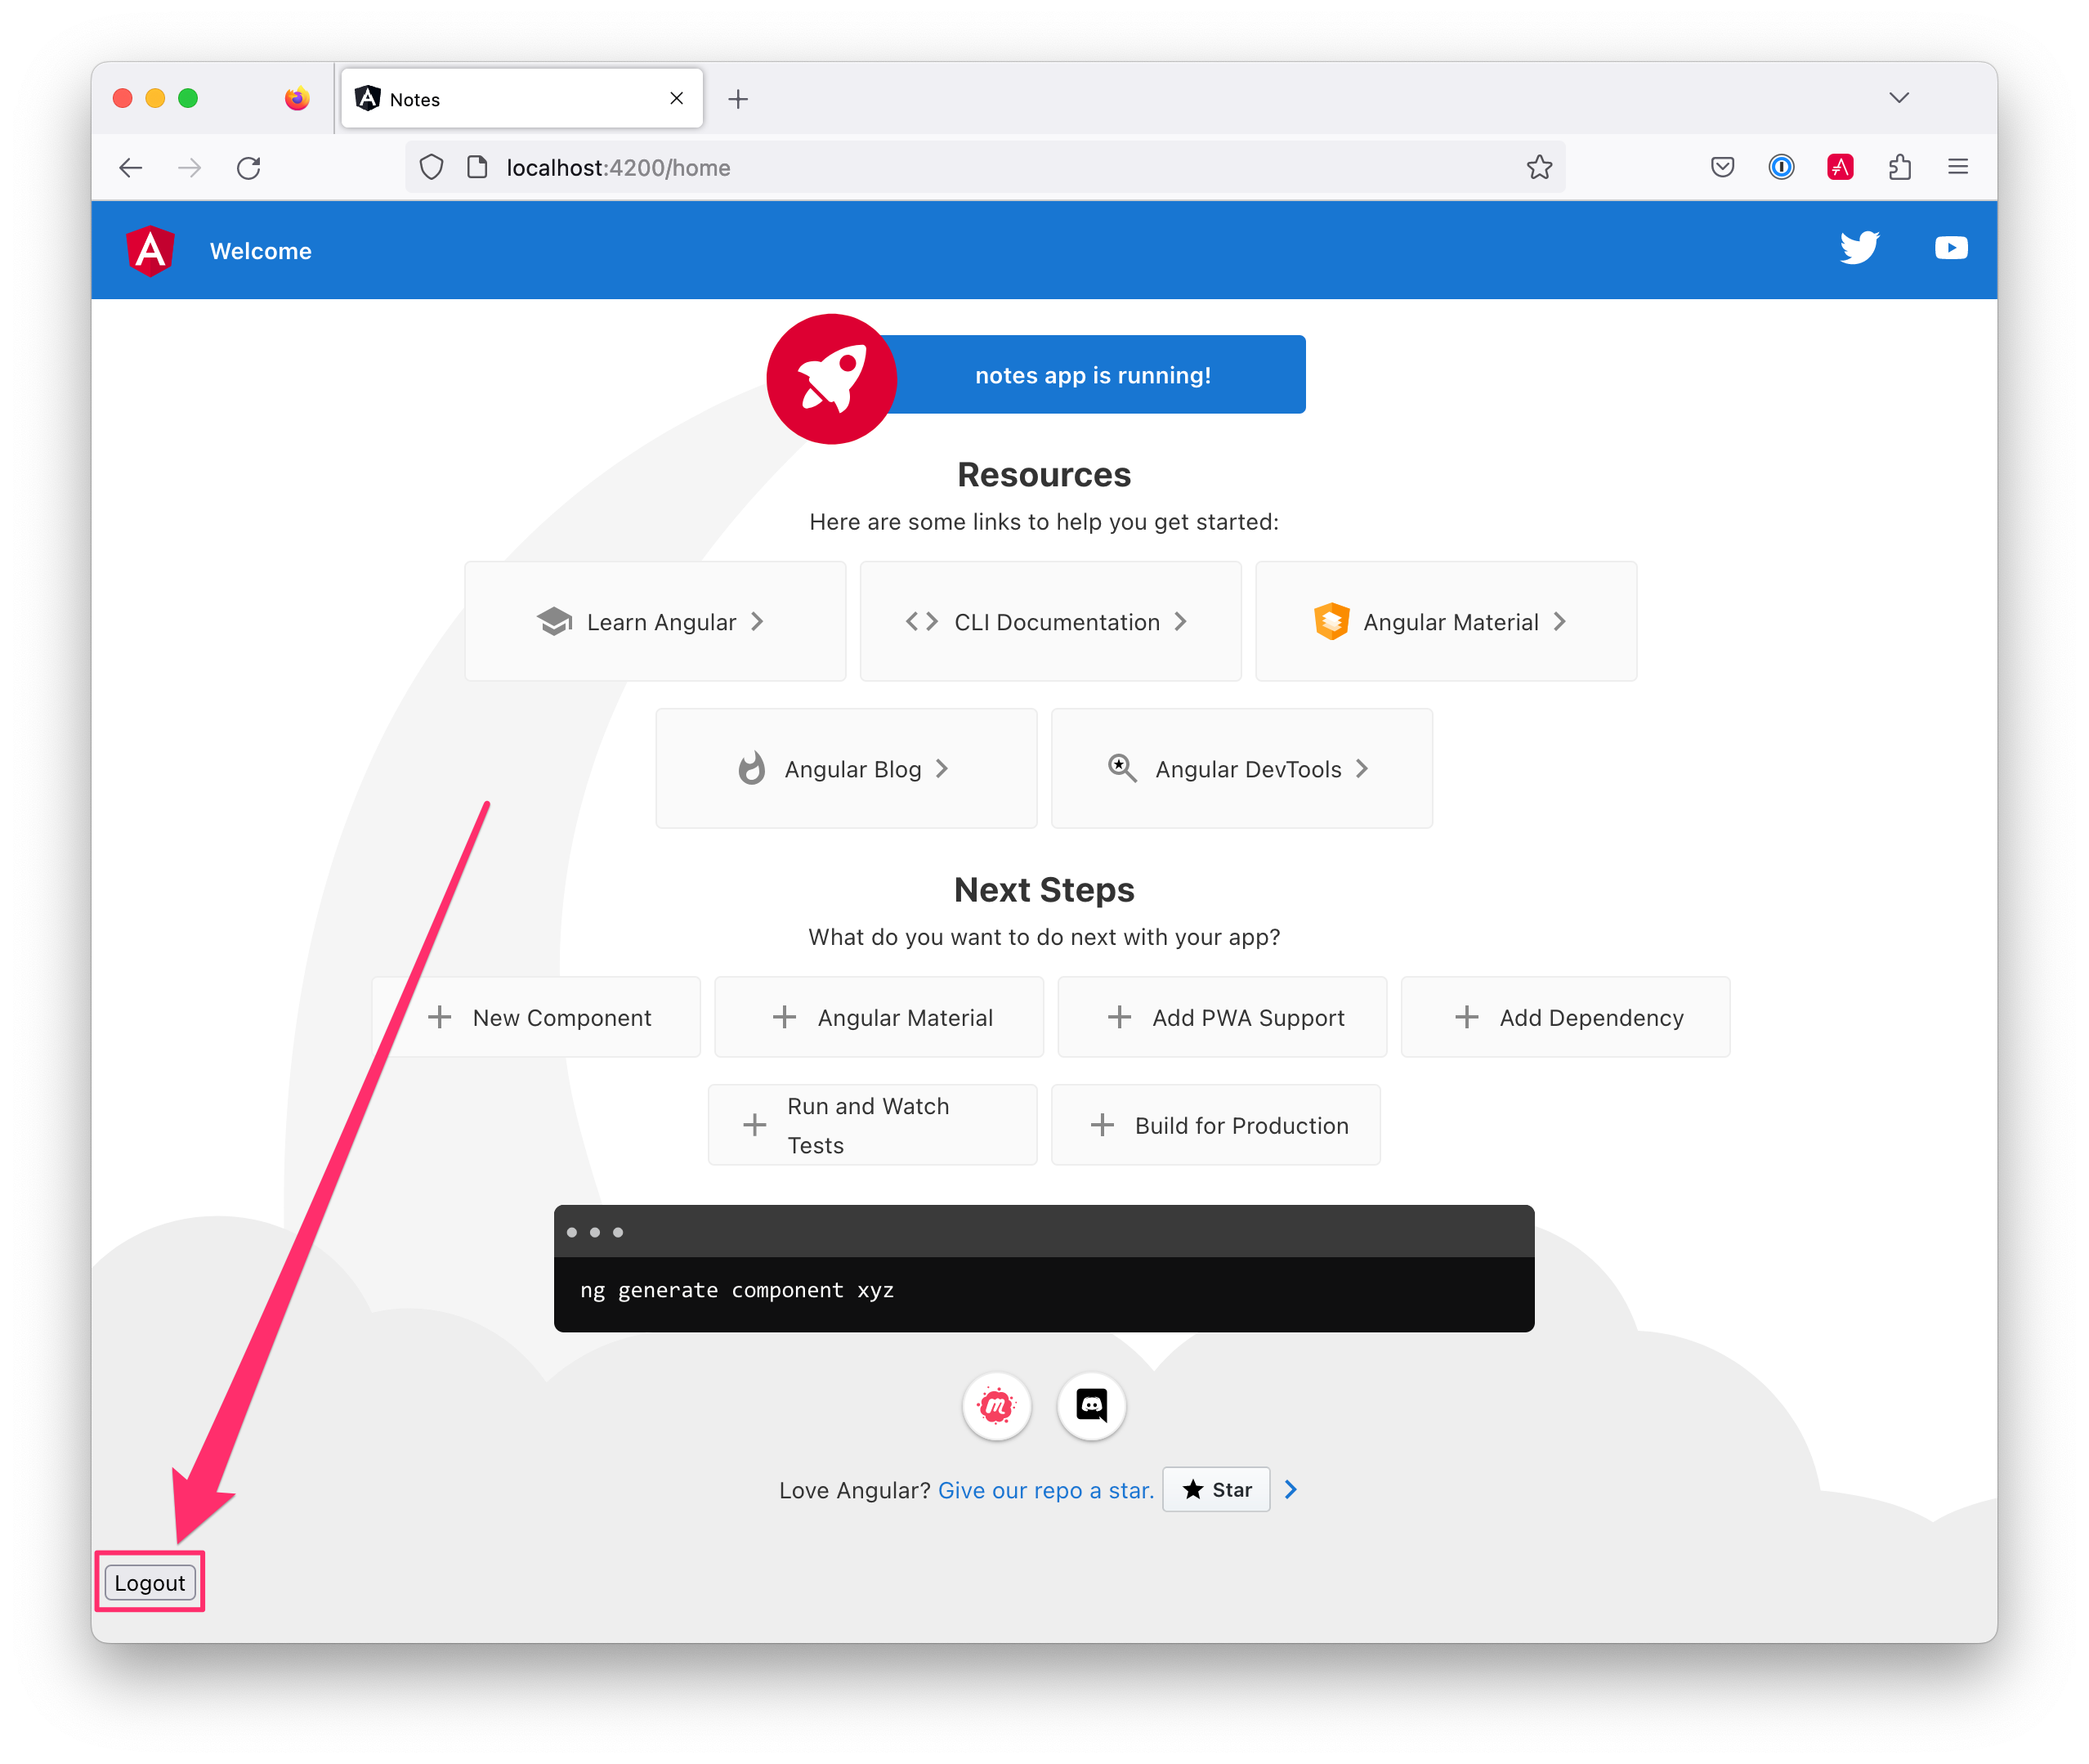
Enter valid credentials, and you’ll be redirected back to your app. There will now be a Logout button, indicating that you’ve authenticated successfully.
Now that you’ve created a secure Angular app let’s create a Spring Boot app to serve up data with a REST API.
Create a Spring Boot App
The good folks at VMWare created start.spring.io to help you create Spring Boot apps quickly with minimal fuss. This site is a Spring Boot app with a REST API you can use with HTTPie.
Kotlin is an intriguing language for Spring developers because it reduces boilerplate code and allows succinct, effective code. Kotlin is 100% interoperable with Java, so you can continue to use the Java libraries and frameworks you know and love. Not only that, but Spring has first-class support for Kotlin.
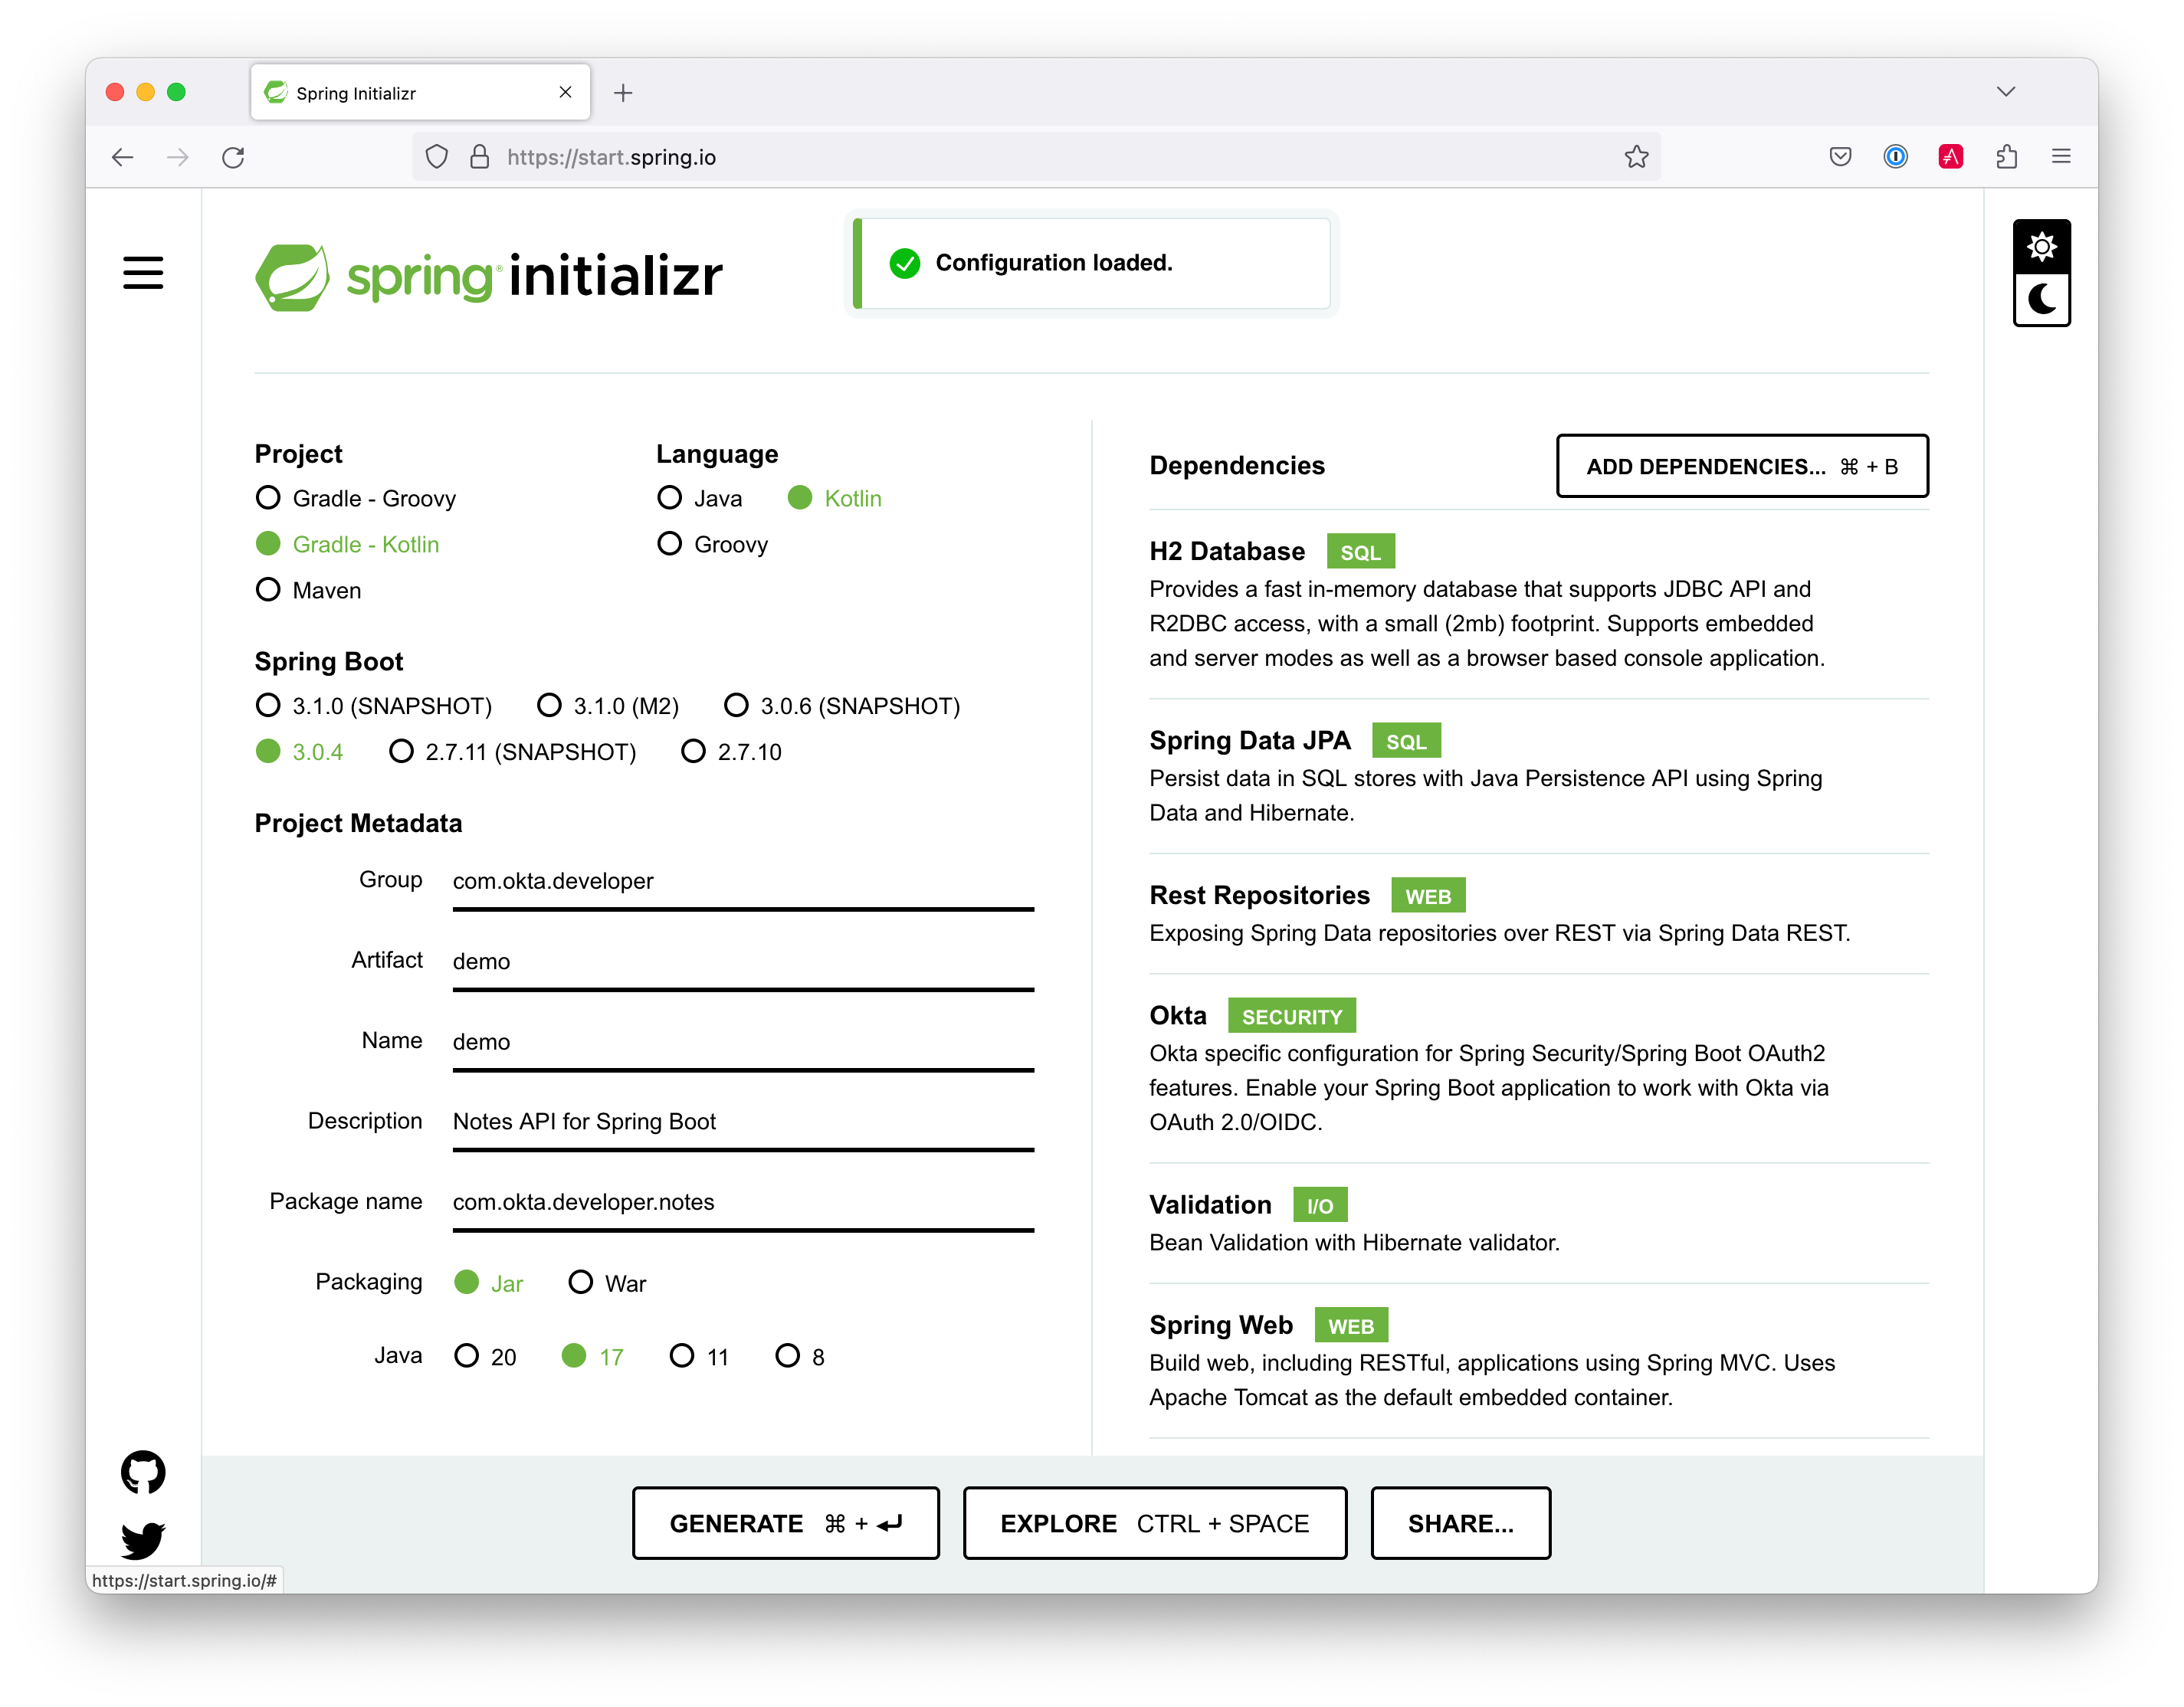
Create a new Spring Boot app that uses Kotlin and Gradle, and has the necessary dependencies to create a secure CRUD API.
https start.spring.io/starter.zip type==gradle-project-kotlin \
  language==kotlin bootVersion==3.0.4 \
  artifactId==notes-api groupId==com.okta.developer \
  packageName==com.okta.developer.notes \
  dependencies==h2,data-jpa,data-rest,okta,validation,web -d
You can remove the bootVersion parameter to use the latest version of Spring Boot. Or, you can change it to a newer version, and it should work. The value used here has been QA’d and is guaranteed to work.
|
Run this command in a terminal, and a notes-api.zip file will be downloaded. Expand it into the angular-spring-boot/notes-api directory.
unzip notes-api.zip -d angular-spring-boot/notes-apiYou can also use start.spring.io in your browser to create this same app.
Secure Spring Boot with Spring Security
Because you selected Okta as a dependency, you’ll need to create an OIDC app for it to authenticate with OpenID Connect. You could use the client ID from your Angular app, but if you ever want to allow people to log in to your Spring Boot app, it’ll need its own OIDC app.
The OIDC integration you added to your Angular app allows you to authenticate a user and receive an access token. You can use this access token to securely communicate with a back end that is configured to use the same issuer. This is done by using an HTTP interceptor that adds it in an Authorization header as a bearer token.
Open a terminal and navigate to your Spring Boot app’s directory. Create an OIDC app for Spring Boot with the following command:
auth0 apps create \
  --name "Spring Boot" \
  --description "Spring Boot OIDC App" \
  --type regular \
  --callbacks http://localhost:8080/login/oauth2/code/okta \
  --logout-urls http://localhost:8080 \
  --reveal-secrets
Copy the results of the previous command into an .okta.env file. You’ll need to replace the placeholders with your values.
export OKTA_OAUTH2_ISSUER=https://<your-auth0-domain>/
export OKTA_OAUTH2_CLIENT_ID=<your-client-id>
export OKTA_OAUTH2_CLIENT_SECRET=<your-client-secret>
export OKTA_OAUTH2_AUDIENCE=https://<your-auth0-domain>/api/v2/
After replacing the <…> placeholders with your values, run source .okta.env to set these environment variables.
Then start your app using ./gradlew bootRun. Open http://localhost:8080 in a browser, and you’ll be redirected to Auth0 to sign in.
| If you don’t get prompted, it’s because you’re already logged in. Try it in an incognito window to see the full login flow. |
Spring Boot as an OAuth 2.0 Resource Server
Your Spring Boot API is now secure, and it’s configured to look for an Authorization header with an access token in it. The Okta Spring Boot starter configures your Spring Boot API as an OAuth 2.0 resource server by default and enables login.
To override the default configuration, create a SecurityConfiguration.kt class in the same directory as DemoApplication.kt:
package com.okta.developer.notes

import org.springframework.context.annotation.Bean
import org.springframework.context.annotation.Configuration
import org.springframework.security.config.Customizer.withDefaults
import org.springframework.security.config.annotation.web.builders.HttpSecurity
import org.springframework.security.web.SecurityFilterChain

@Configuration
class SecurityConfiguration {

    @Bean
    fun webSecurity(http: HttpSecurity): SecurityFilterChain {
        http
            .authorizeHttpRequests { authz ->
                authz.anyRequest().authenticated()
            }
            .oauth2Login(withDefaults())
            .oauth2ResourceServer().jwt()

        return http.build()
    }
}
The oauth2Login() configuration is not necessary for this example to work. It’s only needed if you want to require authentication from a browser and can be useful to test logging in without a client.
|
Spring Data REST
Start by creating a new Note entity in DemoApplication.kt.
package com.okta.developer.notes

import com.fasterxml.jackson.annotation.JsonIgnore
import org.springframework.boot.autoconfigure.SpringBootApplication
import org.springframework.boot.runApplication
import jakarta.persistence.Entity
import jakarta.persistence.GeneratedValue
import jakarta.persistence.Id

@SpringBootApplication
class DemoApplication

fun main(args: Array<String>) {
    runApplication<DemoApplication>(*args)
}

@Entity
data class Note(@Id @GeneratedValue var id: Long? = null,
                var title: String? = null,
                var text: String? = null,
                @JsonIgnore var username: String? = null)
Kotlin’s data classes are built to hold data. By adding the data keyword, your class will get equals(), hashCode(), toString(), and a copy() function. The Type? = null syntax means the arguments are nullable when creating a new instance of the class.
Create a NotesRepository for persisting the data in your notes. Add the following lines of code just below your Note entity.
@RepositoryRestResource
interface NotesRepository : JpaRepository<Note, Long>
The extends syntax differs from Java and is a lot more concise (a colon instead of extends). If your IDE doesn’t automatically add imports, you must add the following at the top of the file.
import org.springframework.data.jpa.repository.JpaRepository
import org.springframework.data.rest.core.annotation.RepositoryRestResource
To automatically add the username to a note when it’s created, add a RepositoryEventHandler that is invoked before creating the record.
@Component
@RepositoryEventHandler(Note::class)
class AddUserToNote {

    @HandleBeforeCreate
    fun handleCreate(note: Note) {
        val username: String = SecurityContextHolder.getContext().authentication.name
        note.username = username
        println("Creating note: $note")
    }
}
The imports for this class are:
import org.springframework.data.rest.core.annotation.HandleBeforeCreate
import org.springframework.data.rest.core.annotation.RepositoryEventHandler
import org.springframework.security.core.context.SecurityContextHolder
import org.springframework.stereotype.Component
Create a DataInitializer.kt class that populates the database with some default data on startup.
package com.okta.developer.notes

import org.springframework.boot.ApplicationArguments
import org.springframework.boot.ApplicationRunner
import org.springframework.stereotype.Component

@Component
class DataInitializer(val repository: NotesRepository) : ApplicationRunner {

    @Throws(Exception::class)
    override fun run(args: ApplicationArguments) {
        listOf("Note 1", "Note 2", "Note 3").forEach {
            repository.save(Note(title = it, username = "user"))
        }
        repository.findAll().forEach { println(it) }
    }
}
Restart your Spring Boot app, and you should see the following printed to your console on startup.
Note(id=1, title=Note 1, text=null, username=user)
Note(id=2, title=Note 2, text=null, username=user)
Note(id=3, title=Note 3, text=null, username=user)
Create a UserController.kt class (in the same directory as DemoApplication.kt) and use it to filter notes by the currently logged-in user. While you’re at it, add a /user endpoint that returns the user’s information.
package com.okta.developer.notes

import org.springframework.security.core.annotation.AuthenticationPrincipal
import org.springframework.security.oauth2.core.oidc.user.OidcUser
import org.springframework.web.bind.annotation.GetMapping
import org.springframework.web.bind.annotation.RestController
import java.security.Principal

@RestController
class UserController(val repository: NotesRepository) {

    @GetMapping("/user/notes")
    fun notes(principal: Principal): List<Note> {
        println("Fetching notes for user: ${principal.name}")
        return repository.findAllByUsername(principal.name)
    }

    @GetMapping("/user")
    fun user(@AuthenticationPrincipal user: OidcUser): OidcUser {
        return user
    }
}
The findAllByUser() method doesn’t exist on NotesRepository, so you’ll need to add it. Thanks to Spring Data JPA, all you need to do is add the method definition to the interface, and it will handle generating the finder method in the implementation.
interface NotesRepository : JpaRepository<Note, Long> {
    fun findAllByUsername(name: String): List<Note>
}
To prevent conflicting paths with the REST endpoints created by @RepositoryRestResource, set the base path to /api in application.properties.
spring.data.rest.base-path=/apiRestart your Spring Boot app, navigate to http://localhost:8080/user, and you’ll see a whole plethora of details about your account. Opening http://localhost:8080/api/notes will show the default notes entered by the DataInitializer component.
CORS Integration
For your Angular app (on port 4200) to communicate with your Spring Boot app (on port 8080), you have to enable CORS (cross-origin resource sharing). You can do this by updating your SecurityConfiguration to have http.cors() and defining a corsConfigurationSource bean.
package com.okta.developer.notes

...
import org.springframework.web.cors.CorsConfiguration
import org.springframework.web.cors.CorsConfigurationSource
import org.springframework.web.cors.UrlBasedCorsConfigurationSource

@Configuration
class SecurityConfiguration {

    @Bean
    fun webSecurity(http: HttpSecurity): SecurityFilterChain {
        ...

        http.cors()
        return http.build()
    }

    @Bean
    fun corsConfigurationSource(): CorsConfigurationSource {
        val source = UrlBasedCorsConfigurationSource()
        val config = CorsConfiguration()
        config.allowCredentials = true
        config.allowedOrigins = listOf("http://localhost:4200")
        config.allowedMethods = listOf("*")
        config.allowedHeaders = listOf("*")
        source.registerCorsConfiguration("/**", config)
        return source
    }
}
Restart your Spring Boot app after adding this bean.
Now that your API is working, it’s time to develop a UI with Angular!
CRUD in Angular
Angular Schematics is a workflow tool that allows you to manipulate any project that has a package.json. Angular CLI is based on Schematics. OktaDev Schematics uses Schematics to update and add new files to projects. There’s even an Angular CRUD schematic!
Angular CRUD allows you to generate CRUD (create, read, update, and delete) screens and associated files from JSON.
In your Angular notes app, install angular-crud using npm:
npm i -D angular-crud@3Then create a src/app/note directory.
mkdir -p src/app/noteThen, in that directory, create a model.json file that defines metadata used when generating files.
{
  "title": "Notes",
  "entity": "note",
  "api": {
    "url": "http://localhost:8080/api/notes"
  },
  "filter": [
    "title"
  ],
  "fields": [
    {
      "name": "id",
      "label": "Id",
      "isId": true,
      "readonly": true,
      "type": "number"
    },
    {
      "name": "title",
      "type": "string",
      "label": "Title"
    },
    {
      "name": "text",
      "type": "string",
      "label": "Text"
    }
  ]
}
Then, run the command below to generate CRUD screens.
ng g angular-crud:crud-module note --style bootstrapYou will see the following output:
CREATE src/app/note/note-filter.ts (42 bytes)
CREATE src/app/note/note.module.ts (659 bytes)
CREATE src/app/note/note.routes.ts (346 bytes)
CREATE src/app/note/note.service.spec.ts (607 bytes)
CREATE src/app/note/note.service.ts (1774 bytes)
CREATE src/app/note/note.ts (72 bytes)
CREATE src/app/note/note-edit/note-edit.component.html (1007 bytes)
CREATE src/app/note/note-edit/note-edit.component.spec.ts (978 bytes)
CREATE src/app/note/note-edit/note-edit.component.ts (1527 bytes)
CREATE src/app/note/note-list/note-list.component.html (1601 bytes)
CREATE src/app/note/note-list/note-list.component.spec.ts (978 bytes)
CREATE src/app/note/note-list/note-list.component.ts (1116 bytes)
UPDATE src/app/app.module.ts (540 bytes)
This schematic creates a NotesModule, routes a service to communicate with the API, and list/edit screens for viewing and editing notes. Open the generated note.routes.ts file, and protect the routes it creates with AuthGuard.
import { Routes } from '@angular/router';
import { NoteListComponent } from './note-list/note-list.component';
import { NoteEditComponent } from './note-edit/note-edit.component';
import { AuthGuard } from '@auth0/auth0-angular';

export const NOTE_ROUTES: Routes = [
  {
    path: 'notes',
    component: NoteListComponent,
    canActivate: [AuthGuard],
  },
  {
    path: 'notes/:id',
    component: NoteEditComponent,
    canActivate: [AuthGuard]
  }
];
Add a link to the NoteListComponent in src/app/home/home.component.html.
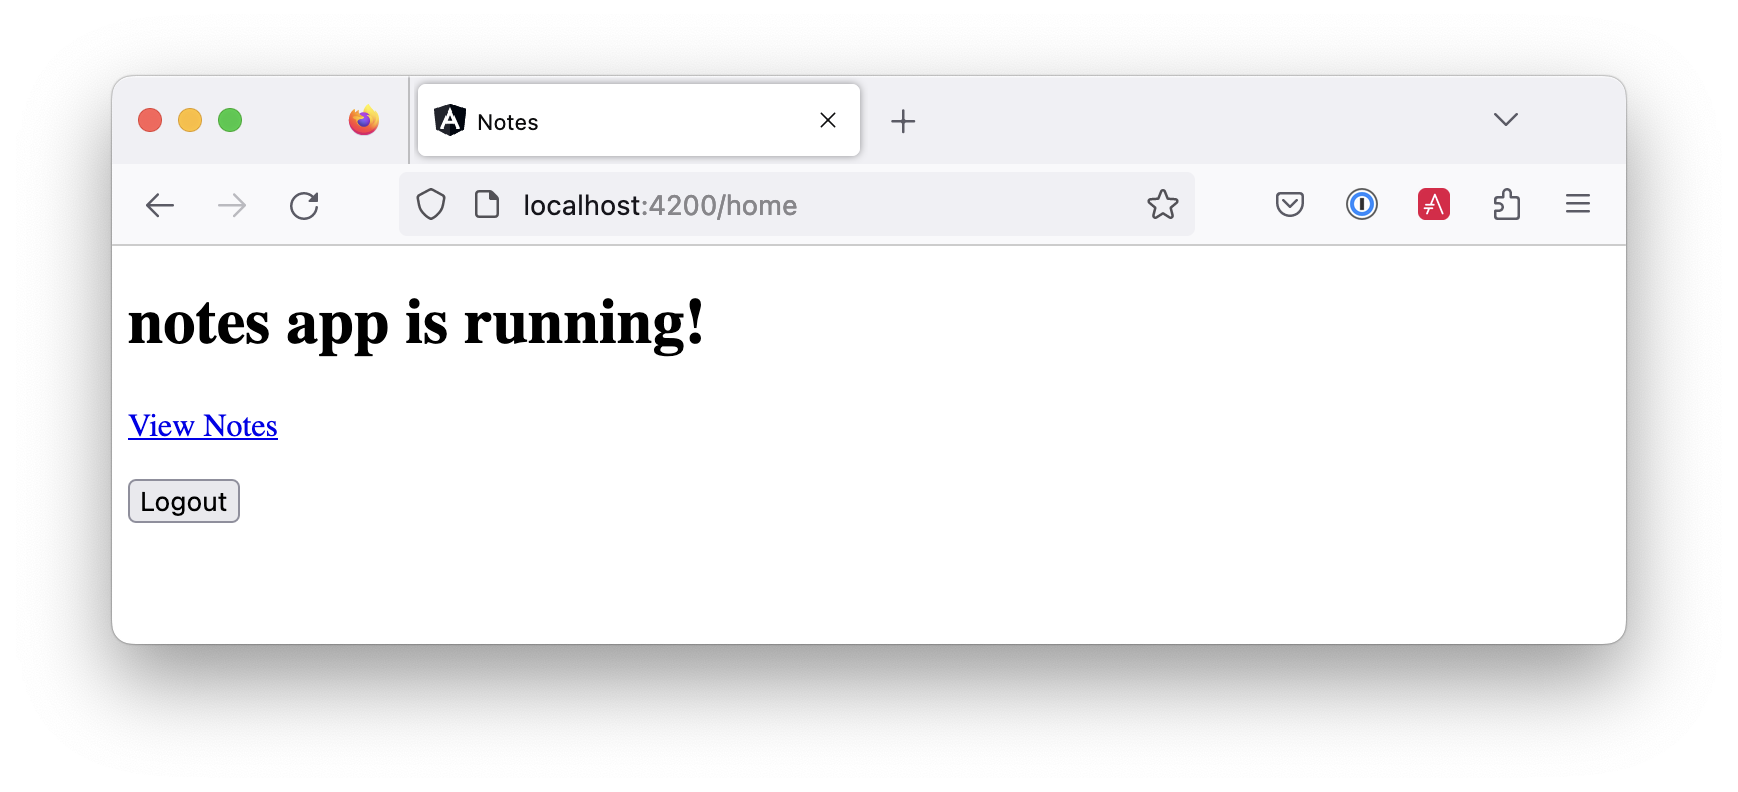
<div>
  <button *ngIf="(auth.isAuthenticated$ | async) === false" (click)="login()">Login</button>
  <p><a routerLink="/notes" *ngIf="auth.isAuthenticated$ | async">View Notes</a></p>
  <button *ngIf="auth.isAuthenticated$ | async" (click)="logout()">Logout</button>
</div>
Change src/app/app.component.html to be as simple as it can be.
<h1>{{ title }} app is running!</h1>

<router-outlet></router-outlet>
If you want npm test to pass after modifying this template, you’ll need to change app.component.spec.ts to look for querySelector('h1') instead of querySelector('.content span').
|
Run ng serve (and make sure your Spring Boot app is running, too).

Log in, and you should see a View Notes link.
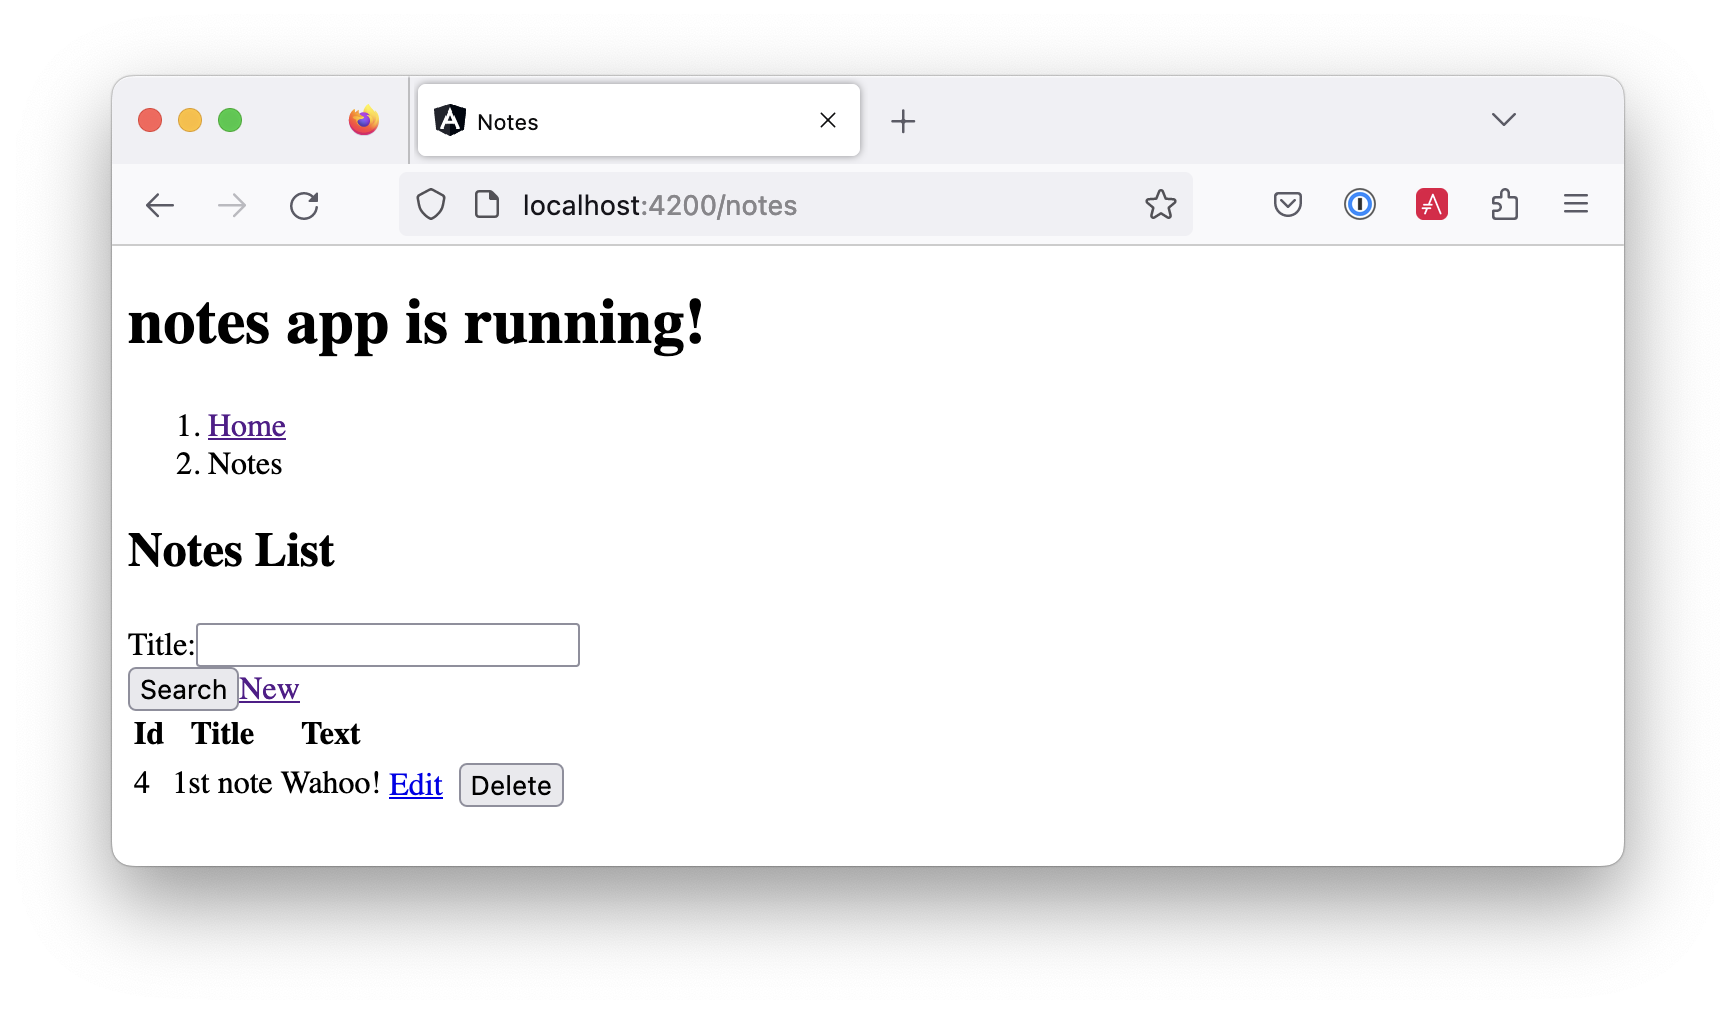
Click on the link, and you’ll see a list screen like the one below. No notes are displayed because you haven’t created any notes tied to your user.
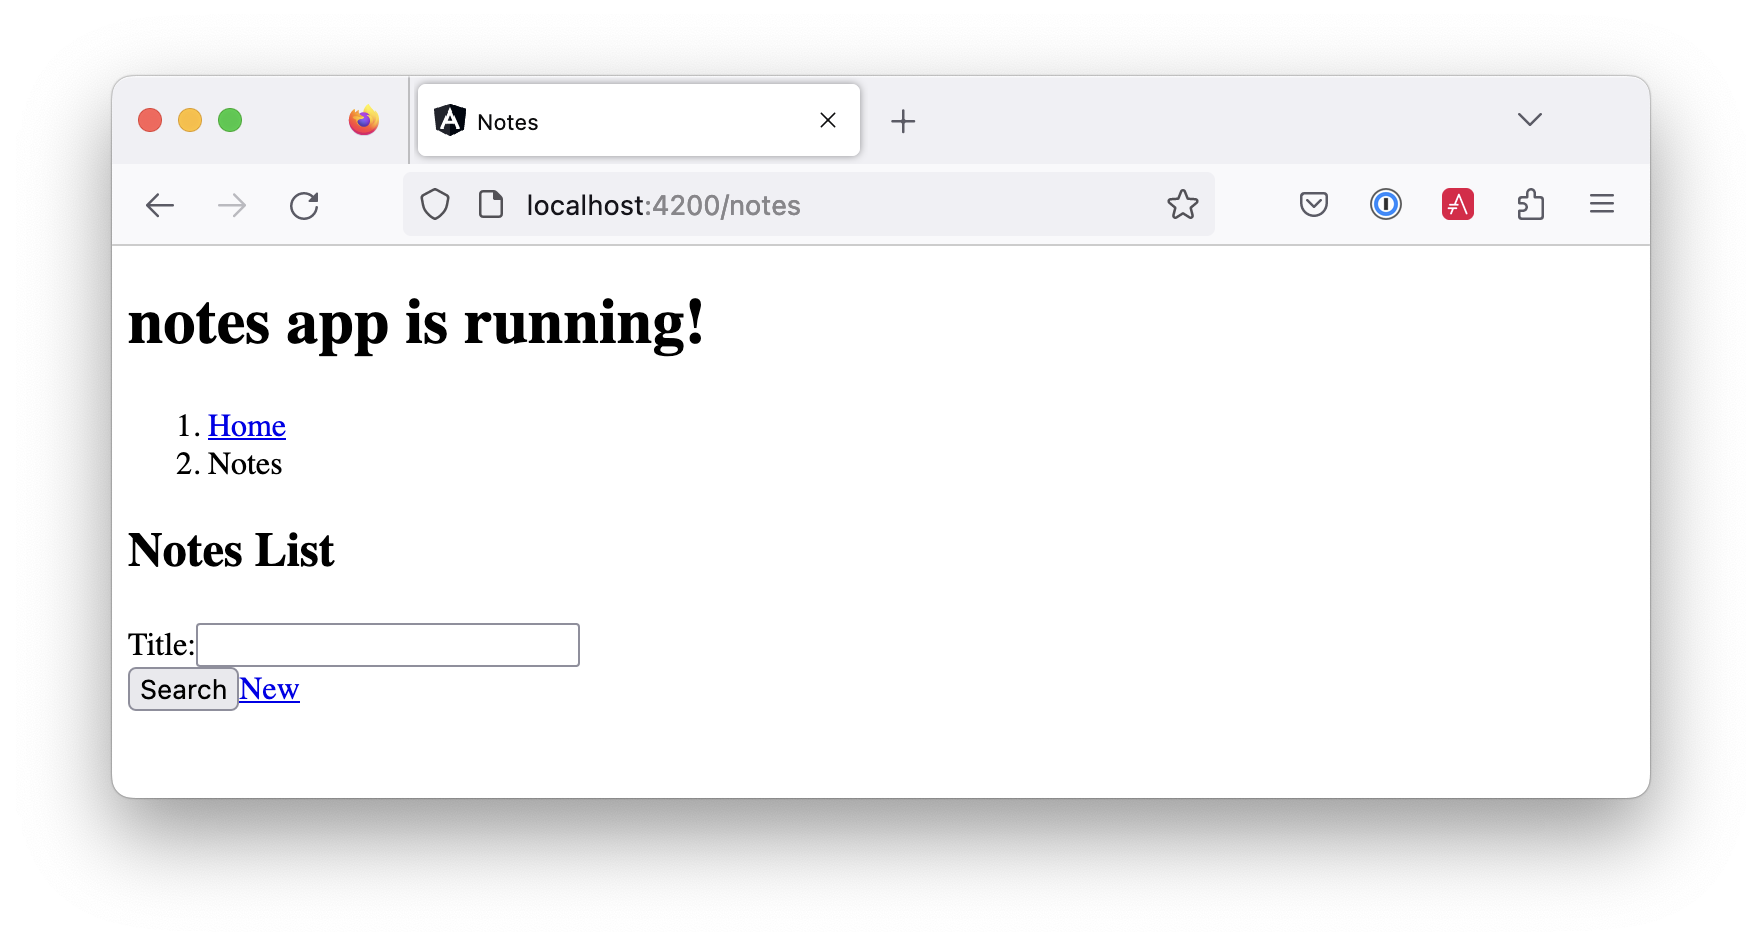
Click on the New link to add a new note.
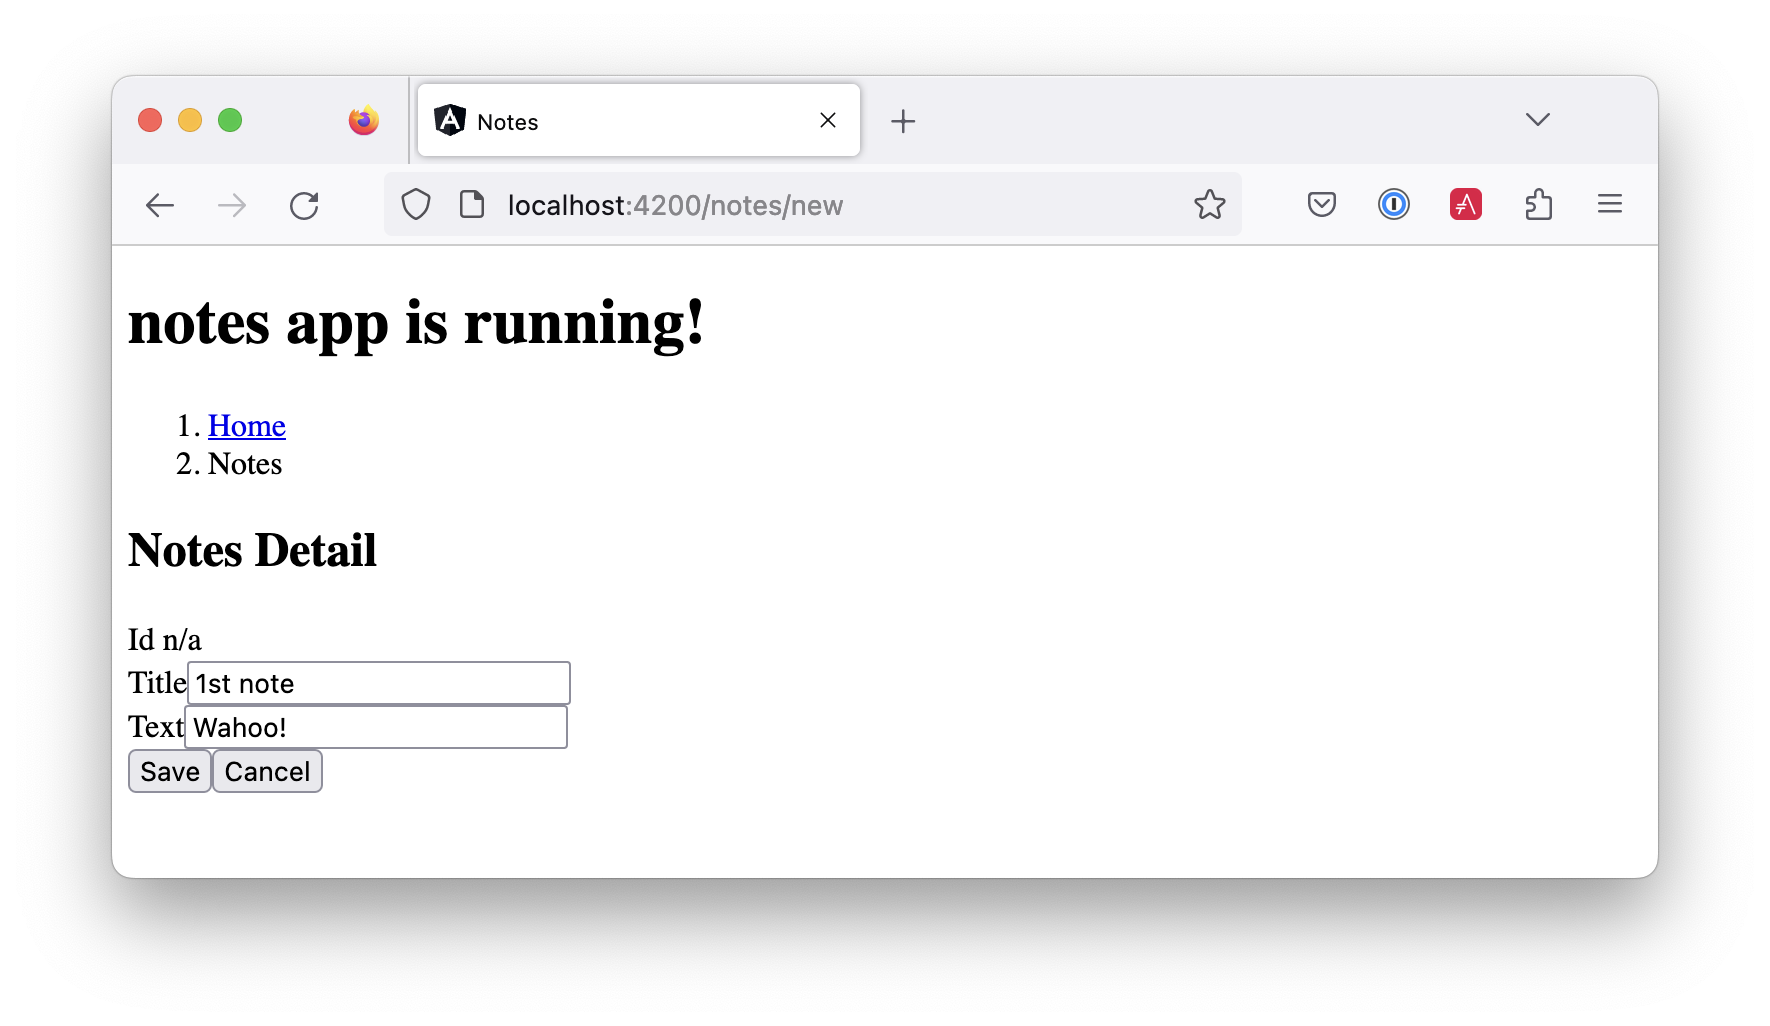
Add a new note, and you’ll see a message like this in your back-end console.
Creating note: Note(id=null, title=1st note, text=Wahoo!, username=auth0|61bcbc76f64d4a0072af8a1d)You still won’t see notes in the list. You need to change the NoteService to call the /user/notes endpoint to get your notes.
find(filter: NoteFilter): Observable<Note[]> {
  const params = {
    'title': filter.title,
  };
  const userNotes = 'http://localhost:8080/user/notes';
  return this.http.get<Note[]>(userNotes, {params, headers});
}
Now you’ll see your notes listed. Nice work!
You might be wondering how the NoteListComponent works. It loads the user’s notes from the NoteService when the component initializes and also contains select() and delete() methods. It can talk to your secured Spring Boot API because the aforementioned AuthInterceptor adds an access token to the request.
import { Component, OnInit } from '@angular/core';
import { NoteFilter } from '../note-filter';
import { NoteService } from '../note.service';
import { Note } from '../note';

@Component({
  selector: 'app-note',
  templateUrl: 'note-list.component.html'
})
export class NoteListComponent implements OnInit {

  filter = new NoteFilter();
  selectedNote!: Note;
  feedback: any = {};

  get noteList(): Note[] {
    return this.noteService.noteList;
  }

  constructor(private noteService: NoteService) {
  }

  ngOnInit() {
    this.search();
  }

  search(): void {
    this.noteService.load(this.filter);
  }

  select(selected: Note): void {
    this.selectedNote = selected;
  }

  delete(note: Note): void {
    if (confirm('Are you sure?')) {
      this.noteService.delete(note).subscribe({
        next: () => {
          this.feedback = {type: 'success', message: 'Delete was successful!'};
          setTimeout(() => {
            this.search();
          }, 1000);
        },
        error: err => {
          this.feedback = {type: 'warning', message: 'Error deleting.'};
        }
      });
    }
  }
}
The Edit link in this component’s template links to the NoteEditComponent.
<a [routerLink]="['../notes', item.id ]" class="btn btn-secondary">Edit</a>The NoteEditComponent has methods for loading a note, saving a note, and canceling.
import { Component, OnInit } from '@angular/core';
import { ActivatedRoute, Router } from '@angular/router';
import { NoteService } from '../note.service';
import { Note } from '../note';
import { map, switchMap } from 'rxjs/operators';
import { of } from 'rxjs';

@Component({
  selector: 'app-note-edit',
  templateUrl: './note-edit.component.html'
})
export class NoteEditComponent implements OnInit {

  id!: string;
  note!: Note;
  feedback: any = {};

  constructor(
    private route: ActivatedRoute,
    private router: Router,
    private noteService: NoteService) {
  }

  ngOnInit() {
    this
      .route
      .params
      .pipe(
        map(p => p['id']),
        switchMap(id => {
          if (id === 'new') { return of(new Note()); }
          return this.noteService.findById(id);
        })
      )
      .subscribe({
        next: note => {
          this.note = note;
          this.feedback = {};
        },
        error: err => {
          this.feedback = {type: 'warning', message: 'Error loading'};
        }
      });
  }

  save() {
    this.noteService.save(this.note).subscribe({
      next: note => {
        this.note = note;
        this.feedback = {type: 'success', message: 'Save was successful!'};
        setTimeout(async () => {
          await this.router.navigate(['/notes']);
        }, 1000);
      },
      error: err => {
        this.feedback = {type: 'warning', message: 'Error saving'};
      }
    });
  }

  async cancel() {
    await this.router.navigate(['/notes']);
  }
}
Fix the Note Edit Feature
One of the problems with the NoteEditComponent is it assumes the API returns an ID. Since Spring Data REST uses HATEOS by default, it returns links instead of IDs. You can change this default to return IDs by creating a RestConfiguration class in your Spring Boot app. You might notice you can also configure the base path in this class, instead of in application.properties.
package com.okta.developer.notes

import org.springframework.context.annotation.Configuration
import org.springframework.data.rest.core.config.RepositoryRestConfiguration
import org.springframework.data.rest.webmvc.config.RepositoryRestConfigurer
import org.springframework.web.servlet.config.annotation.CorsRegistry

@Configuration
class RestConfiguration : RepositoryRestConfigurer {

    override fun configureRepositoryRestConfiguration(
        config: RepositoryRestConfiguration?,
        cors: CorsRegistry?
    ) {
        config?.exposeIdsFor(Note::class.java)
        config?.setBasePath("/api")
    }
}
Another option is to modify the Angular side of things. Since the ID is passed into the NoteEditComponent, you can set it as a local variable, then set it on the note after it’s returned. Here’s a diff of what changes need to be made in notes/src/app/note/note-edit/note-edit.component.ts.
--- a/note/note-edit/note-edit.component.ts
+++ b/note/note-edit/note-edit.component.ts
@@ -29,12 +29,14 @@ export class NoteEditComponent implements OnInit {
         map(p => p['id']),
         switchMap(id => {
           if (id === 'new') { return of(new Note()); }
+          this.id = id;
           return this.noteService.findById(id);
         })
       )
       .subscribe({
         next: note => {
           this.note = note;
+          this.note.id = +note.id
           this.feedback = {};
         },
         error: err => {
@@ -47,6 +49,7 @@ export class NoteEditComponent implements OnInit {
     this.noteService.save(this.note).subscribe({
       next: note => {
         this.note = note;
+        this.note.id = +this.id;
         this.feedback = {type: 'success', message: 'Save was successful!'};
         setTimeout(async () => {
           await this.router.navigate(['/notes']);
In this example, you might notice this.note.id = +note.id. The + converts the string parameter to a number.
In the final example for this chapter, I opted to return IDs from my Spring Boot API.
Mocking Spring Security’s OIDC Configuration
If you open a new terminal window and run ./gradlew test in the notes-api directory, tests will fail. This happens because Spring Security cannot connect to an identity provider on startup. You can run source .okta.env before running ./gradlew test to solve the problem. However, this is not a good long-term solution, especially for continuous integration.
To solve this problem, mock the OIDC configuration by creating a notes-api/src/test/…/notes/MockSecurityConfiguration.kt class.
package com.okta.developer.notes

import org.mockito.Mockito.mock
import org.springframework.boot.test.context.TestConfiguration
import org.springframework.context.annotation.Bean
import org.springframework.security.oauth2.client.InMemoryOAuth2AuthorizedClientService
import org.springframework.security.oauth2.client.OAuth2AuthorizedClientService
import org.springframework.security.oauth2.client.registration.ClientRegistration
import org.springframework.security.oauth2.client.registration.ClientRegistrationRepository
import org.springframework.security.oauth2.client.registration.InMemoryClientRegistrationRepository
import org.springframework.security.oauth2.client.web.AuthenticatedPrincipalOAuth2AuthorizedClientRepository
import org.springframework.security.oauth2.client.web.OAuth2AuthorizedClientRepository
import org.springframework.security.oauth2.core.AuthorizationGrantType.AUTHORIZATION_CODE
import org.springframework.security.oauth2.core.ClientAuthenticationMethod.CLIENT_SECRET_BASIC
import org.springframework.security.oauth2.jwt.JwtDecoder

@TestConfiguration
class MockSecurityConfiguration {
    private val clientRegistration: ClientRegistration

    @Bean
    fun clientRegistrationRepository(): ClientRegistrationRepository {
        return InMemoryClientRegistrationRepository(clientRegistration)
    }

    private fun clientRegistration(): ClientRegistration.Builder {
        val metadata: MutableMap<String, Any> = HashMap()
        metadata["end_session_endpoint"] = "https://angular.org/logout"
        return ClientRegistration.withRegistrationId("okta")
            .redirectUri("{baseUrl}/{action}/oauth2/code/{registrationId}")
            .clientAuthenticationMethod(CLIENT_SECRET_BASIC)
            .authorizationGrantType(AUTHORIZATION_CODE)
            .scope("read:user")
            .authorizationUri("https://angular.org/login/oauth/authorize")
            .tokenUri("https://angular.org/login/oauth/access_token")
            .jwkSetUri("https://angular.org/oauth/jwk")
            .userInfoUri("https://api.angular.org/user")
            .providerConfigurationMetadata(metadata)
            .userNameAttributeName("id")
            .clientName("Client Name")
            .clientId("client-id")
            .clientSecret("client-secret")
    }

    @Bean
    fun jwtDecoder(): JwtDecoder {
        return mock(JwtDecoder::class.java)
    }

    @Bean
    fun authorizedService(registration: ClientRegistrationRepository?):
        OAuth2AuthorizedClientService {
        return InMemoryOAuth2AuthorizedClientService(registration)
    }

    @Bean
    fun authorizedRepository(client: OAuth2AuthorizedClientService?):
        OAuth2AuthorizedClientRepository {
        return AuthenticatedPrincipalOAuth2AuthorizedClientRepository(client)
    }

    init {
        clientRegistration = clientRegistration().build()
    }
}
Then, modify DemoApplicationTests.kt to use this class.
package com.okta.developer.notes

import org.junit.jupiter.api.Test
import org.springframework.boot.test.context.SpringBootTest

@SpringBootTest(classes = [DemoApplication::class, MockSecurityConfiguration::class])
class DemoApplicationTests {

    @Test
    fun contextLoads() {
    }

}
Now, running ./gradlew test should pass as expected.
Summary
In this chapter, I showed you how to create Angular and Spring Boot apps and secure communication between them with OAuth 2.0 and OIDC. You used Kotlin on the back end; a language loved by many. You used Angular Schematics to generate code for authentication and CRUD, improving your efficiency as a developer.
This section did not show you how to make your Angular app look good, add validation, or how to deploy it to a public server. I’ll tackle those topics in the next section.
You can download the code for this book’s examples from InfoQ. The angular-spring-boot directory has this chapter’s completed example.
|