Build an Angular App
Before you start creating an Angular app, I think it’s useful to know a bit about the history of Angular. Its first version was called AngularJS. Then, from its second version until today, it’s been called Angular.
A Brief History of Angular
AngularJS was started by Miško Hevery in 2009. He was working on a project that was using GWT (Google Web Toolkit). Three developers had been developing the product for six months, and Miško rewrote the whole thing in AngularJS in three weeks. At that time, AngularJS was a side project he’d created. It didn’t require you to write much in JavaScript, as you could program most of the logic in HTML. The GWT version of the product contained 17,000 lines of code. The AngularJS version was only 1,000 lines of code!
In October 2014, the AngularJS team announced they were building Angular 2.0. The announcement led to a bit of upheaval in the Angular developer community. The API for writing Angular applications would change, and it would be based on a new language, AtScript. There would be no migration path, and users would have to continue using 1.x or rewrite their applications for 2.x.
In March 2015, the Angular team addressed community concerns, announced they would be using TypeScript over AtScript and that they would provide a migration path for Angular 1.x users. They also adopted semantic versioning and recommended people call it “Angular” instead of Angular 2.0.
Angular 2.0 was released in September 2016. Angular 4.0 was released in March 2017. The Angular project releases two major versions each year to keep Angular synchronized with the rest of the JavaScript ecosystem and have a predictable schedule. They released Angular 15 on November 18, 2022.
You can find the Angular project at angular.io.
Developers like to see things working in minutes. I’m a developer, and I like to evaluate software with a “10-minute test.” If I can get it working in 10 minutes, sign me up!
Rather than explain all the concepts in Angular, I’ll show you how to build a basic application. You’ll learn how to write unit tests, integration tests, add authentication, and deploy to production.
| I should warn you about my teaching style. My words will tell you to do things that cause errors to happen. You’ll think you did something wrong. However, if you return to my instructions, you’ll find that error was expected. When you see errors happen, make sure to keep reading. 🙂 |
Prerequisites:
-
A favorite text editor or IDE. I recommend IntelliJ IDEA.
-
Node.js and npm installed.
-
Angular CLI installed.
If you don’t have the Angular CLI installed, please install it:
npm install -g @angular/cli@15
| IntelliJ IDEA Ultimate Edition has the best support for TypeScript. If you’d rather not pay for your IDE, check out Visual Studio Code. |
Create a new Angular project
Create a new project using the ng new command from Angular CLI:
ng new ng-demo
When prompted to install Angular routing, type “Y”. For the stylesheet format, choose “CSS” (the default).
This will create a ng-demo project and run npm install in it. It takes about a minute to complete but will vary based on your internet connection speed.
You can see the version of Angular CLI you’re using with the ng version command.
$ ng version

     _                      _                 ____ _     ___
    / \   _ __   __ _ _   _| | __ _ _ __     / ___| |   |_ _|
   / △ \ | '_ \ / _` | | | | |/ _` | '__|   | |   | |    | |
  / ___ \| | | | (_| | |_| | | (_| | |      | |___| |___ | |
 /_/   \_\_| |_|\__, |\__,_|_|\__,_|_|       \____|_____|___|
                |___/


Angular CLI: 15.2.0
Node: 18.14.0
Package Manager: npm 9.3.1
OS: darwin arm64

Angular:
...

Package                      Version
------------------------------------------------------
@angular-devkit/architect    0.1502.0 (cli-only)
@angular-devkit/core         15.2.0 (cli-only)
@angular-devkit/schematics   15.2.0 (cli-only)
@schematics/angular          15.2.0 (cli-only)
If you run this command from the ng-demo directory, you’ll see even more information.
....

Angular: 15.2.0
... animations, cli, common, compiler, compiler-cli, core, forms
... platform-browser, platform-browser-dynamic, router

Package                         Version
---------------------------------------------------------
@angular-devkit/architect       0.1502.0
@angular-devkit/build-angular   15.2.0
@angular-devkit/core            15.2.0
@angular-devkit/schematics      15.2.0
@schematics/angular             15.2.0
rxjs                            7.8.0
typescript                      4.9.5
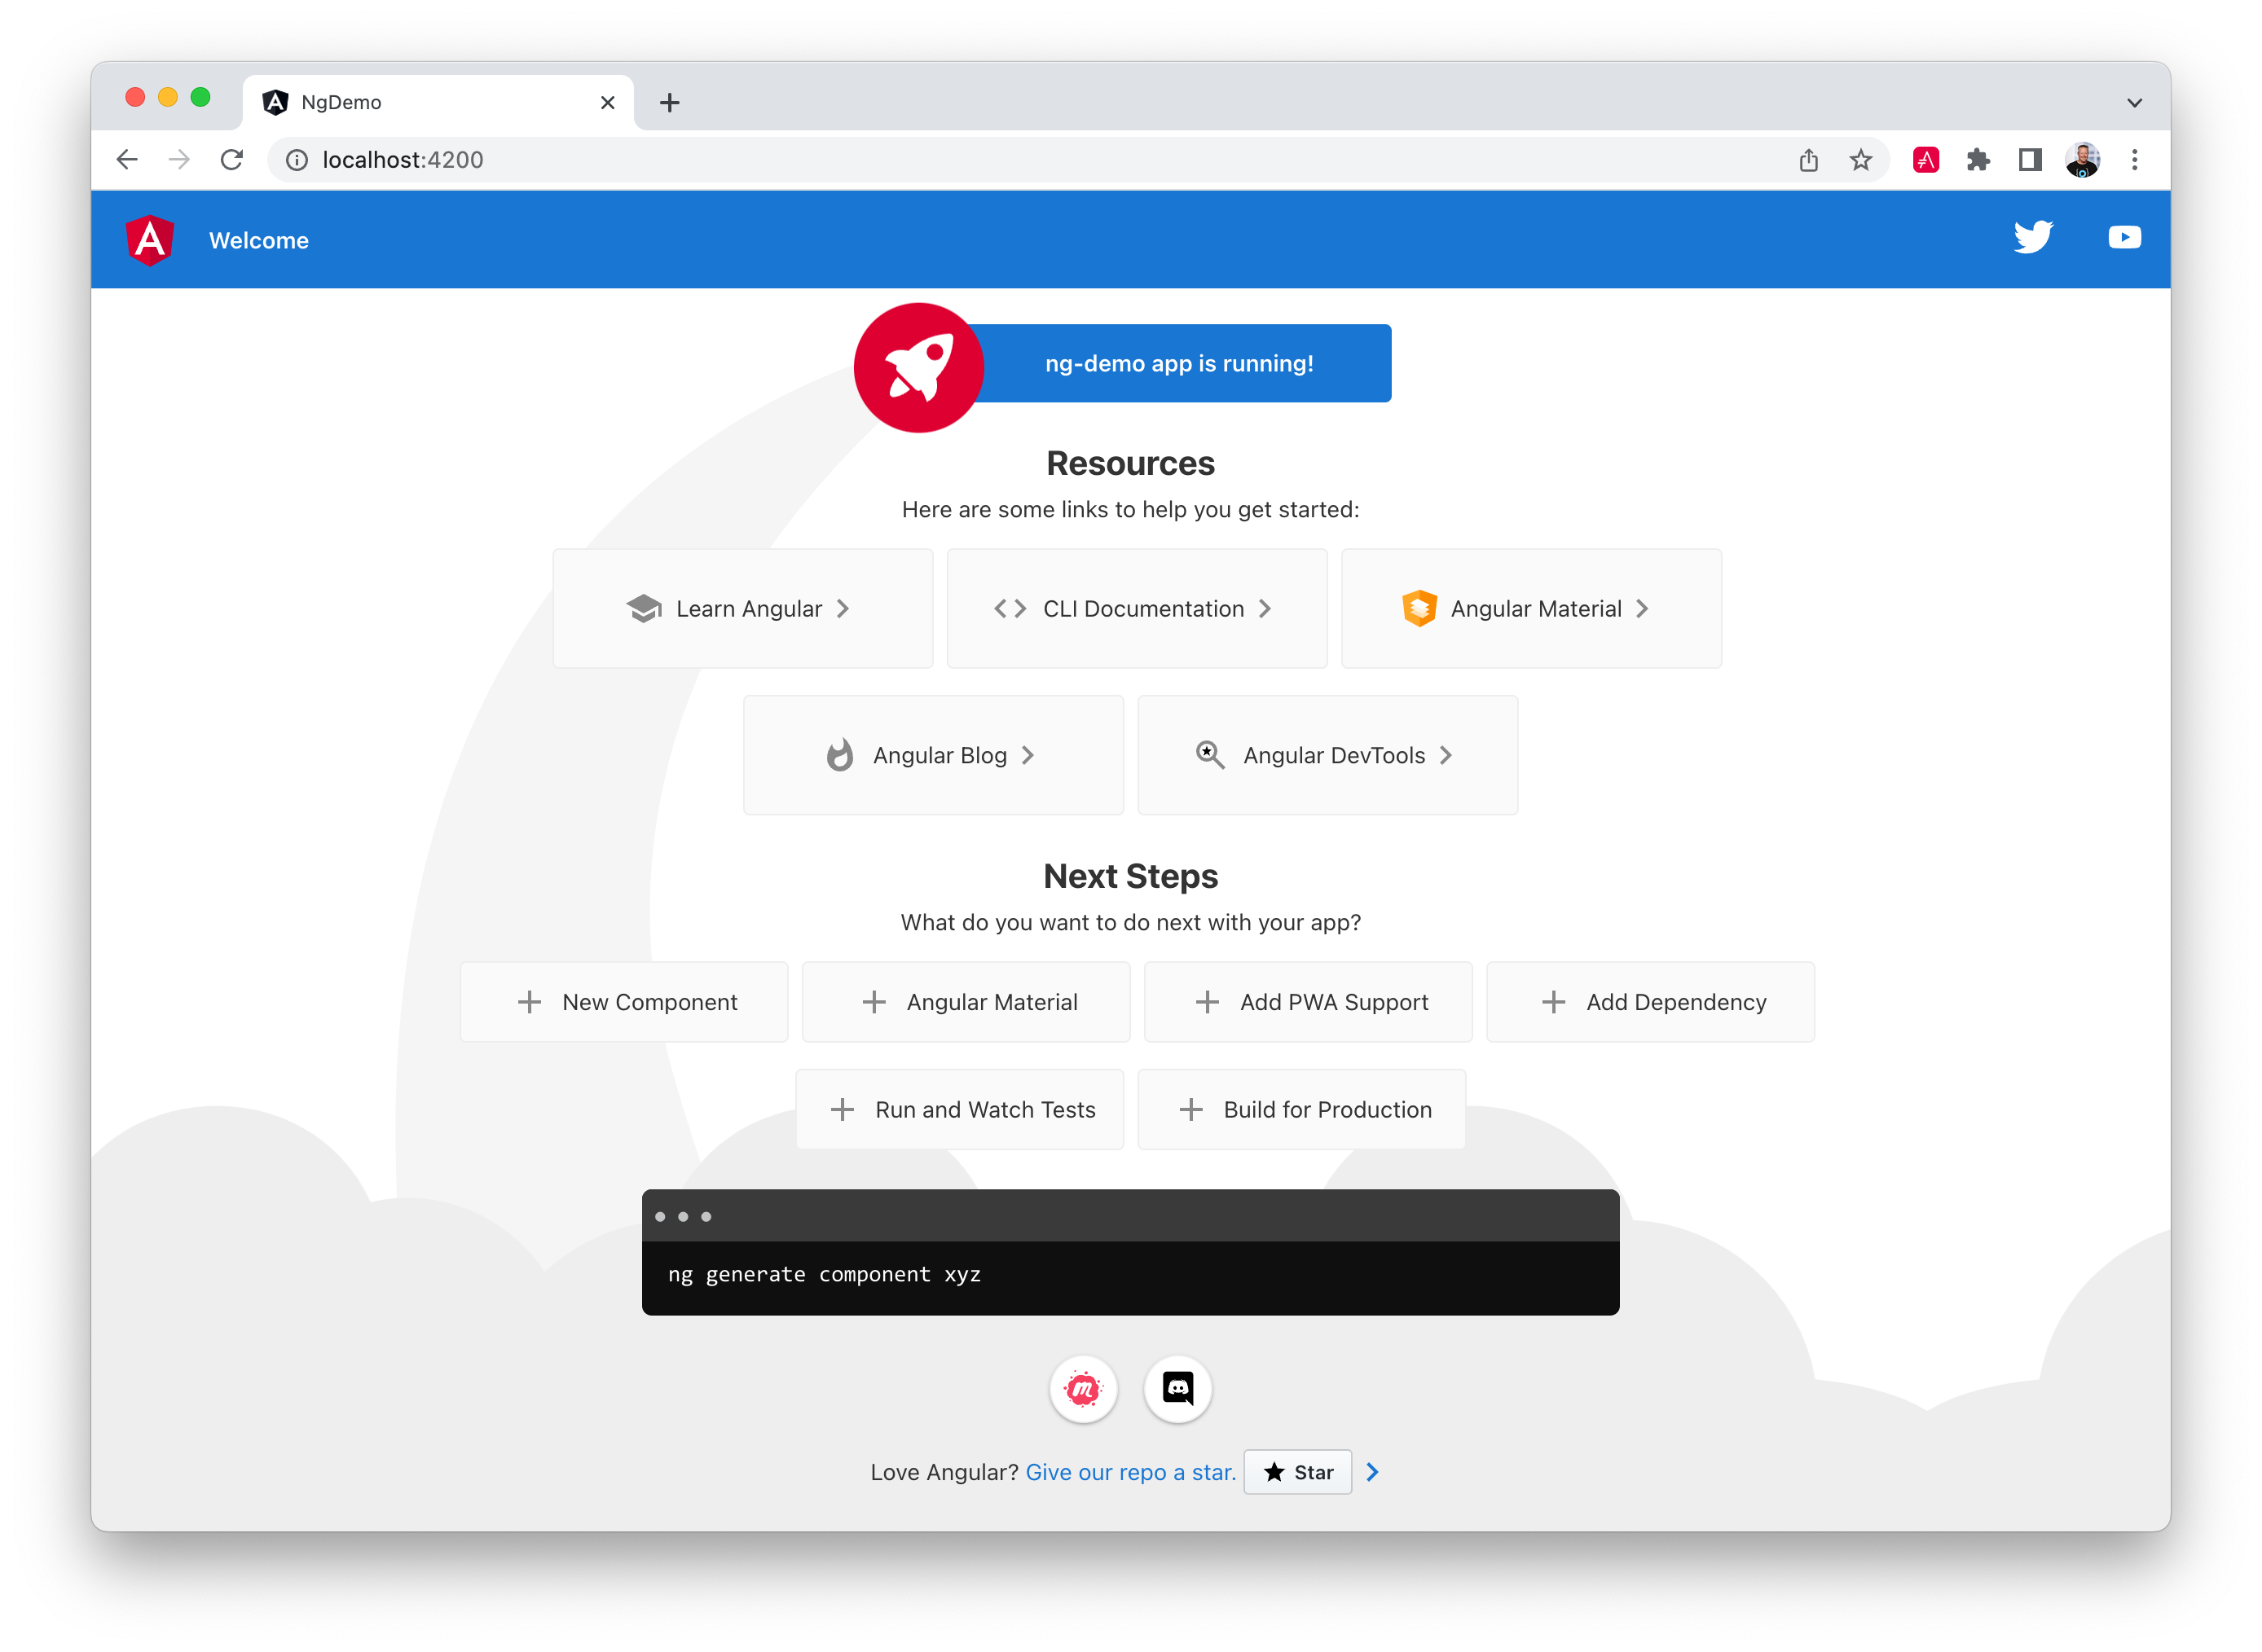
Run the application
The project is configured with a simple web server for development. To start it, run:
ng serve
You should see a screen like the one below at http://localhost:4200.
You can make sure your new project’s tests pass, run ng test:
$ ng test
...
...: Executed 3 of 3 SUCCESS (0.061 secs / 0.055 secs)
Add a search feature
To add a search feature, open the project in an IDE or your favorite text editor.
In a terminal window, cd into your project’s directory and run the following command to create a search component.
ng g component search
ng g is an alias for ng generate.
|
Open src/app/search/search.component.html and replace its default HTML with the following:
<h2>Search</h2>
<form>
  <input type="search" name="query" [(ngModel)]="query" (keyup.enter)="search()">
  <button type="button" (click)="search()">Search</button>
</form>
<pre>{{searchResults | json}}</pre>
Add a query property to src/app/search/search.component.ts. While you’re there, add a searchResults property and an empty search() method.
export class SearchComponent implements OnInit {
  query: string | undefined;
  searchResults: any;

  constructor() { }

  ngOnInit(): void { }

  search(): void { }

}
In src/app/app-routing.module.ts, modify the routes constant to add SearchComponent as the default:
import { SearchComponent } from './search/search.component';

const routes: Routes = [
  { path: 'search', component: SearchComponent },
  { path: '', redirectTo: '/search', pathMatch: 'full' }
];
Run ng serve again you will see a compilation error.
ERROR in src/app/search/search.component.html:3:37 - error NG8002:
 Can't bind to 'ngModel' since it isn't a known property of 'input'.
To solve this, open src/app/app.module.ts and add FormsModule as an import in @NgModule:
import { FormsModule } from '@angular/forms';

@NgModule({
  ...
  imports: [
    ...
    FormsModule
  ]
  ...
})
export class AppModule { }
Run ng serve again, and now you should be able to see the search form when you visit http://localhost:4200/search.
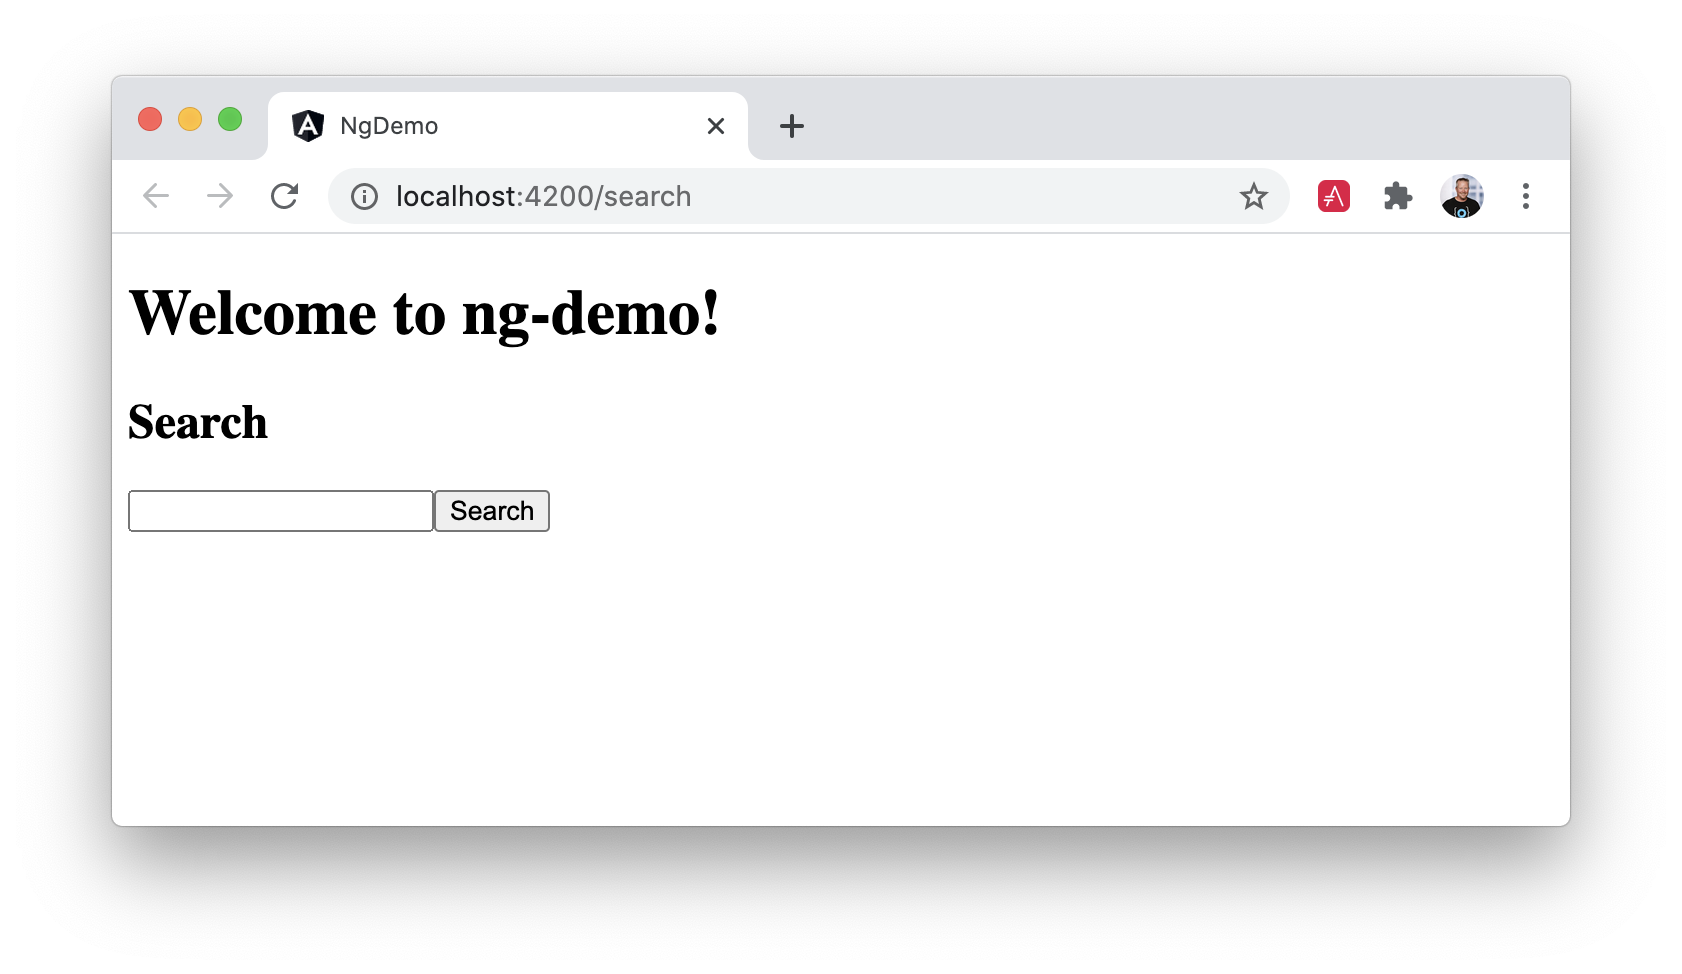
If yours looks different, it’s because I trimmed my app.component.html to the bare minimum.
<h1>Welcome to {{ title }}!</h1>

<router-outlet></router-outlet>
If you want to add styling for this component, open search.component.css and add some CSS. For example:
:host {
  display: block;
  padding: 0 20px;
}
The :host allows you to target the container of the component. It’s the only way to target the host element. You can’t reach the host element inside the component with other selectors because it’s not part of the component’s template.
|
This section has shown you how to generate and add a new component to a basic Angular application with the Angular CLI. The next section shows you how to create and use a JSON file and localStorage to create a fake API.
The Back end
To get search results, create a SearchService that makes HTTP requests to a JSON file. Start by generating a new service.
ng g service shared/search/search
Create src/assets/data/people.json to hold your data.
mkdir -p src/assets/data
[
  {
    "id": 1,
    "name": "Nikola Jokić",
    "phone": "(720) 555-1212",
    "address": {
      "street": "2000 16th Street",
      "city": "Denver",
      "state": "CO",
      "zip": "80202"
    }
  },
  {
    "id": 2,
    "name": "Jamal Murray",
    "phone": "(303) 321-8765",
    "address": {
      "street": "2654 Washington Street",
      "city": "Lakewood",
      "state": "CO",
      "zip": "80568"
    }
  },
  {
    "id": 3,
    "name": "Aaron Gordon",
    "phone": "(303) 323-1233",
    "address": {
      "street": "46 Creekside Way",
      "city": "Winter Park",
      "state": "CO",
      "zip": "80482"
    }
  }
]
Modify src/app/shared/search/search.service.ts and provide HttpClient as a dependency in its constructor.
In this same file, create a getAll() method to gather all the people. Also, define the Address and Person classes to which JSON will be marshaled.
import { Injectable } from '@angular/core';
import { HttpClient } from '@angular/common/http';
import { Observable } from 'rxjs';

@Injectable({
  providedIn: 'root'
})
export class SearchService {

  constructor(private http: HttpClient) { }

  getAll(): Observable<Person[]> {
    return this.http.get<Person[]>('assets/data/people.json');
  }
}

export class Address {
  street: string;
  city: string;
  state: string;
  zip: string;

  constructor(address: Partial<Address> = {}) {
    this.street = address?.street || '';
    this.city = address?.city || '';
    this.state = address?.state || '';
    this.zip = address?.zip || '';
  }
}

export class Person {
  id: number | null;
  name: string;
  phone: string;
  address: Address;

  constructor(person: Partial<Person> = {}) {
    this.id = person?.id || null;
    this.name = person?.name || '';
    this.phone = person?.phone || '';
    this.address = person?.address || new Address();
  }
}
To make these classes easier to consume by your components, create src/app/shared/index.ts and add the following:
export * from './search/search.service';The reason for creating this file is so you can import multiple classes on a single line rather than having to import each class on separate lines.
In search.component.ts, add imports for these classes.
import { Person, SearchService } from '../shared';You can now add a proper type to the searchResults variable. While you’re there, modify the constructor to inject the SearchService.
export class SearchComponent implements OnInit {
  query: string | undefined;
  searchResults: Person[] = [];

  constructor(private searchService: SearchService) { }
Then update the search() method to call the service’s getAll() method.
search(): void {
  this.searchService.getAll().subscribe({
    next: (data: Person[]) => {
      this.searchResults = data;
    },
    error: error => console.log(error)
  });
}
At this point, if your app is running, you’ll see the following message in your browser’s console.
NullInjectorError: No provider for HttpClient!
To fix the “No provider” error from above, update app.module.ts to import HttpClientModule.
import { HttpClientModule } from '@angular/common/http';
@NgModule({
...
imports: [
...
HttpClientModule
],
providers: [],
bootstrap: [AppComponent]
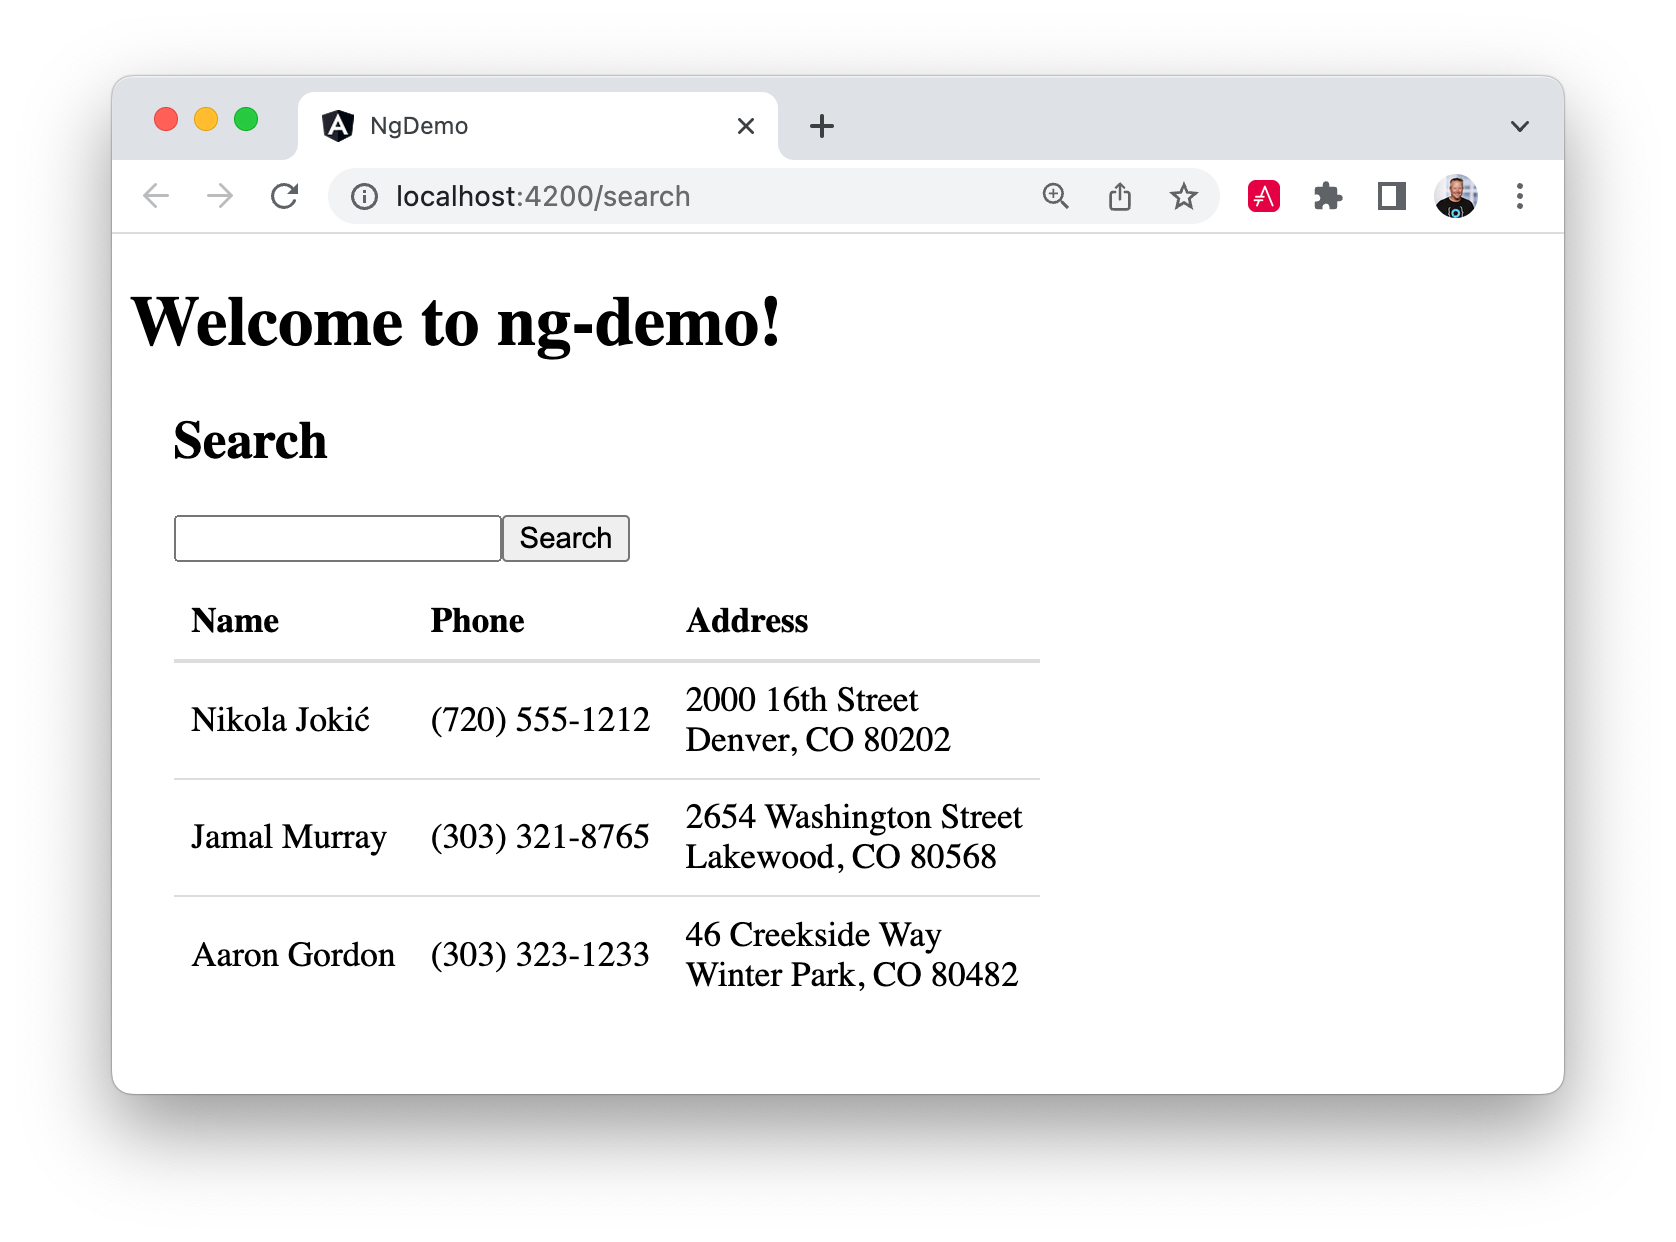
})Now clicking the search button should work. To make the results look better, remove the <pre> tag and replace it with a <table> in search.component.html.
<table *ngIf="searchResults?.length">
  <thead>
  <tr>
    <th>Name</th>
    <th>Phone</th>
    <th>Address</th>
  </tr>
  </thead>
  <tbody>
  <tr *ngFor="let person of searchResults; let i=index">
    <td>{{person.name}}</td>
    <td>{{person.phone}}</td>
    <td>{{person.address.street}}<br/>
      {{person.address.city}}, {{person.address.state}} {{person.address.zip}}
    </td>
  </tr>
  </tbody>
</table>Then add some additional CSS to search.component.css to improve its table layout.
table {
  margin-top: 10px;
  border-collapse: collapse;
}

th {
  text-align: left;
  border-bottom: 2px solid #ddd;
  padding: 8px;
}

td {
  border-top: 1px solid #ddd;
  padding: 8px;
}
Now the search results look better.
But wait, you still don’t have search functionality! To add a search feature, add a search() method to SearchService.
import { map, Observable } from 'rxjs';
...

  search(q: string): Observable<Person[]> {
    if (!q || q === '*') {
      q = '';
    } else {
      q = q.toLowerCase();
    }
    return this.getAll().pipe(
      map((data: Person[]) => data
        .filter((item: Person) => JSON.stringify(item).toLowerCase().includes(q)))
    );
  }
Then refactor SearchComponent to call this method with its query variable.
search(): void {
  this.searchService.search(this.query).subscribe({
    next: (data: Person[]) => {
      this.searchResults = data;
    },
    error: error => console.log(error)
  });
}
This won’t compile right away.
Error: src/app/search/search.component.ts:18:31 - error TS2345:
 Argument of type 'string | undefined' is not assignable to parameter of type 'string'.
Since query will always be assigned (even if it’s empty), change its variable declaration to:
query!: string; // query: string = ''; will also workThis is called a definite assignment assertion. It’s a way to tell TypeScript, “I know what I’m doing; the variable will be assigned.”
Now, the search results will be filtered by the query value you type in.
This section showed you how to fetch and display search results. The next section builds on this and shows how to edit and save a record.
Add an edit feature
Modify search.component.html to wrap the person’s name with a link.
<td><a [routerLink]="['/edit', person.id]">{{person.name}}</a></td>Run the following command to generate an EditComponent.
ng g component editAdd a route for this component in app-routing.module.ts:
import { EditComponent } from './edit/edit.component';
const routes: Routes = [
{ path: 'search', component: SearchComponent },
{ path: 'edit/:id', component: EditComponent },
{ path: '', redirectTo: '/search', pathMatch: 'full' }
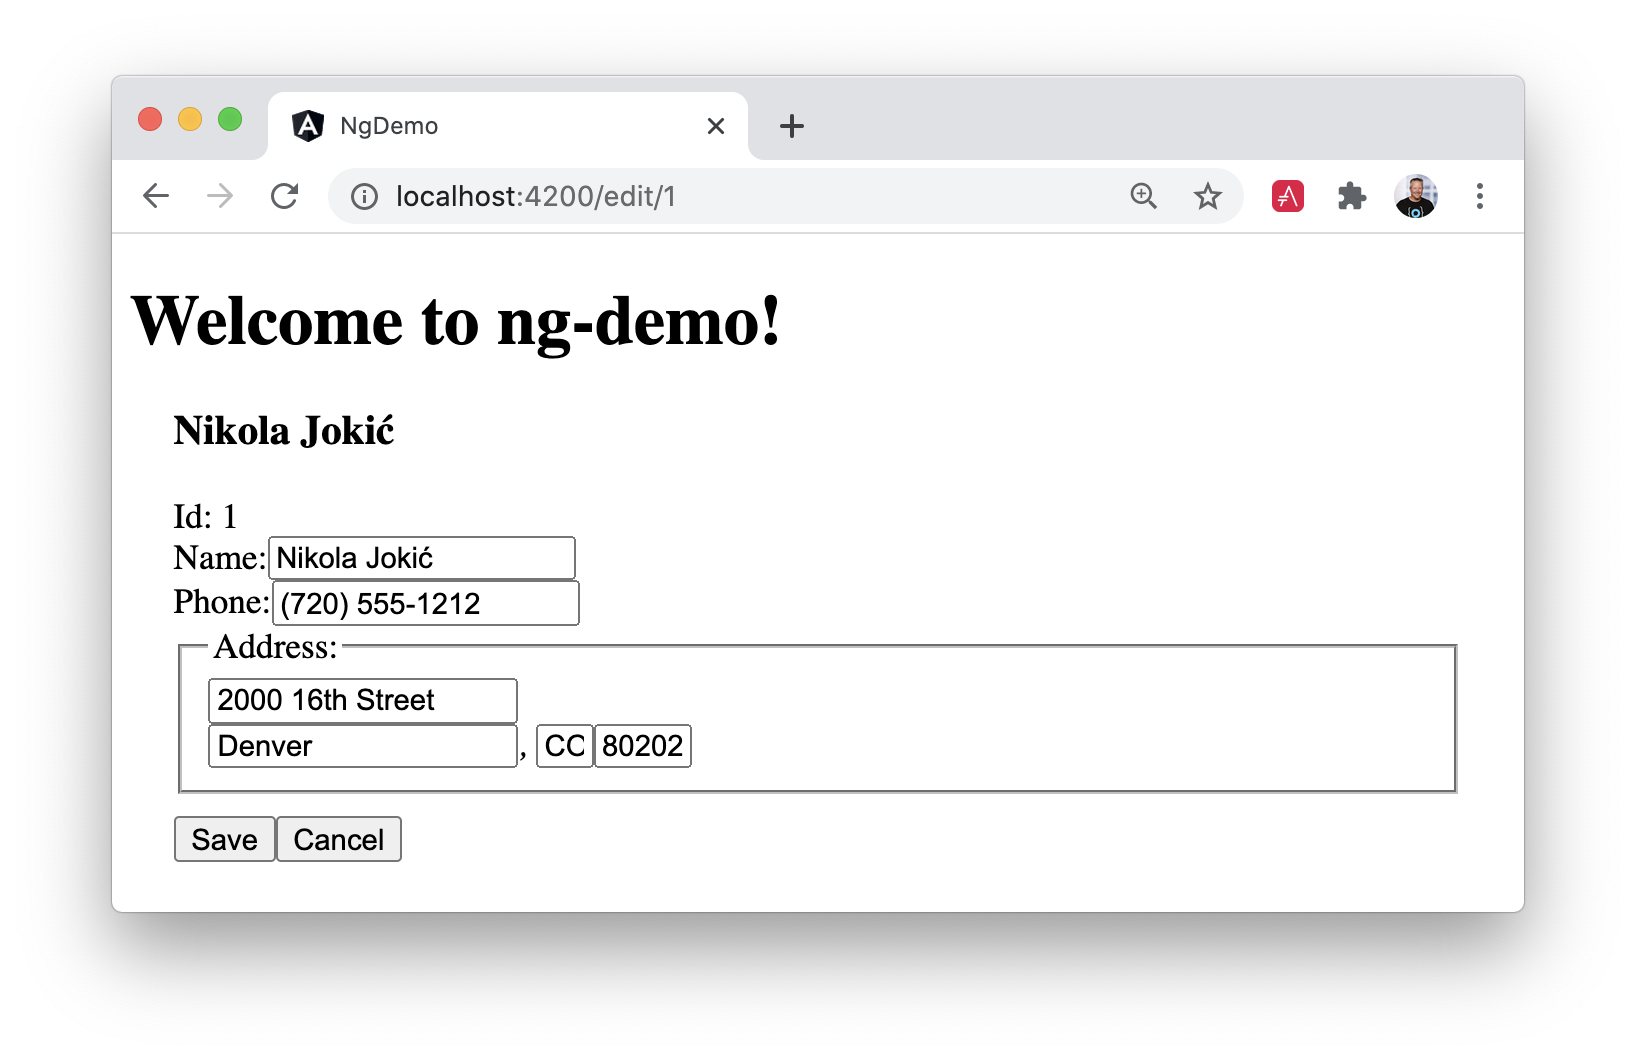
];Update src/app/edit/edit.component.html to display an editable form. You might notice I’ve added id attributes to most elements. This is to make it easier to locate elements when writing integration tests.
<div *ngIf="person">
  <h3>{{person.name}}</h3>
  <div>
    <label>Id:</label>
    {{person.id}}
  </div>
  <div>
    <label>Name:</label>
    <input [(ngModel)]="person.name" name="name" id="name" placeholder="Name"/>
  </div>
  <div>
    <label>Phone:</label>
    <input [(ngModel)]="person.phone" name="phone" id="phone" placeholder="Phone"/>
  </div>
  <fieldset>
    <legend>Address:</legend>
    <address>
      <input [(ngModel)]="person.address.street" id="street"><br/>
      <input [(ngModel)]="person.address.city" id="city">,
      <input [(ngModel)]="person.address.state" id="state" size="2">
      <input [(ngModel)]="person.address.zip" id="zip" size="5">
    </address>
  </fieldset>
  <button (click)="save()" id="save">Save</button>
  <button (click)="cancel()" id="cancel">Cancel</button>
</div>
Modify EditComponent to import model and service classes and to use the SearchService to get data.
import { Component, OnInit, OnDestroy } from '@angular/core';
import { Person, SearchService } from '../shared';
import { Subscription } from 'rxjs';
import { ActivatedRoute, Router } from '@angular/router';

@Component({
  selector: 'app-edit',
  templateUrl: './edit.component.html',
  styleUrls: ['./edit.component.css']
})
export class EditComponent implements OnInit, OnDestroy {
  person!: Person;
  sub!: Subscription;

  constructor(private route: ActivatedRoute,
              private router: Router,
              private service: SearchService) {
  }

  async ngOnInit(): Promise<void> {
    const params = this.route.snapshot.params;
    const id = +params['id']; // (+) converts string 'id' to a number
    this.sub = this.service.get(id).subscribe(person => {
      if (person) {
        this.person = person;
      } else {
        this.gotoList();
      }
    });
  }

  ngOnDestroy(): void {
    if (this.sub) {
      this.sub.unsubscribe();
    }
  }

  async cancel() {
    await this.router.navigate(['/search']);
  }

  async save() {
    this.service.save(this.person);
    await this.gotoList();
  }

  async gotoList() {
    if (this.person) {
      await this.router.navigate(['/search', {term: this.person.name}]);
    } else {
      await this.router.navigate(['/search']);
    }
  }
}
Modify SearchService to contain functions for finding a person by their id and saving them. While you’re in there, modify the search() method to be aware of updated objects in localStorage.
search(q: string): Observable<Person[]> {
  if (!q || q === '*') {
    q = '';
  } else {
    q = q.toLowerCase();
  }
  return this.getAll().pipe(
    map((data: Person[]) => data
      .map((item: Person) => !!localStorage['person' + item.id] ?
        JSON.parse(localStorage['person' + item.id]) : item)
      .filter((item: Person) => JSON.stringify(item).toLowerCase().includes(q))
    ));
}

get(id: number): Observable<Person> {
  return this.getAll().pipe(map((all: Person[]) => {
    if (localStorage['person' + id]) {
      return JSON.parse(localStorage['person' + id]);
    }
    return all.find((e: Person) => e.id === id);
  }));
}

save(person: Person) {
  localStorage['person' + person.id] = JSON.stringify(person);
}
You can add CSS to src/app/edit/edit.component.css to make the form look a bit better.
:host {
  display: block;
  padding: 0 20px;
}

button {
  margin-top: 10px;
}
At this point, you should be able to search for a person and update their information.
The <form> in src/app/edit/edit.component.html calls a save() function to update a person’s data. You already implemented this above. The function calls a gotoList() function that appends the person’s name to the URL when sending the user back to the search screen.
async gotoList() {
  if (this.person) {
    await this.router.navigate(['/search', {term: this.person.name}]);
  } else {
    await this.router.navigate(['/search']);
  }
}
Since the SearchComponent doesn’t execute a search automatically when you execute this URL, add the following logic to do so in its ngOnInit() method.
import { ActivatedRoute } from '@angular/router';
...

  constructor(private searchService: SearchService, private route: ActivatedRoute) { }

  ngOnInit(): void {
    const params = this.route.snapshot.params;
    if (params['term']) {
      this.query = decodeURIComponent(params['term']);
      this.search();
    }
  }
After making all these changes, you should be able to search/edit/update a person’s information. If it works—nice job!
Add Form Validation
You might notice that you can clear any input element in the form and save it. At the very least, the name field should be required. Otherwise, there’s nothing to click on in the search results.
To make the name field required, modify edit.component.html to add a required attribute to the name <input> and bind it to Angular’s validation with #name="ngModel". Add a <div> next to the field to display an error message when validation fails.
<input [(ngModel)]="person.name" name="name" id="name" placeholder="Name" required #name="ngModel"/>
<div [hidden]="name.valid || name.pristine" style="color: red">
  Name is required
</div>
You’ll also need to wrap everything in a <form> element. Add <form> after the <h3> tag and close it before the last </div>. You’ll also need to add an (ngSubmit) handler to the form, give it the name of editForm, and change the save button to be a regular submit button that’s disabled when the form is invalid.
<h3>{{person.name}}</h3>
<form (ngSubmit)="save()" #editForm="ngForm">
...
<button type="submit" id="save" [disabled]="!editForm.form.valid">Save</button>
<button (click)="cancel()" id="cancel">Cancel</button>
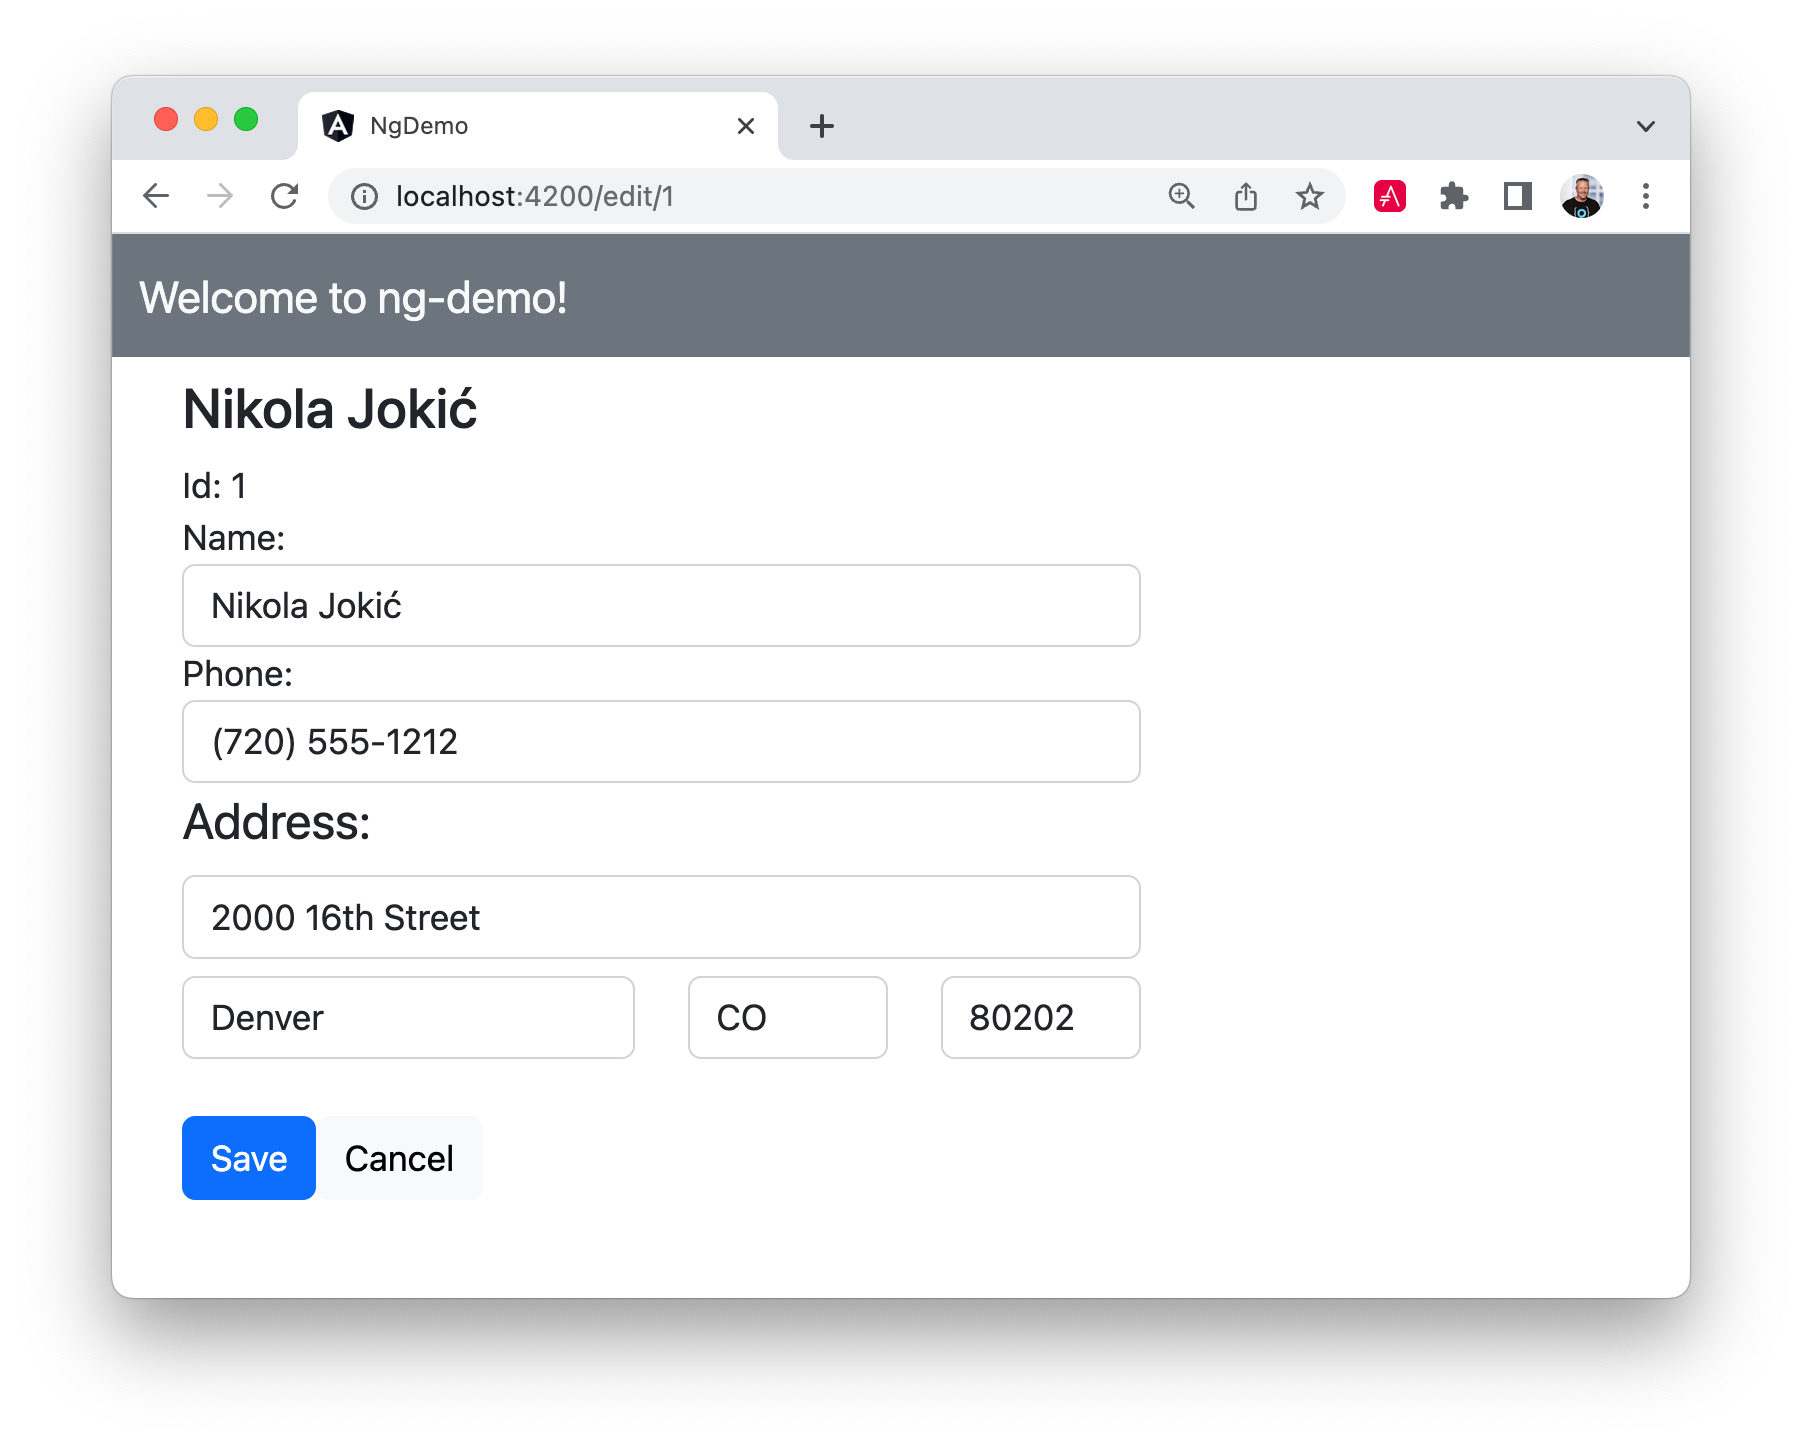
</form>After making these changes, the name field will be required.
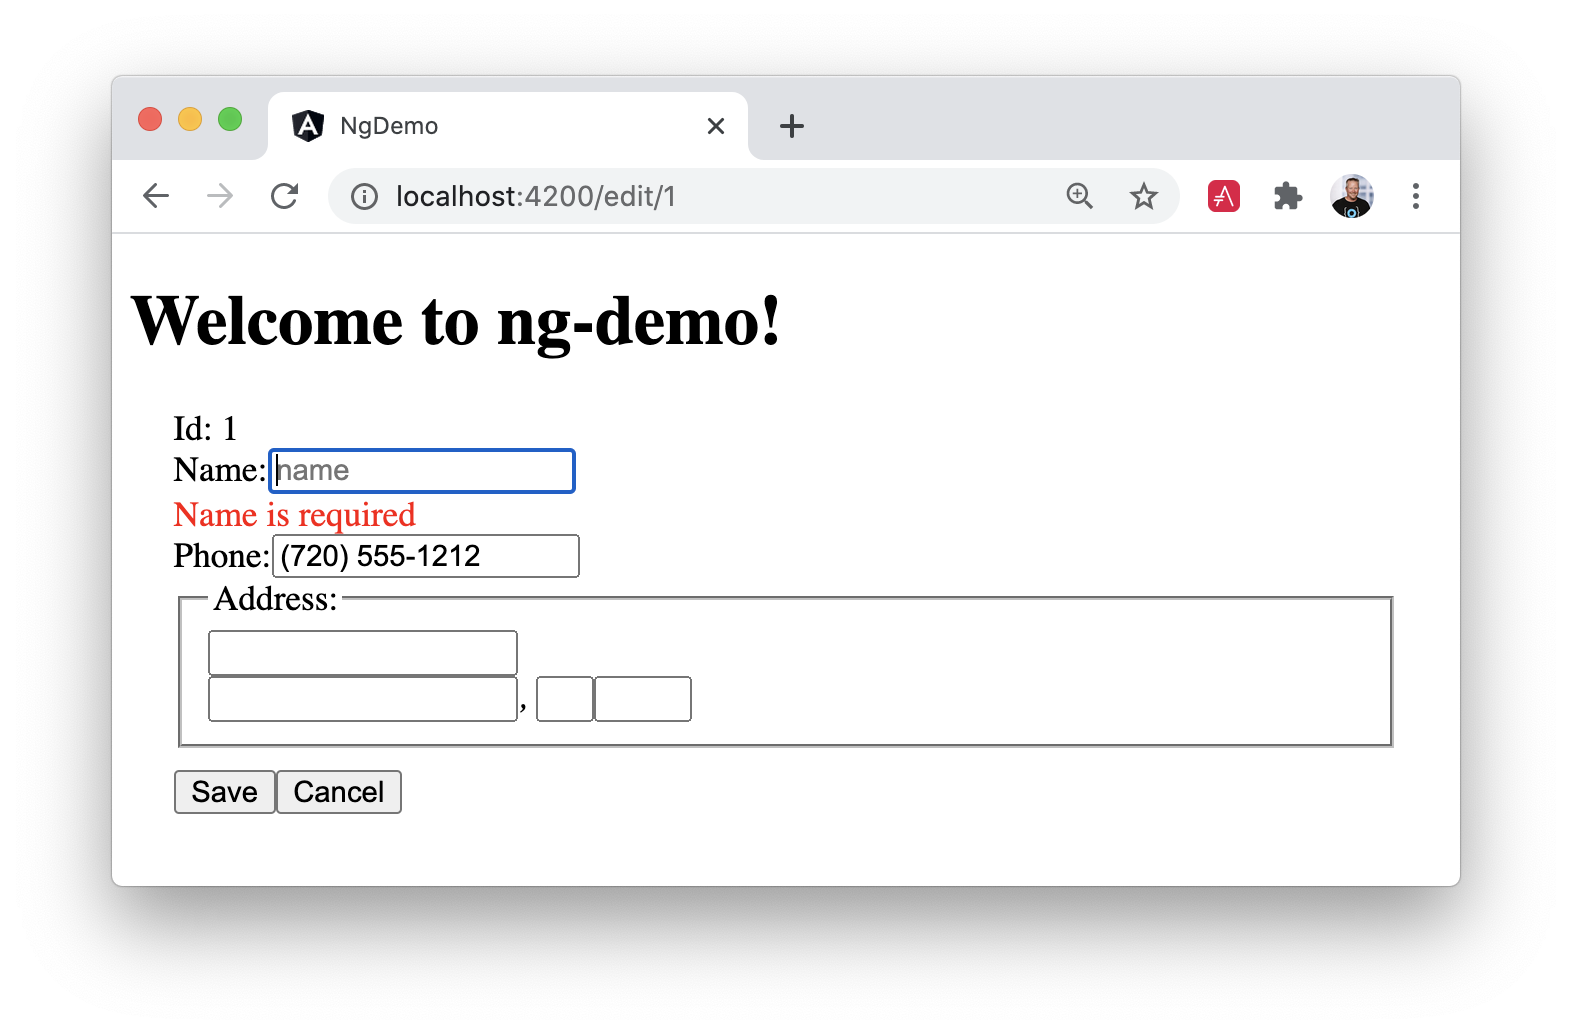
In this screenshot you might notice the address fields are blank, and the save button is enabled. The error in your console explains this.
If ngModel is used within a form tag, either the name attribute must be set or the form control must be defined as 'standalone' in ngModelOptions.

Example 1: <input [(ngModel)]="person.firstName" name="first">
Example 2: <input [(ngModel)]="person.firstName" [ngModelOptions]="{standalone: true}">
To fix this, add a name attribute to all the address fields. For example:
<address>
<input [(ngModel)]="person.address.street" name="street" id="street"><br/>
<input [(ngModel)]="person.address.city" name="city" id="city">,
<input [(ngModel)]="person.address.state" name="state" id="state" size="2">
<input [(ngModel)]="person.address.zip" name="zip" id="zip" size="5">
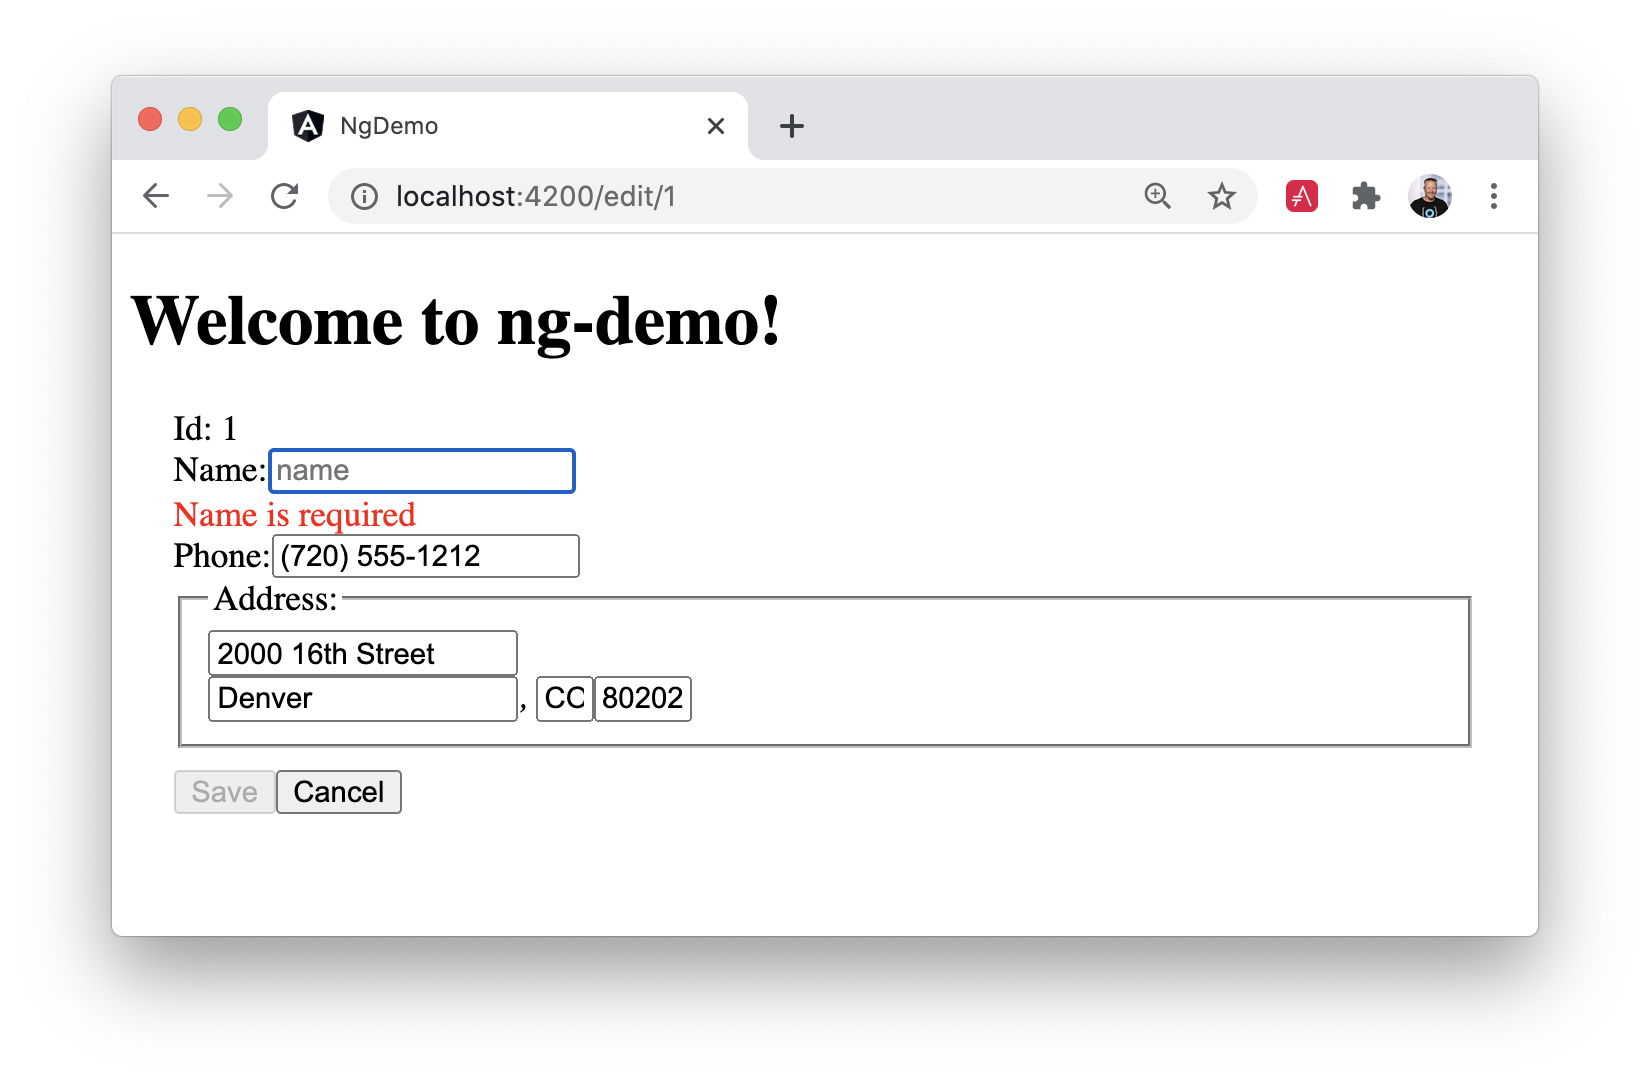
</address>Now values display in all fields, name is required, and save is disabled when the form is invalid.
To learn more about forms and validation, see Angular’s Validating form input documentation.
Unit and End-to-End Testing
Now that you’ve built an application, it’s important to test it to ensure it works. The best reason for writing tests is to automate your testing. Without tests, you’ll likely be testing manually. This manual testing will take longer and longer as your application grows.
In this section, you’ll learn to use Jasmine for unit testing controllers and Cypress for integration testing.
Fix the Tests
If you run ng test, you’ll likely get failures for the components and service you created. These failures will be solved as you complete the section below. The ng test command will start a process that listens for changes, so all you need to do is edit/save files, and tests will be automatically run again.
You can use x and f prefixes before describe and it functions to exclude or only run a particular test.
|
Fix the AppComponent test
If you changed the app.component.html template as I did, you’ll need to modify app.component.spec.ts to account for the change in HTML. Change its last test to look for an <h1> element and the welcome message inside it.
it('should render title', () => {
  const fixture = TestBed.createComponent(AppComponent);
  fixture.detectChanges();
  const compiled = fixture.nativeElement as HTMLElement;
  expect(compiled.querySelector('h1')?.textContent)
    .toContain('Welcome to ng-demo!');
});
Now this test should pass.
Unit test the SearchService
Modify search.service.spec.ts and set up the test’s infrastructure (a.k.a. TestBed) using HttpClientTestingModule and HttpTestingController.
import { TestBed } from '@angular/core/testing';
import { SearchService } from './search.service';
import { HttpClientTestingModule, HttpTestingController } from '@angular/common/http/testing';

describe('SearchService', () => {
  let service: SearchService;
  let httpMock: HttpTestingController;

  beforeEach(async () => {
    await TestBed.configureTestingModule({
      imports: [HttpClientTestingModule],
      providers: [SearchService]
    });

    service = TestBed.inject(SearchService);
    httpMock = TestBed.inject(HttpTestingController);
  });

  it('should be created', () => {
    expect(service).toBeTruthy();
  });
});
Now, you will likely see some errors about the test stubs that Angular CLI created for you. You can ignore these for now.
NullInjectorError: R3InjectorError(DynamicTestModule)[SearchService -> HttpClient -> HttpClient]:
  NullInjectorError: No provider for HttpClient!

NullInjectorError: R3InjectorError(DynamicTestModule)[ActivatedRoute -> ActivatedRoute]:
  NullInjectorError: No provider for ActivatedRoute!
HttpTestingController allows you to mock requests and use its flush() method to provide response values. Since the HTTP request methods return an Observable, you can subscribe to it and create expectations in the callback methods. Add the first test of getAll() to search.service.spec.ts.
The test below should be on the same level as beforeEach. Passing the done function into the test ensures the test doesn’t complete and exit before all the asserts are run.
it('should retrieve all search results', (done) => {
  const mockResponse = [
    {name: 'Nikola Jokić'},
    {name: 'Mike Malone'}
  ];

  service.getAll().subscribe((people: any) => {
    expect(people.length).toBe(2);
    expect(people[0].name).toBe('Nikola Jokić');
    expect(people).toEqual(mockResponse);
    done();
  });

  const req = httpMock.expectOne('assets/data/people.json');
  expect(req.request.method).toBe('GET');
  req.flush(mockResponse);
});
While you’re there, add an afterEach() to verify requests.
afterEach(() => {
  httpMock.verify();
});
Add a couple more tests for filtering by search term and fetching by id.
it('should filter by search term', (done) => {
  const mockResponse = [{name: 'Nikola Jokić'}];

  service.search('nik').subscribe((people: any) => {
    expect(people.length).toBe(1);
    expect(people[0].name).toBe('Nikola Jokić');
    done();
  });

  const req = httpMock.expectOne('assets/data/people.json');
  expect(req.request.method).toBe('GET');
  req.flush(mockResponse);
});

it('should fetch by id', (done) => {
  const mockResponse = [
    {id: 1, name: 'Nikola Jokić'},
    {id: 2, name: 'Mike Malone'}
  ];

  service.get(2).subscribe((person: any) => {
    expect(person.name).toBe('Mike Malone');
    done();
  });

  const req = httpMock.expectOne('assets/data/people.json');
  expect(req.request.method).toBe('GET');
  req.flush(mockResponse);
});
Unit test the SearchComponent
To unit test the SearchComponent, you can mock the methods in SearchService with spies. These allow you to spy on functions to check if they were called.
You can use TestBed.configureTestingModule() to set up ActivatedRoute to have a specific parameter. In the second beforeEach(), you can see that the search() method is spied on, and its results are mocked. The response isn’t important in this case because you’re just unit testing the SearchComponent.
import { ComponentFixture, TestBed } from '@angular/core/testing';
import { SearchComponent } from './search.component';
import { SearchService } from '../shared';
import { ActivatedRoute } from '@angular/router';
import { RouterTestingModule } from '@angular/router/testing';
import { FormsModule } from '@angular/forms';
import { of } from 'rxjs';
import { HttpClientTestingModule } from '@angular/common/http/testing';

describe('SearchComponent', () => {
  let component: SearchComponent;
  let fixture: ComponentFixture<SearchComponent>;
  let mockSearchService: SearchService;

  beforeEach(async () => {
    await TestBed.configureTestingModule({
      declarations: [SearchComponent],
      providers: [
        {
          provide: ActivatedRoute,
          useValue: {
            snapshot: {
              params: {term: 'nikola'}
            }
          }
        }
      ],
      imports: [FormsModule, RouterTestingModule, HttpClientTestingModule]
    }).compileComponents();
  });

  beforeEach(() => {
    // mock response
    mockSearchService = TestBed.inject(SearchService);
    mockSearchService.search = jasmine.createSpy().and.returnValue(of([]));

    // initialize component
    fixture = TestBed.createComponent(SearchComponent);
    component = fixture.componentInstance;
    fixture.detectChanges();
  });

  it('should create', () => {
    expect(component).toBeTruthy();
  });
});
Add two tests, one to verify a search term is used when it’s set on the component, and a second to verify search is called when a term is passed in as a route parameter.
it('should search when a term is set and search() is called', () => {
  component = fixture.componentInstance;
  component.query = 'J';
  component.search();
  expect(mockSearchService.search).toHaveBeenCalledWith('J');
});

it('should search automatically when a term is on the URL', () => {
  fixture.detectChanges();
  expect(mockSearchService.search).toHaveBeenCalledWith('nikola');
});
Update the test for EditComponent, verifying fetching a single record works. Notice how you can access the component directly with fixture.componentInstance, or its rendered version with fixture.nativeElement.
import { EditComponent } from './edit.component';
import { TestBed } from '@angular/core/testing';
import { Address, Person, SearchService } from '../shared';
import { ActivatedRoute } from '@angular/router';
import { FormsModule } from '@angular/forms';
import { of } from 'rxjs';
import { HttpClientTestingModule } from '@angular/common/http/testing';

describe('EditComponent', () => {
  let mockSearchService: SearchService;

  beforeEach(async () => {
    await TestBed.configureTestingModule({
      declarations: [EditComponent],
      providers: [
        {
          provide: ActivatedRoute,
          useValue: {
            snapshot: {
              params: {id: 1}
            }
          }
        }
      ],
      imports: [FormsModule, HttpClientTestingModule]
    }).compileComponents();

    mockSearchService = TestBed.inject(SearchService);
  });

  it('should fetch a single record', () => {
    const fixture = TestBed.createComponent(EditComponent);

    const person = new Person({id: 1, name: 'Michael Porter Jr.'});
    person.address = new Address({city: 'Denver'});

    // mock response
    spyOn(mockSearchService, 'get').and.returnValue(of(person));

    // initialize component
    fixture.detectChanges();

    // verify service was called
    expect(mockSearchService.get).toHaveBeenCalledWith(1);

    // verify data was set on component when initialized
    const editComponent = fixture.componentInstance;
    expect(editComponent.person.address.city).toBe('Denver');

    // verify HTML renders as expected
    const compiled = fixture.nativeElement;
    expect(compiled.querySelector('h3').innerHTML)
      .toBe('Michael Porter Jr.');
  });
});
You should see "`Executed 11 of 11 SUCCESS" in the shell window that’s running ng test. If you don’t, try canceling the command and restarting.
Integration test the search UI
To test if the application works end-to-end, you can write tests with Cypress. These are also known as integration tests since they test the integration between all application layers.
If you’re an experienced Angular developer, you might be wondering, “What happened to Protractor?” Protractor support was removed in Angular 12, and other options such as Cypress, WebdriverIO, and TestCafe are being considered for future versions.
| If you’re experienced with Protractor, see Migrating from Protractor to Cypress. |
To add Cypress to your Angular project, you can use the official Cypress Angular Schematic.
ng add @cypress/schematic
When prompted to proceed and use Cypress for ng e2e, answer “Yes”.
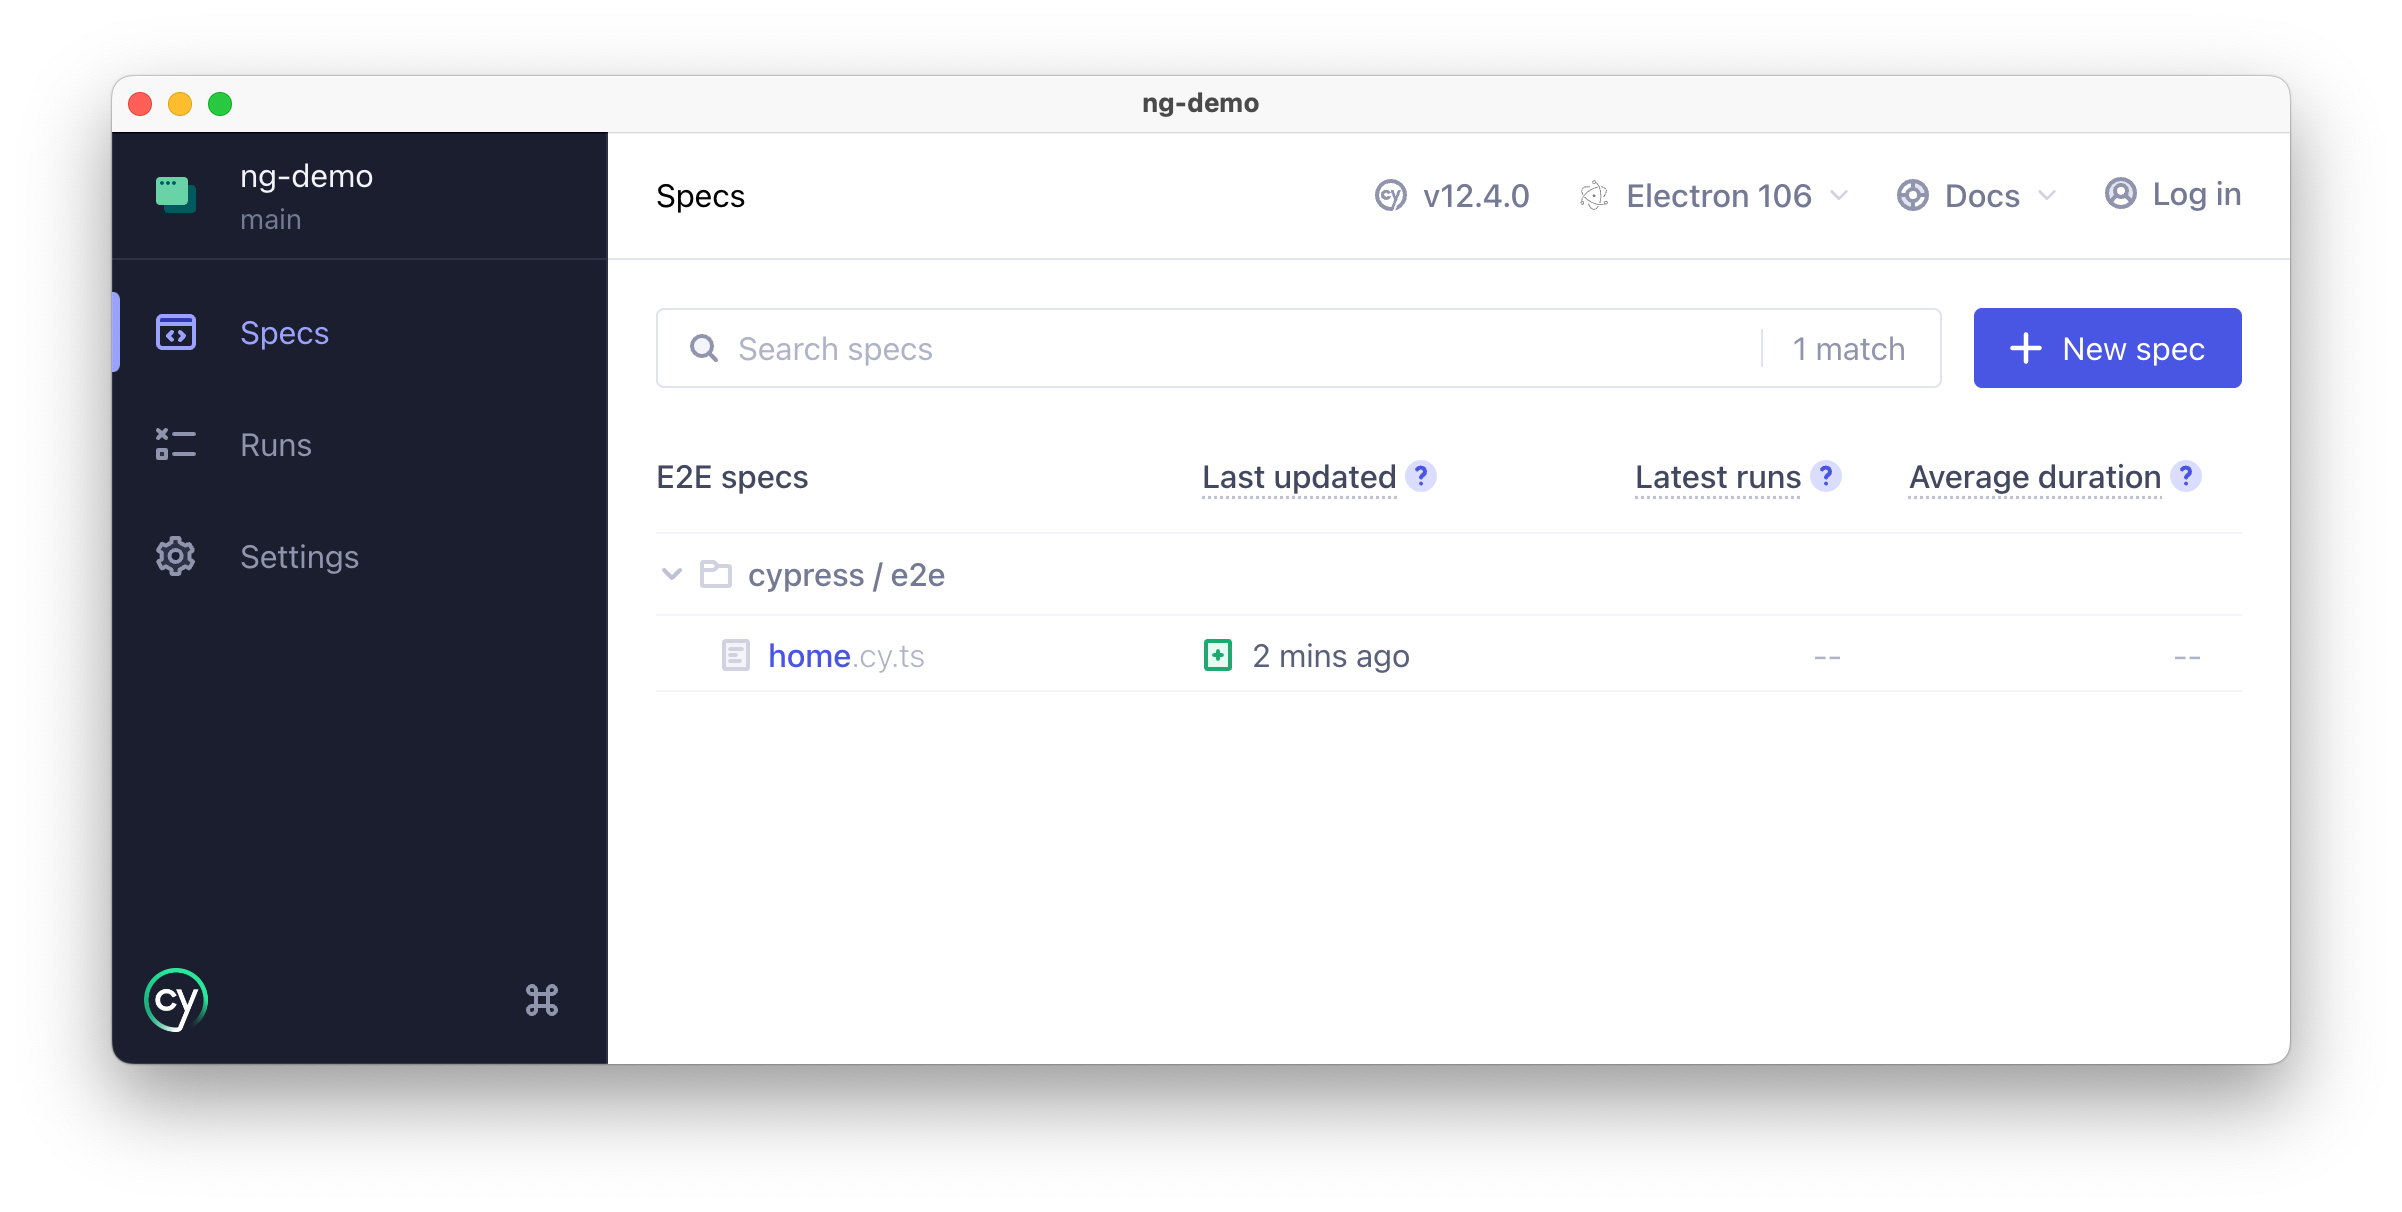
This will add Cypress as a dependency and create configuration files to work with Angular and TypeScript. Rename cypress/e2e/spec.cy.ts to home.cy.ts and change it to look for the title of your app.
describe('Home', () => {
  it('Visits the initial project page', () => {
    cy.visit('/')
    cy.contains('Welcome to ng-demo!')
    cy.contains('Search')
  })
})
Then, run ng e2e. This will compile your app, start it on http://localhost:4200, and launch the Cypress Electron app.
If you click on the file name, it’ll launch a browser and run the test. You can use this feature to step through your tests, find selectors for elements, and much more. You can learn more about Cypress' features at Setting up Cypress for an Angular Project.
I prefer the Protractor experience, where you could just run the command, it would run all the tests, and the user doesn’t need to interact. You can do this with Cypress too!
The Cypress Angular Schematic added a few scripts to your package.json:
"scripts": {
  ...
  "e2e": "ng e2e",
  "cypress:open": "cypress open",
  "cypress:run": "cypress run"
}
To use the no-interaction approach, you’ll need to start your app:
npm start
Then, run the Cypress tests for it in another window:
npm run cypress:run
|
You might notice Cypress creates a video. You can disable this by adding |
The npm run cypress:run command will run a headless browser so that you won’t see anything happening on your screen.
If you want to see the tests run, append -- --browser chrome --headed to the command. Add this to your package.json if you want to make it the default. See Cypress' launching browsers documentation for a list of supported browsers.
You can also install concurrently to run multiple tasks with one command.
npm install -D concurrentlyThen, add a cy:run script to your package.json:
"scripts": {
  ...
  "cy:run": "concurrently \"ng serve\" \"cypress run\""
}
Then, you can run npm run cy:run to start your app and continuously run end-to-end tests on it when you change files.
Testing the search feature
Create another end-to-end test in cypress/e2e/search.cy.ts to verify the search feature works. Populate it with the following code:
describe('Search', () => {

  beforeEach(() => {
    cy.visit('/search')
  });

  it('should have an input and search button', () => {
    cy.get('app-root app-search form input').should('exist');
    cy.get('app-root app-search form button').should('exist');
  });

  it('should allow searching', () => {
    cy.get('input').type('A');
    cy.get('button').click();
    const list = cy.get('app-search table tbody tr');
    list.should('have.length', 3);
  });
});
Testing the edit feature
Create a cypress/e2e/edit.cy.ts test to verify the EditComponent renders a person’s information and that their information can be updated.
describe('Edit', () => {
beforeEach(() => {
cy.visit('/edit/1')
});
it('should allow viewing a person', () => {
cy.get('h3').should('have.text', 'Nikola Jokić');
cy.get('#name').should('have.value', 'Nikola Jokić');
cy.get('#street').should('have.value', '2000 16th Street');
cy.get('#city').should('have.value', 'Denver');
});
it('should allow updating a name', () => {
cy.get('#name').type(' Rocks!');
cy.get('#save').click();
// verify one element matched this change
const list = cy.get('app-search table tbody tr');
list.should('have.length', 1);
});
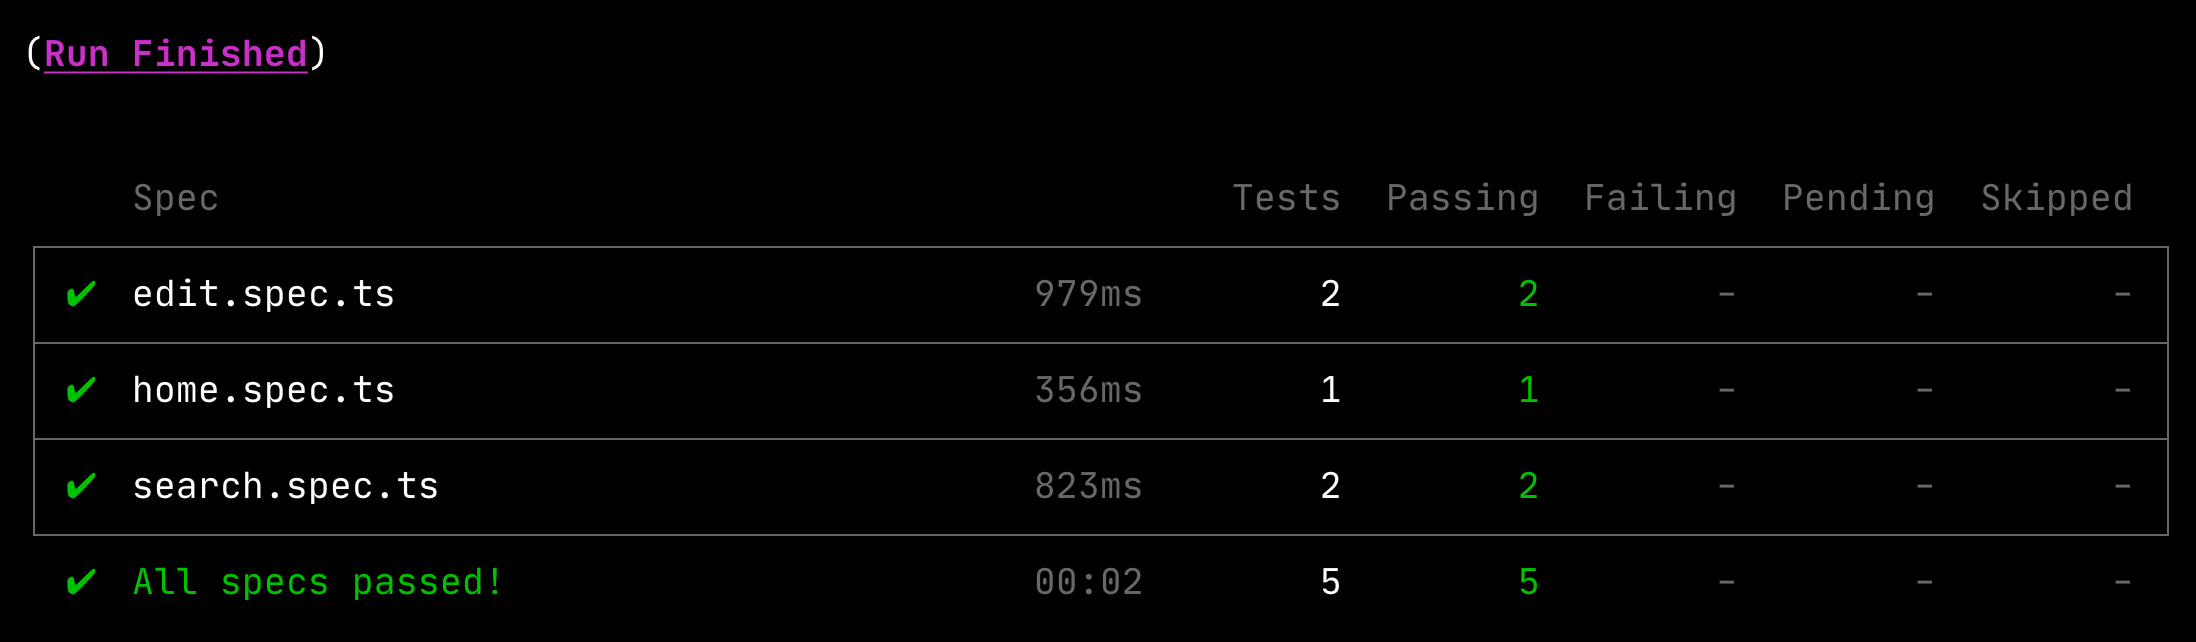
});With your app running, execute npm run cypress:run to verify all your end-to-end tests pass. You should see a success message similar to the one below in your terminal window.
If you made it this far and have all your specs passing—congratulations! You’re well on your way to writing quality code with Angular and verifying it works.
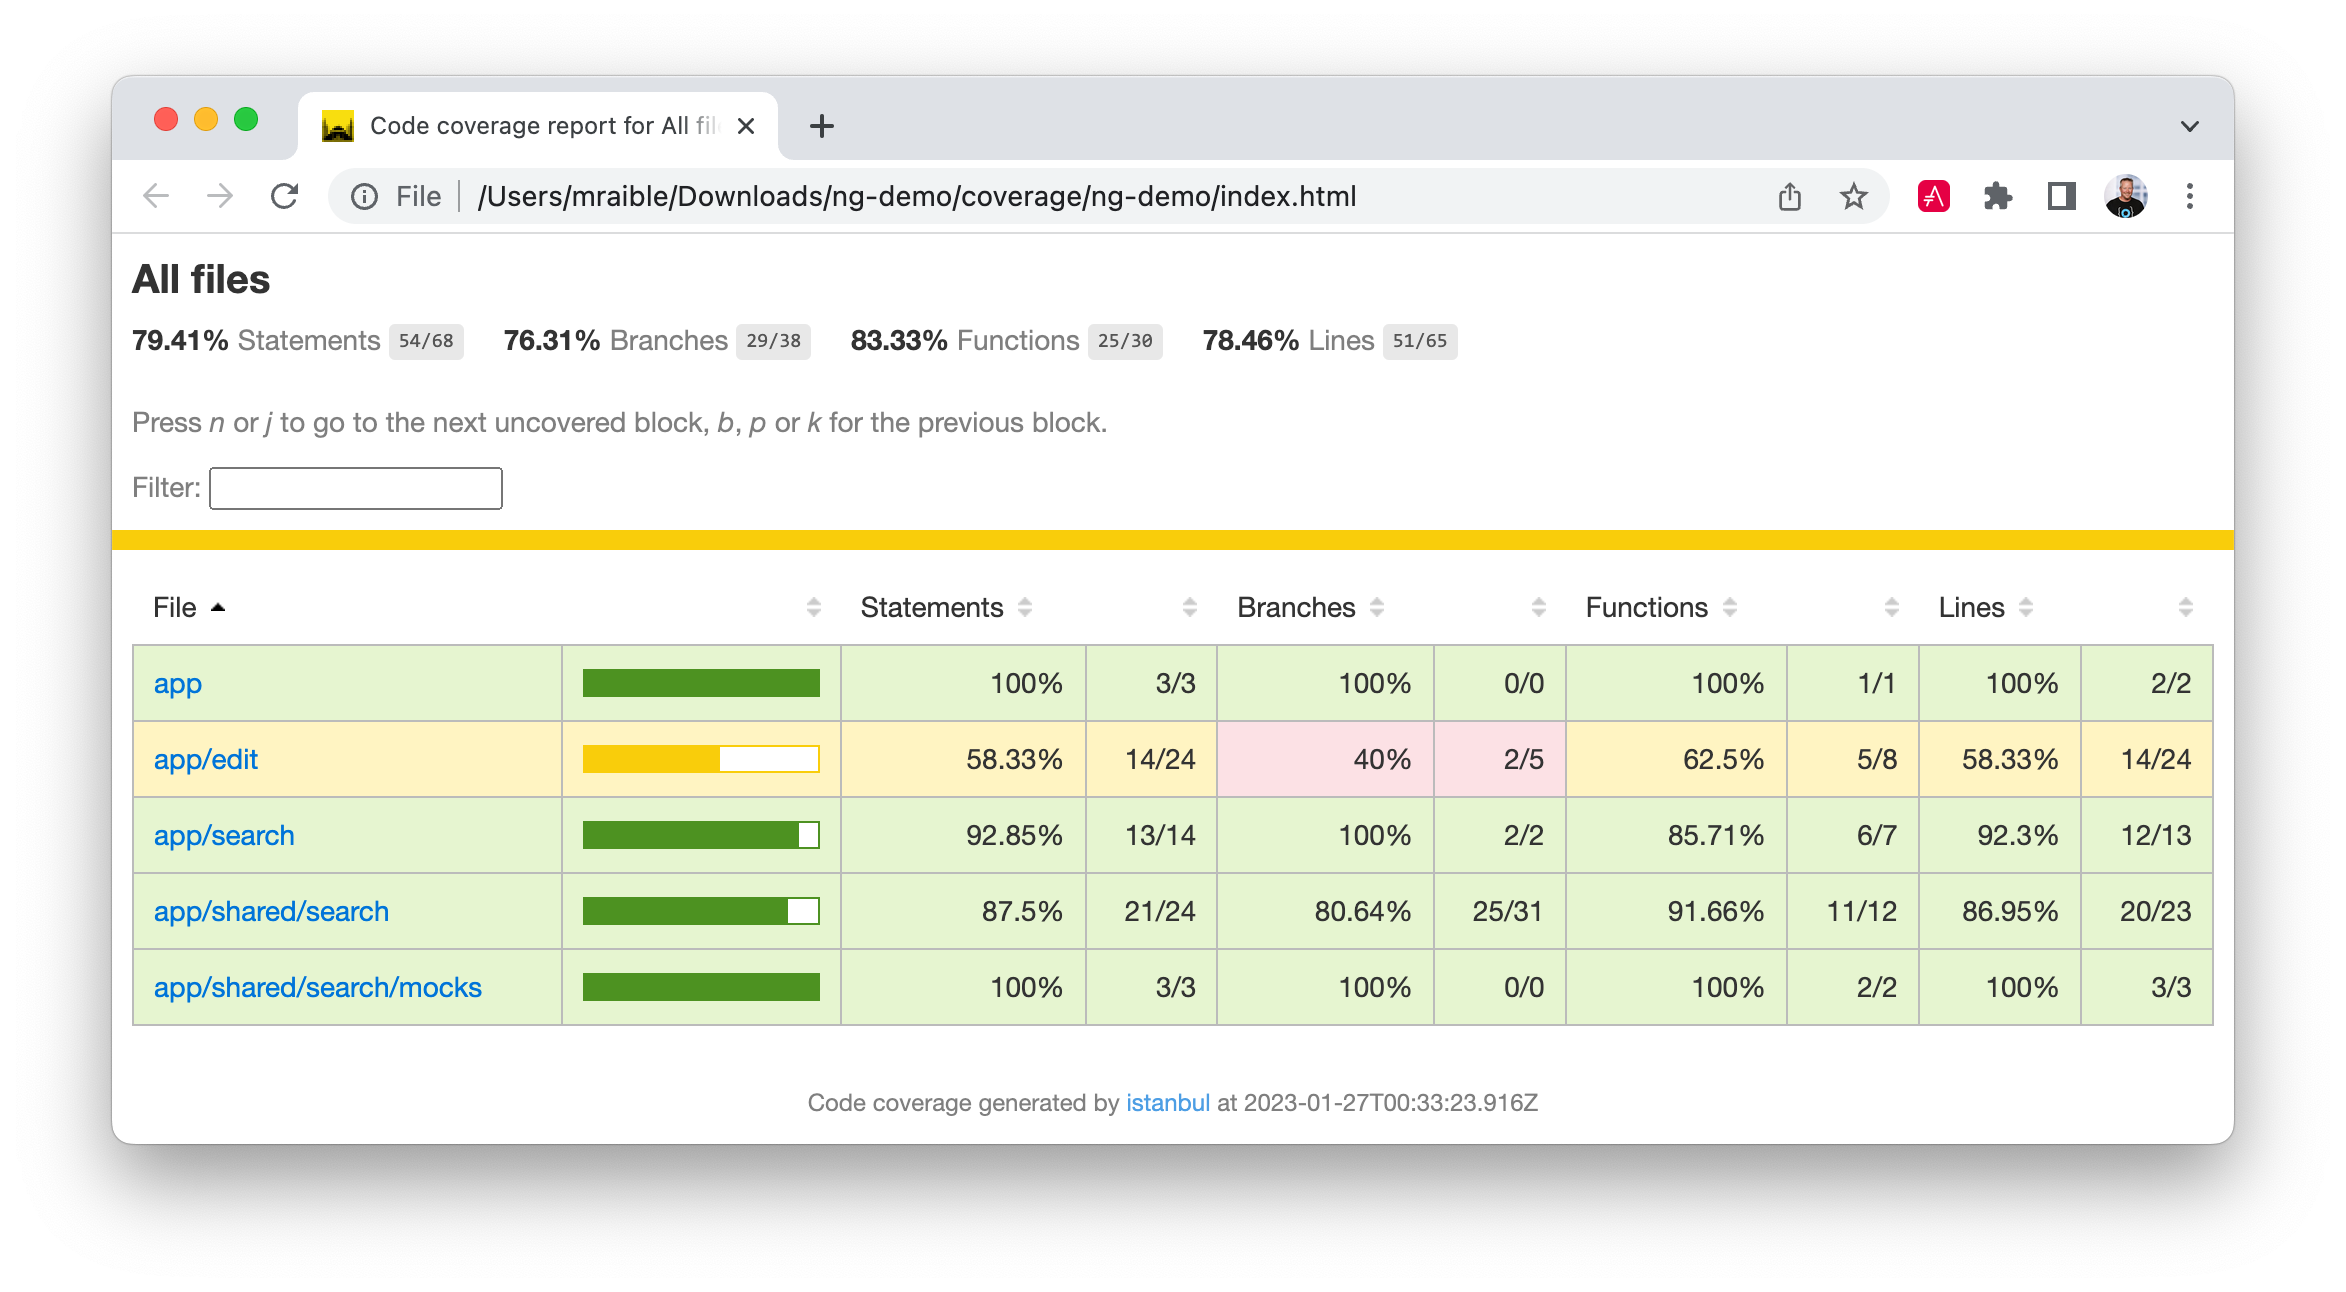
You can see the test coverage of your project by running ng test --no-watch --code-coverage.
You’ll see a printout of code coverage in your terminal window.
============================ Coverage summary ============================
Statements   : 79.41% ( 54/68 )
Branches     : 76.31% ( 29/38 )
Functions    : 83.33% ( 25/30 )
Lines        : 78.46% ( 51/65 )
==========================================================================
You can also open coverage/ng-demo/index.html in your browser. You might notice that the EditComponent could use some additional coverage.
Continuous Integration
At the time of this writing, Angular CLI had no continuous integration support. This section shows you how to set up continuous integration with GitHub Actions and Jenkins.
|
In the commands below, I use |
GitHub Actions
If you’ve checked your project into GitHub, you can use GitHub Actions.
Create a .github/workflows/main.yml file. Add the following YAML to it. This will run both unit tests and integration tests with Cypress.
name: Demo CI

on: [push, pull_request]

jobs:
  build:
    name: Build and Test
    runs-on: ubuntu-latest
    steps:
      - name: Checkout
        uses: actions/checkout@v3
      - name: Use Node 18
        uses: actions/setup-node@v3
        with:
          node-version: 18
      - name: Install latest Chrome
        run: |
          sudo apt update
          sudo apt --only-upgrade install google-chrome-stable
          google-chrome --version
      - name: Install dependencies
        run: npm ci
      - name: Run unit tests
        run: xvfb-run npm test -- --watch=false
      - name: Run integration tests
        uses: cypress-io/github-action@v5
        with:
          browser: chrome
          start: npm start
          install: false
          wait-on: http://[::1]:4200
See issue #634 for more information on the strange syntax for wait-on.
|
Check it in on a branch, create a pull request for that branch, and you should see your tests running.
Jenkins
If you’ve checked your project into source control, you can use Jenkins to automate testing.
-
Create a
Jenkinsfilein the root directory and commit/push it.node { def nodeHome = tool name: 'node-18', type: 'jenkins.plugins.nodejs.tools.NodeJSInstallation' env.PATH = "${nodeHome}/bin:${env.PATH}" stage('check tools') { sh "node -v" sh "npm -v" } stage('checkout') { checkout scm } stage('npm install') { sh "npm install" } stage('unit tests') { sh "npm test -- --watch=false" } stage('cypress tests') { sh "npm start &" sh "npm run cypress:run" } } -
Install Jenkins on your hard drive and start it:
java -jar jenkins.war
-
Log in to Jenkins at
http://localhost:8080and install the Node.js plugin. -
Go to Manage Jenkins > Global Tool Configuration > NodeJS. Install and configure the name of your Node.js installation to match your build script.
-
Create a new project with Dashboard > New Item > Pipeline > Pipeline script from SCM (near the bottom). Point it at your project’s repository and specify the
mainbranch. -
Click Save, then Build Now on the following screen.
Deployment to Heroku
This section shows how to deploy an Angular app to Heroku.
Create a Heroku account, install the heroku CLI, and run heroku login.
Run heroku create to create an app on Heroku.
Create a config/nginx.conf.erb file with the configuration for secure headers and redirect all HTTP requests to HTTPS.
daemon off;
# Heroku dynos have at least 4 cores.
worker_processes <%= ENV['NGINX_WORKERS'] || 4 %>;

events {
	use epoll;
	accept_mutex on;
	worker_connections <%= ENV['NGINX_WORKER_CONNECTIONS'] || 1024 %>;
}

http {
	gzip on;
	gzip_comp_level 2;
	gzip_min_length 512;
	gzip_proxied any; # Heroku router sends Via header

	server_tokens off;

	log_format l2met 'measure#nginx.service=$request_time request_id=$http_x_request_id';
	access_log <%= ENV['NGINX_ACCESS_LOG_PATH'] || 'logs/nginx/access.log' %> l2met;
	error_log <%= ENV['NGINX_ERROR_LOG_PATH'] || 'logs/nginx/error.log' %>;

	include mime.types;
	default_type application/octet-stream;
	sendfile on;

	# Must read the body in 5 seconds.
	client_body_timeout <%= ENV['NGINX_CLIENT_BODY_TIMEOUT'] || 5 %>;

	server {
		listen <%= ENV["PORT"] %>;
		server_name _;
		keepalive_timeout 5;
		client_max_body_size <%= ENV['NGINX_CLIENT_MAX_BODY_SIZE'] || 1 %>M;

		root dist/ng-demo;
		index index.html;

		location / {
			try_files $uri /index.html;
		}

		add_header Content-Security-Policy "default-src 'self'; script-src 'self' 'unsafe-eval'; style-src 'self' 'unsafe-inline'; img-src 'self' data:; font-src 'self' data:; frame-ancestors 'none'; connect-src 'self' https://*.auth0.com https://*.herokuapp.com";
		add_header Referrer-Policy "no-referrer, strict-origin-when-cross-origin";
		add_header Strict-Transport-Security "max-age=63072000; includeSubDomains";
		add_header X-Content-Type-Options nosniff;
		add_header X-Frame-Options DENY;
		add_header X-XSS-Protection "1; mode=block";
		add_header Permissions-Policy "geolocation=(self), microphone=(), accelerometer=(), camera=()";
	}
}| In this code, you might notice that some https URLs are allowed in the content security policy. Those are there so this app can make XHR requests to those domains when that functionality is added. |
For config/nginx.conf.erb to be read, you have to use the Heroku NGINX buildpack.
Add a Procfile to the root of your project.
web: bin/start-nginx-soloCommit your changes to Git, add the Node.js + NGINX buildpack, and redeploy your Angular app using git push.
git add .
git commit -m "Configure secure headers and nginx buildpack"
heroku buildpacks:add heroku/nodejs
heroku buildpacks:add heroku-community/nginx
git push heroku main
View the application in your browser with heroku open. Try your app’s URL on https://securityheaders.com to be pleasantly surprised.
You can watch your app’s logs using heroku logs --tail.
|
Styling with Bootstrap
To integrate Bootstrap and Bootstrap widgets into your Angular CLI-generated app, install NG Bootstrap.
ng add @ng-bootstrap/ng-bootstrap
This will install Bootstrap, NG Bootstrap, @angular/localize, and @popperjs/core. It will also configure Angular to use Bootstrap for CSS and import NgbModule in app.module.ts.
Then, change your HTML templates to use Bootstrap classes. For example, change app.component.html to be the following:
<nav class="navbar navbar-light bg-secondary">
  <div class="container-fluid">
    <a class="navbar-brand text-light" href="#">Welcome to {{ title }}!</a>
  </div>
</nav>
<div class="container-fluid">
  <router-outlet></router-outlet>
</div>
You’ll also need to change its test to look for nav instead of h1.
expect(compiled.querySelector('nav')?.textContent)
  .toContain('Welcome to ng-demo!');
Update search.component.html to add a top margin to the H2, put the form in a grid layout, and add classes to input/button/table elements.
<h2 class="mt-2">Search</h2>
<form class="row g-2">
  <div class="col-auto">
    <input type="search" name="query" [(ngModel)]="query" (keyup.enter)="search()"
           placeholder="Search" class="form-control ml-2 mr-2">
  </div>
  <div class="col-auto">
    <button type="button" (click)="search()" class="btn btn-primary">Search</button>
  </div>
</form>
<table *ngIf="searchResults?.length" class="table">
  <thead>
  <tr>
    <th>Name</th>
    <th>Phone</th>
    <th>Address</th>
  </tr>
  </thead>
  <tbody>
  <tr *ngFor="let person of searchResults; let i=index">
    <td><a [routerLink]="['/edit', person.id]">{{person.name}}</a></td>
    <td>{{person.phone}}</td>
    <td>{{person.address.street}}<br/>
      {{person.address.city}}, {{person.address.state}} {{person.address.zip}}
    </td>
  </tr>
  </tbody>
</table>
Make similar changes to edit.component.html:
<div *ngIf="person" class="col-8">
  <h3 class="mt-2">{{person.name}}</h3>
  <form (ngSubmit)="save()" #editForm="ngForm">
    <div>
      <label>Id:</label>
      {{person.id}}
    </div>
    <div class="form-group">
      <label for="name">Name:</label>
      <input [(ngModel)]="person.name" name="name" id="name" placeholder="Name" required class="form-control" #name="ngModel"
             [ngClass]="{'is-invalid': name.touched && name.invalid, 'is-valid': name.touched && name.valid}"/>
      <div [hidden]="name.valid || name.pristine" style="display: block" class="invalid-feedback">
        Name is required
      </div>
    </div>
    <div class="form-group">
      <label>Phone:</label>
      <input [(ngModel)]="person.phone" name="phone" id="phone" placeholder="Phone" class="form-control"/>
    </div>
    <fieldset class="form-group">
      <legend class="col-form-legend">Address:</legend>
      <address>
        <input [(ngModel)]="person.address.street" name="street" id="street" class="form-control mb-2">
        <div class="row">
          <div class="col-6">
            <input [(ngModel)]="person.address.city" name="city" id="city" class="form-control">
          </div>
          <div class="col-3">
            <input [(ngModel)]="person.address.state" name="state" id="state" size="2" class="form-control">
          </div>
          <div class="col-3">
            <input [(ngModel)]="person.address.zip" name="zip" id="zip" size="5" class="form-control">
          </div>
        </div>
      </address>
    </fieldset>
    <button type="submit" id="save" class="btn btn-primary" [disabled]="!editForm.form.valid">Save</button>
    <button (click)="cancel()" id="cancel" class="btn btn-light">Cancel</button>
  </form>
</div>
After modifying your templates, the edit screen will look as follows:
Styling with Angular Material
To integrate Angular Material into your Angular CLI-generated app, install Angular Material.
ng add @angular/material
When prompted for the theme, pick the one you prefer, using the links to preview them. Accept the defaults for the other questions.
Add the relevant Material modules as imports in app.module.ts:
import { MatButtonModule } from '@angular/material/button';
import { MatListModule } from '@angular/material/list';
import { MatInputModule } from '@angular/material/input';
import { MatIconModule } from '@angular/material/icon';
import { MatToolbarModule } from '@angular/material/toolbar';

@NgModule({
  ...
  imports: [
    ...
    MatButtonModule,
    MatIconModule,
    MatInputModule,
    MatListModule,
    MatToolbarModule
  ],
  ...
})
Then, change your HTML templates to use Material components. For example, change <h1> in app.component.html to <mat-toolbar>.
<mat-toolbar>Welcome to {{ title }}!</mat-toolbar>You’ll also need to change this component’s test to import Material modules and look for mat-toolbar instead of h1.
import { TestBed } from '@angular/core/testing';
import { MatListModule } from '@angular/material/list';
import { MatToolbarModule } from '@angular/material/toolbar';

describe('AppComponent', () => {
  beforeEach(async () => {
    await TestBed.configureTestingModule({
      imports: [
        RouterTestingModule,
        MatListModule,
        MatToolbarModule
      ],
      declarations: [
        AppComponent
      ],
    }).compileComponents();
  });

  ...
  it('should render title', () => {
     ...
     expect(compiled.querySelector('mat-toolbar')?.textContent)
       .toContain('Welcome to ng-demo!');
  });
}
Update search.component.html to use Material components.
<h2>Search</h2>
<form>
  <mat-form-field>
    <input matInput type="search" name="query" placeholder="Search"
           [(ngModel)]="query" (keyup.enter)="search()">
  </mat-form-field>
  <button mat-mini-fab (click)="search()"><mat-icon>search</mat-icon></button>
</form>
<mat-list *ngIf="searchResults?.length" flex>
  <mat-list-item *ngFor="let person of searchResults; let i=index">
    <div class="mat-list-item-text">
      <div mat-line><a [routerLink]="['/edit', person.id]">{{person.name}}</a></div>
      <div mat-line>{{person.phone}}</div>
      <div mat-line>{{person.address.street}}<br/>
        {{person.address.city}}, {{person.address.state}} {{person.address.zip}}</div>
    </div>
  </mat-list-item>
</mat-list>
Update this component’s test to be aware of these components.
import { NoopAnimationsModule } from '@angular/platform-browser/animations';
import { MatListModule } from '@angular/material/list';
import { MatIconModule } from '@angular/material/icon';
import { MatInputModule } from '@angular/material/input';

describe('SearchComponent', () => {
  ...
  beforeEach(async () => {
    ...

    await TestBed.configureTestingModule({
      ...
      imports: [FormsModule, RouterTestingModule, HttpClientTestingModule,
        MatListModule, MatIconModule, MatInputModule, NoopAnimationsModule]
    }).compileComponents();
  });

  ...
}
Replace the plain ol' HTML inputs in edit.component.html with Material components.
<div *ngIf="person">
  <h3>{{person.name}}</h3>
  <form (ngSubmit)="save()" #editForm="ngForm">
    <div>
      <label>Id:</label>
      {{person.id}}
    </div>
    <p>
      <mat-form-field>
        <input matInput [(ngModel)]="person.name" name="name" id="name" placeholder="Name" required/>
      </mat-form-field>
    </p>
    <p>
      <mat-form-field>
        <input matInput [(ngModel)]="person.phone" name="phone" id="phone" placeholder="Phone"/>
      </mat-form-field>
    </p>
    <table>
      <tr>
        <td>
          <mat-form-field>
            <input matInput placeholder="Address" [(ngModel)]="person.address.street" name="street" id="street">
          </mat-form-field>
        </td>
        <td>
          <mat-form-field>
            <input matInput placeholder="City" [(ngModel)]="person.address.city" name="city" id="city">
          </mat-form-field>
        </td>
      </tr>
      <tr>
        <td>
          <mat-form-field>
            <input matInput placeholder="State" #state [(ngModel)]="person.address.state" name="state" id="state" maxlength="2">
          </mat-form-field>
        </td>
        <td>
          <mat-form-field>
            <input matInput placeholder="Zip" #postalCode maxlength="5" [(ngModel)]="person.address.zip" name="zip" id="zip">
            <mat-hint align="end">{{postalCode.value.length}} / 5</mat-hint>
          </mat-form-field>
        </td>
      </tr>
    </table>

    <button mat-raised-button type="submit" color="primary" id="save"
            [disabled]="!editForm.form.valid">Save</button>
    <button mat-button (click)="cancel(); false" id="cancel">Cancel</button>
  </form>
</div>
And import modules used in its test.
import { MatInputModule } from '@angular/material/input';
import { NoopAnimationsModule } from '@angular/platform-browser/animations';
describe('EditComponent', () => {
...
beforeEach(async () => {
...
await TestBed.configureTestingModule({
...
imports: [FormsModule, HttpClientTestingModule, MatInputModule, NoopAnimationsModule]
}).compileComponents();
});
...
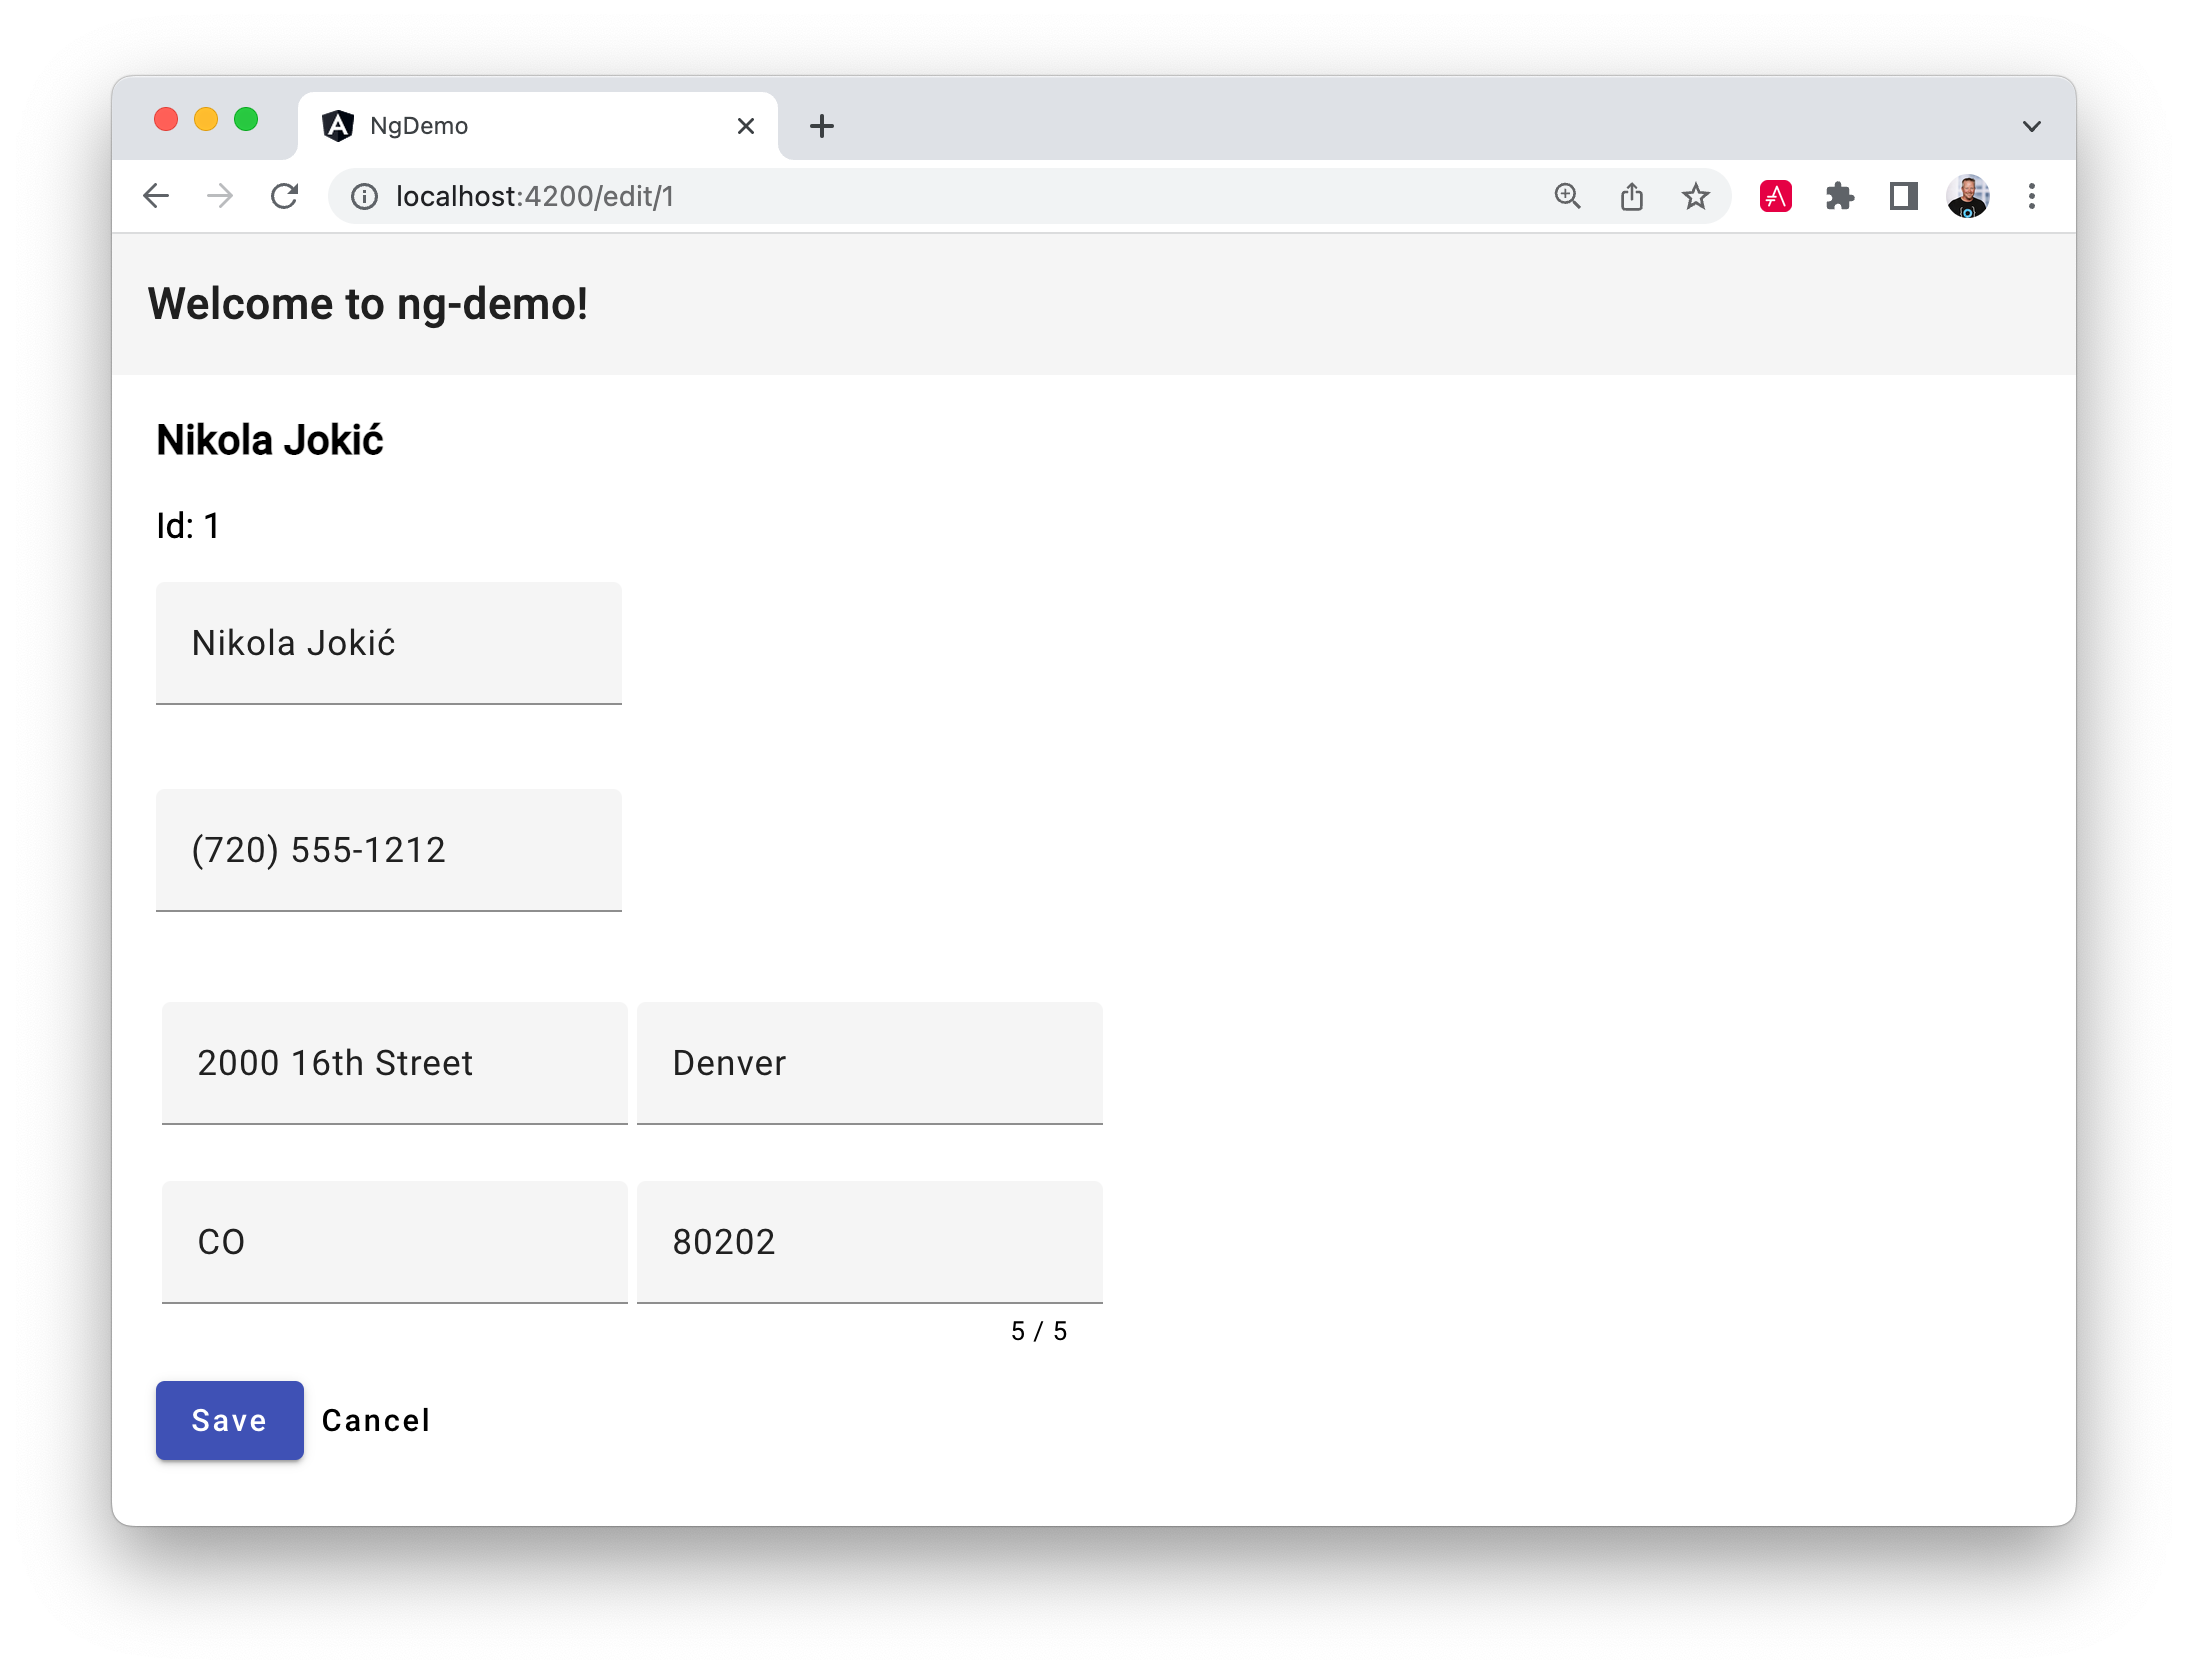
}After completing these changes, the edit screen will look as follows:
Run npm test to confirm your unit tests pass.
For Cypress tests, you must modify the list reference in search.spec.ts and edit.spec.ts to look for Material components instead of table rows.
const list = cy.get('app-search mat-list mat-list-item');Add Auth with OpenID Connect
To add authentication with OpenID Connect, you’ll first need a free Auth0 account. Install the Auth0 CLI and run auth0 login to register your account. Then, run auth0 apps create. Specify a name and description of your choosing. Choose Single Page Web Application and use http://localhost:4200/home for the Callback URL. Specify http://localhost:4200 for the rest of the URLs.
Add OIDC Authentication with OktaDev Schematics
Use OktaDev Schematics to add OAuth 2.0 and OpenID Connect (OIDC) support.
ng add @oktadev/schematics --auth0
You’ll be prompted for an issuer and client ID. You should have these from the OIDC app you just created.
This process will perform the following steps:
-
Install the Auth0 Angular SDK.
-
Add
src/app/auth-routing.module.tswith your OIDC configuration and initialization logic. -
Configure an
AuthHttpInterceptorthat adds anAuthorizationheader with an access token to outbound requests. -
Create a
HomeComponentand configure it with authentication logic. -
Update unit tests for
AppComponentandHomeComponentto mock Auth0.
In addition to these changes, remove the default route from app-routing.ts and add a route guard to the /search and /edit routes.
import { AuthGuard } from '@auth0/auth0-angular';

const routes: Routes = [
  { path: 'search', component: SearchComponent, canActivate: [AuthGuard] },
  { path: 'edit/:id', component: EditComponent, canActivate: [AuthGuard] }
];
This is necessary because the HomeComponent has a default route configured in src/app/auth-routing.ts. The AuthGuard makes authentication required.
const routes: Routes = [
  { path: '', redirectTo: '/home', pathMatch: 'full' },
  {
    path: 'home',
    component: HomeComponent
  }
];
You’ll also need to update the app.component.spec.ts file’s last test to look for the correct welcome message.
it('should render title', () => {
const fixture = TestBed.createComponent(AppComponent);
fixture.detectChanges();
const compiled = fixture.nativeElement as HTMLElement;
expect(compiled.querySelector('h1')?.textContent)
.toContain('Welcome to ng-demo!');
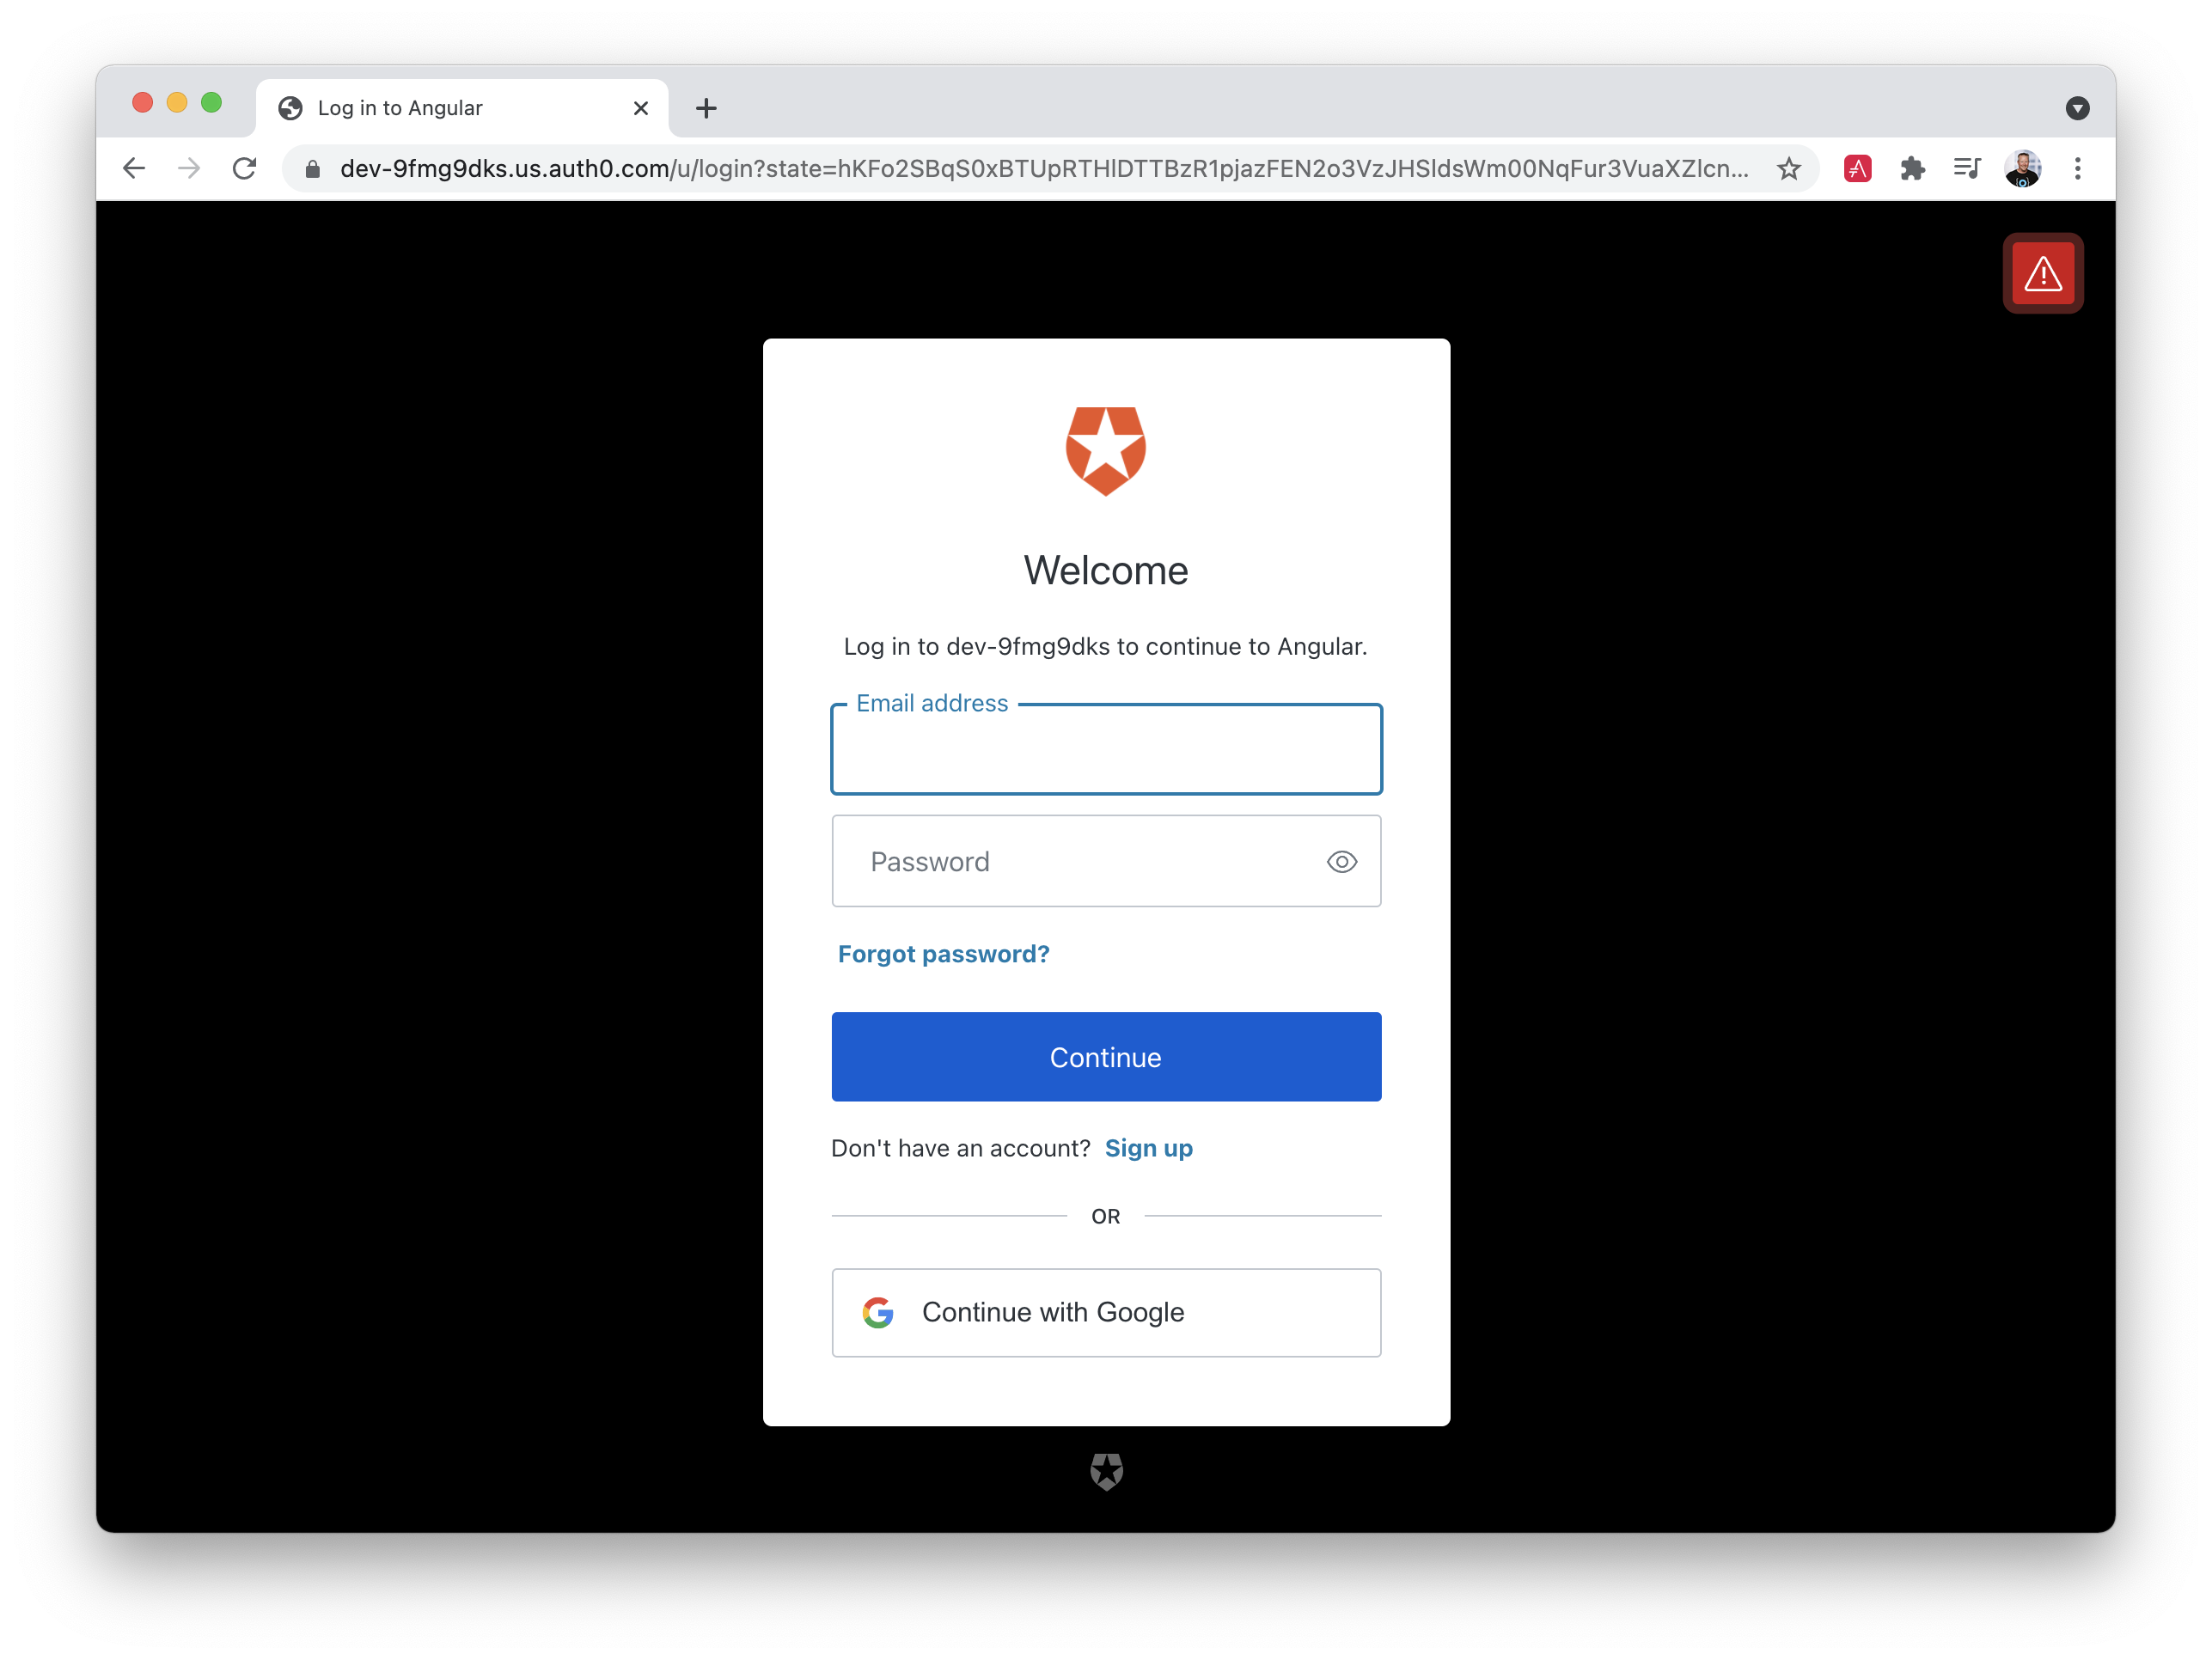
});After making these changes, you should be able to run ng serve and see a login button at http://localhost:4200/home.
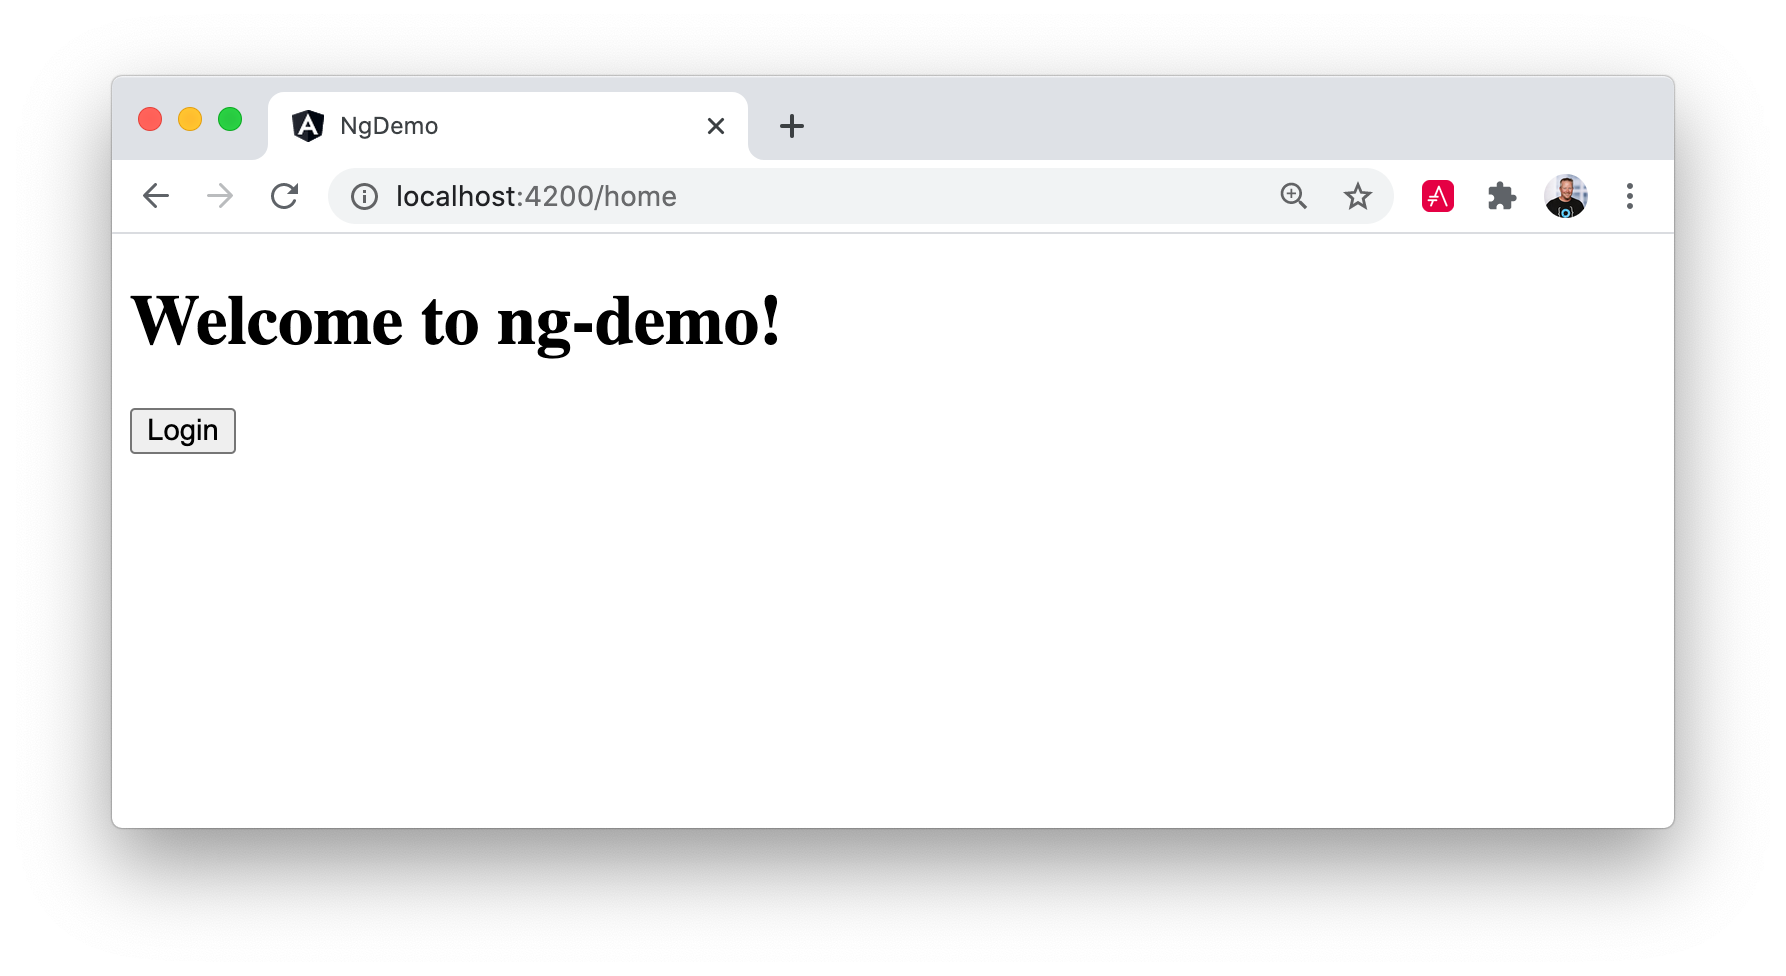
Click the Login button and sign in with one of the users that are configured in your Auth0 application or sign up as a new user.
Display Authenticated User’s Name
To display the authenticated user’s name, you can use the user$ observable on the AuthService instance.
Modify home.component.html to display a welcome message to the user and provide them with a link to search.
<ng-container *ngIf="(auth.isAuthenticated$ | async) === false; else signout">
<button (click)="login()" id="login">Login</button>
</ng-container>
<ng-template #signout>
<div *ngIf="auth.user$ | async as user">
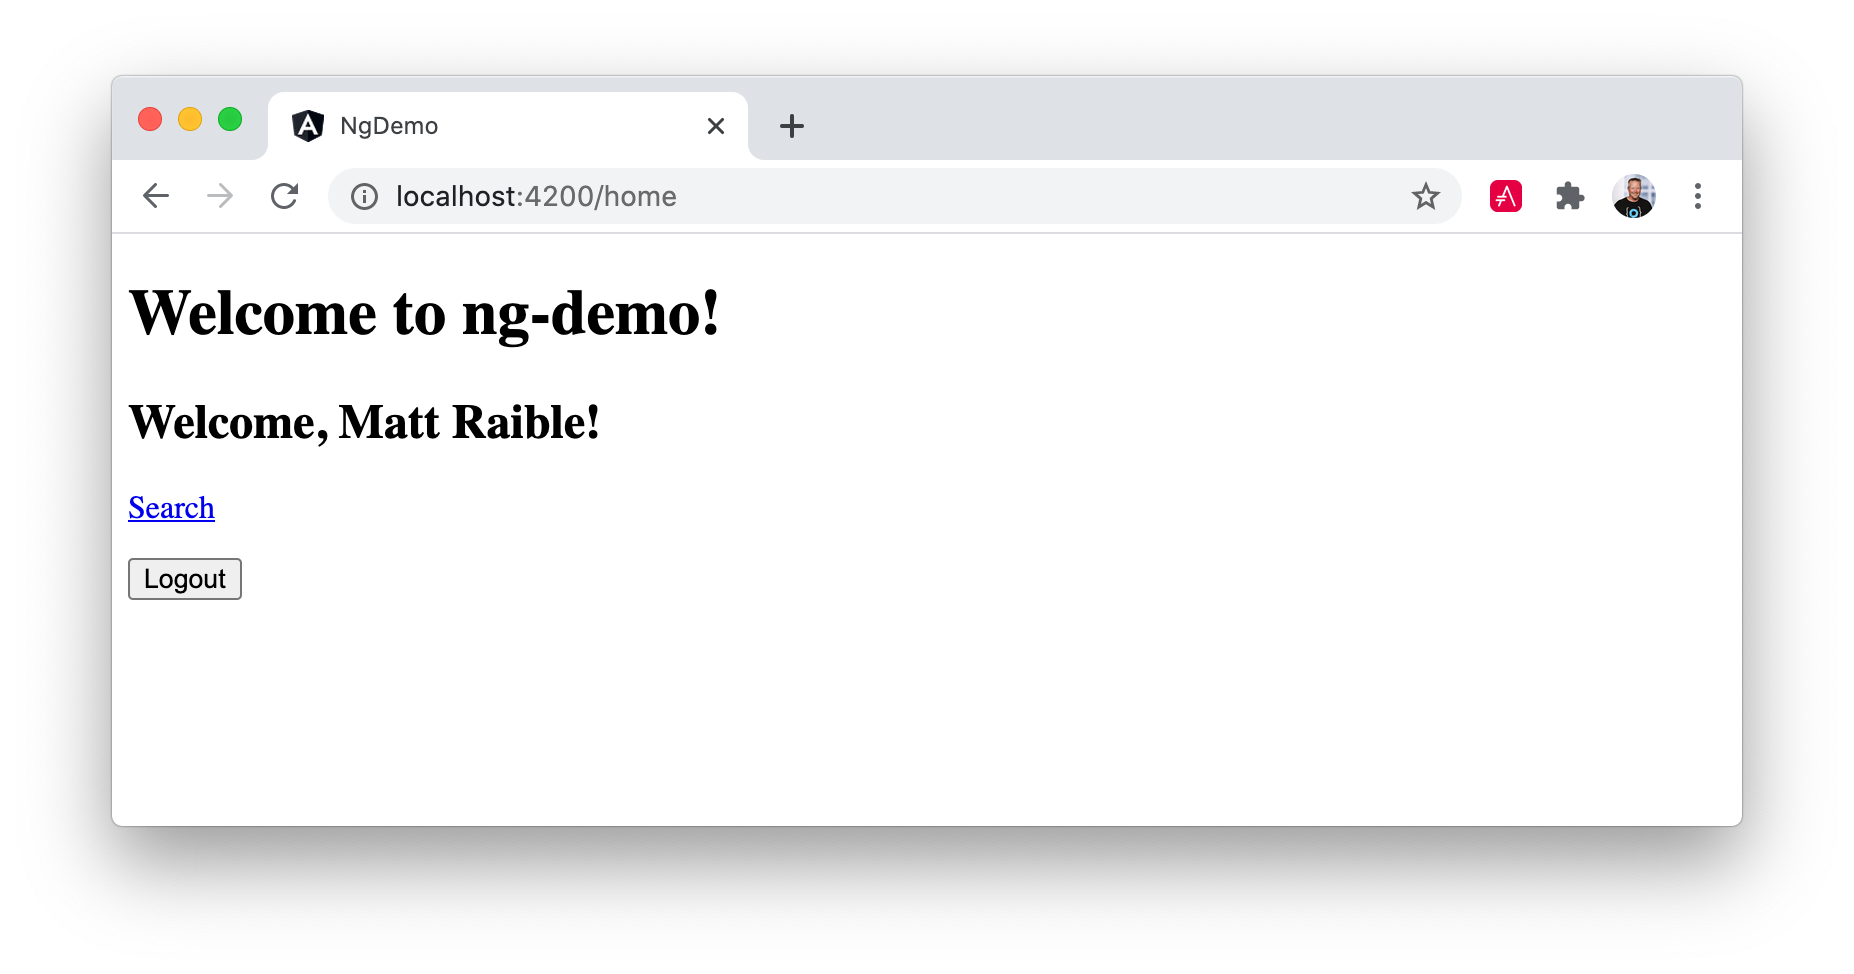
<h2>Welcome, {{user?.name}}!</h2>
<p><a routerLink="/search" routerLinkActive="active">Search</a></p>
</div>
<button (click)="logout()" id="logout">Logout</button>
</ng-template>Refresh your app, and you should see your name with a link to Search.
If you log out and manually navigate to http://localhost:4200/search, you’ll be required to log in.
If everything works—congrats!
Add Authentication to Cypress tests
To make it so you can run your e2e tests with authentication, add a signIn() Cypress command in cypress/support/commands.ts.
Cypress.Commands.add('signIn', (username, password) => {
  Cypress.log({
    message: [`🔐 Authenticating: ${username}`],
    autoEnd: false,
  })

  cy.origin(Cypress.env('E2E_DOMAIN'), {args: {username, password}},
    ({username, password}) => {
      cy.get('input[name=username]').type(username);
      cy.get('input[name=password]').type(`${password}{enter}`, {log: false});
    }
  )

  cy.url().should('equal', 'http://localhost:4200/home')
})
Then, in cypress/support/e2e.ts, uncomment the import for commands and specify before() and after() functions that log in and log out before each test.
import './commands';

beforeEach(() => {
  cy.visit('/')
  cy.get('#login').click()
  cy.signIn(
    Cypress.env('E2E_USERNAME'),
    Cypress.env('E2E_PASSWORD')
  )
})

afterEach(() => {
  cy.visit('/')
  cy.get('#logout').click()
})
Modify cypress/e2e/home.cy.ts to remove the line with cy.visit('/').
Next, configure your domain and credentials in cypress.config.ts.
"env": {
  "E2E_DOMAIN": "YOUR_AUTH0_DOMAIN",
  "E2E_USERNAME": "YOUR_AUTH0_USERNAME",
  "E2E_PASSWORD": "YOUR_AUTH0_PASSWORD"
},
Then, start your app (with ng serve) and run its Cypress tests in a separate terminal window.
npm run cypress:runDon’t Store Credentials in Source Control
In this example, I recommended you store your username and password in cypress.config.ts. This is convenient, but a bad practice.
You can solve it by using cypress.env.json.
Create a cypress.env.json file in your project’s root folder with your Auth0 credentials in it.
{
  "E2E_DOMAIN": "<your domain>",
  "E2E_USERNAME": "<your username>",
  "E2E_PASSWORD": "<your password>"
}
Add *.env.json to your .gitignore file to prevent this file from being checked in.
Then, remove the env key from cypress.config.ts.
Now, npm run cypress:run should work as before.
Update GitHub Actions
If you’re using GitHub Actions to test your project, you’ll need to update the Cypress workflow to include your domain and credentials.
- name: Run integration tests
  uses: cypress-io/github-action@v5
  with:
    browser: chrome
    start: npm start
    install: false
    wait-on: http://[::1]:4200
  env:
    CYPRESS_E2E_DOMAIN: ${{ secrets.E2E_DOMAIN }}
    CYPRESS_E2E_USERNAME: ${{ secrets.E2E_USERNAME }}
    CYPRESS_E2E_PASSWORD: ${{ secrets.E2E_PASSWORD }}
Then, create repository secrets on GitHub for E2E_DOMAIN, E2E_USERNAME and E2E_PASSWORD.
It is also useful to upload screenshots of your test failures to GitHub. Add the following to your workflow.
- name: Upload screenshots on failure
  if: failure()
  uses: actions/upload-artifact@v3
  with:
    name: cypress-screenshots
    path: cypress/screenshots
You can then download the screenshots by going to a job’s summary. From there, scroll down to the Artifacts section and click on the cypress-screenshots artifact.
Summary
I hope you’ve enjoyed this introduction to Angular. You learned how to create a basic application without worrying about the back end.
You can download the code for this book’s examples from InfoQ. The ng-demo directory has this chapter’s completed example. There are also examples for Angular Material, Bootstrap, and Auth0.
|
In the next section, I’ll show you how to use a modern back end to provide data, security, and production-ready features.